
You also want an ePaper? Increase the reach of your titles
YUMPU automatically turns print PDFs into web optimized ePapers that Google loves.
A!<br />
LINE 70<br />
LINE 80<br />
LINE 90<br />
Prints the data read in line 60.<br />
Continues the nested for/next loop, which causes all<br />
60 columns in a row to be read and printed.<br />
Causes a line feed.<br />
LINE<br />
LINE<br />
<strong>10</strong>0 Instructs the nested for/next loop to continue to read<br />
and print subsequent rows until all eight rows have<br />
been printed.<br />
120 Tells the printer to print the word “smile” underneath<br />
the graphic image.<br />
When you’ve run this program, your result should be similar to the<br />
picture illustrated in Figure F-9. Now try running the same program<br />
again, with the following minor changes to lines 90 and 1<strong>10</strong>:<br />
*In line 20, change “<strong>10</strong>” to “15”.<br />
.In line 40, change “Y” to “K”.<br />
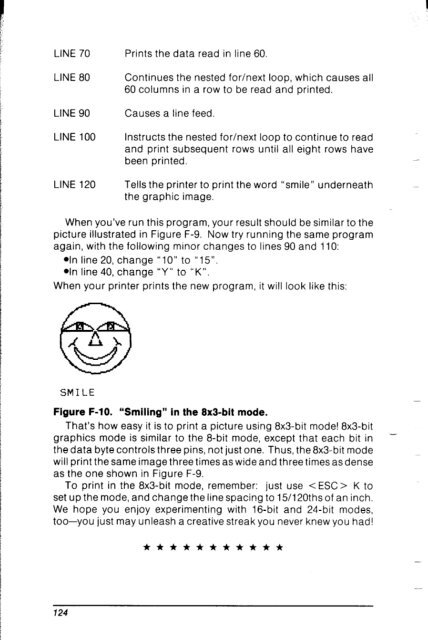
When your printer prints the new program, it will look like this:<br />
SMILE<br />
Figure F-<strong>10</strong>. “Smiling” in the 8x3-bit mode.<br />
That’s how easy it is to print a picture using 8x3-bit mode! 8x3-bit<br />
graphics mode is similar to the 8-bit mode, except that each bit in -<br />
the data byte controls three pins, not just one. Thus, the 8x3-bit mode<br />
will print the same image three times as wide and three times as dense<br />
as the one shown in Figure F-9.<br />
To print in the 8x3-bit mode, remember: just use < ESC> K to<br />
set up the mode, and change the line spacing to 151120ths of an inch.<br />
We hope you enjoy experimenting with 16-bit and 24-bit modes,<br />
too-you just may unleash a creative streak you never knew you had!<br />
124