ÐаÑалог Weidmuller: Electronics - Analogue Signal Conditioning
ÐаÑалог Weidmuller: Electronics - Analogue Signal Conditioning
ÐаÑалог Weidmuller: Electronics - Analogue Signal Conditioning

You also want an ePaper? Increase the reach of your titles
YUMPU automatically turns print PDFs into web optimized ePapers that Google loves.
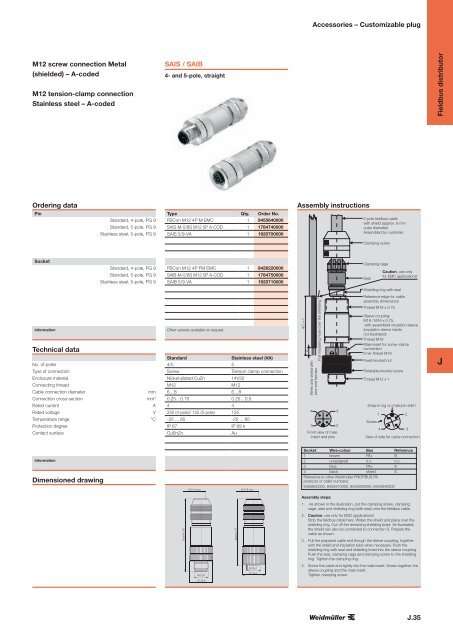
Accessories – Customizable plug<br />
M12 screw connection Metal<br />
(shielded) – A-coded<br />
M12 tension-clamp connection<br />
Stainless steel – A-coded<br />
SAIS / SAIB<br />
4- and 5-pole, straight<br />
Fieldbus distributor<br />
Ordering data<br />
Pin<br />
Standard, 4-pole, PG 9<br />
Standard, 5-pole, PG 9<br />
Stainless steel, 5-pole, PG 9<br />
Type Qty. Order No.<br />
FBCon M12 4P M EMC 1 9455640000<br />
SAIS-M-5/8S M12 5P A-COD 1 1784740000<br />
SAIS 5/9-VA 1 1920700000<br />
Assembly instructions<br />
2-pole fieldbus cable<br />
with shield (approx. 8 mm<br />
outer diameter)<br />
Assembled by customer.<br />
Clamping screw<br />
Socket<br />
Standard, 4-pole, PG 9<br />
Standard, 5-pole, PG 9<br />
Stainless steel, 5-pole, PG 9<br />
FBCon M12 4P FM EMC 1 8426220000<br />
SAIB-M-5/8S M12 5P A-COD 1 1784750000<br />
SAIB 5/9-VA 1 1920710000<br />
Clamping cage<br />
Caution, use only<br />
for EMC applications!<br />
Seal<br />
Shielding ring with seal<br />
Information<br />
Technical data<br />
No. of poles<br />
Type of connection<br />
Enclosure material<br />
Connecting thread<br />
Cable connection diameter<br />
mm<br />
Connection cross-section mm 2<br />
Rated current<br />
A<br />
Rated voltage<br />
V<br />
Temperature range °C<br />
Protection degree<br />
Contact surface<br />
Other variants available on request.<br />
Standard<br />
Stainless steel (VA)<br />
4/5 5<br />
Screw<br />
Tension clamp connection<br />
Nickel-plated CuZn<br />
14V32<br />
M12<br />
M12<br />
6…8 6…8<br />
0.25…0.75<br />
0.25…0.5<br />
4 4<br />
250 (4-pole)/ 125 (5-pole) 125<br />
-25 ... 85 -25 ... 85<br />
IP 67<br />
IP 69 k<br />
CuSnZn<br />
Au<br />
40 +1<br />
4<br />
Wires and shield with<br />
wire-end ferrules<br />
4<br />
1<br />
Pull insulating hose over the shielding !<br />
Front view of male<br />
insert and pins<br />
3<br />
2<br />
Reference edge for cable<br />
assembly dimensions<br />
Thread M16 x 0.75<br />
Sleeve coupling:<br />
M18 / M16 x 0.75,<br />
with assembled insulation sleeve<br />
(insulation sleeve inside,<br />
not illustrated)<br />
Thread M18<br />
Male insert for screw-clamp<br />
connection<br />
Inner thread M18<br />
Fixed knurled nut<br />
Rotatable knurled screw<br />
Thread M12 x 1<br />
Snap-in lug on male/pin side !<br />
Screw<br />
1<br />
2.<br />
4 3<br />
View of side for cable connection<br />
J<br />
Information<br />
Dimensioned drawing<br />
Ø 6–8 mm<br />
Ø 6–8 mm<br />
Socket Wire-colour Bus Reference<br />
1 brown PA+ B<br />
2 unassigned n.c. n.c.<br />
3 blue PA+ A<br />
4 black shield S<br />
Reference to other Weidmüller PROFIBUS PA<br />
products or order numbers:<br />
9455650000, 8425910000, 8425930000, 8425940000<br />
Assembly steps:<br />
1. As shown in the illustration, put the clamping screw, clamping<br />
cage, seal and shielding ring (with seal) onto the fieldbus cable.<br />
approx. 62<br />
approx. 57<br />
2. Caution: use only for EMC applications!<br />
Strip the fieldbus cable here. Widen the shield and place over the<br />
shielding ring. Cut off the remaining shielding braid. As illustrated,<br />
the shield can also be connected to connection S. Prepare the<br />
cable as shown.<br />
3. Pull the prepared cable end though the sleeve coupling, together<br />
with the shield and insulation tube when necessary. Push the<br />
shielding ring with seal and shielding braid into the sleeve coupling.<br />
Push the seal, clamping cage and clamping screw to the shielding<br />
ring. Tighten the clamping ring.<br />
M12x1<br />
M12x1<br />
Ø 19.6<br />
4. Screw the cable end tightly into the male insert. Screw together the<br />
sleeve coupling and the male insert.<br />
Tighten clamping screw.<br />
Ø 19.6<br />
J.35