Instructor Help for Brownstone EDU - McGraw Hill Education ...
Instructor Help for Brownstone EDU - McGraw Hill Education ...
Instructor Help for Brownstone EDU - McGraw Hill Education ...

You also want an ePaper? Increase the reach of your titles
YUMPU automatically turns print PDFs into web optimized ePapers that Google loves.
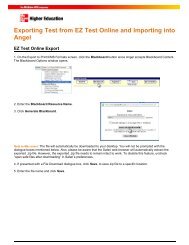
<strong>EDU</strong> System Tools<br />
4. Choose OK to create your Course Module according to the specifications you have indicated.<br />
You return to the Course Modules Main Menu and your new Course Module has been added to<br />
the bottom of the list of installed course modules <strong>for</strong> your class.<br />
Note: Choose Cancel at any time to return to the Course Modules Main Menu.<br />
Delete a Course Module<br />
There are two methods <strong>for</strong> deleting course modules and related resources using the Course Modules<br />
tools.<br />
The Delete button found on the Course Modules Main Menu allows you to remove the index file that<br />
stores the record of what you want to include in the course module without actually deleting the class<br />
elements in the module.<br />
• To delete the Course Module Index from the list of available CMsin your class, first select the<br />
CM you wish to remove by using the checkbox adjacent to it.<br />
• You can select multiple CMs <strong>for</strong> this action.<br />
• Next you will see a message advising you as follows:<br />
This will delete the course module index from your class but will not delete the<br />
course components (the assignments, question banks, and web resources listed in<br />
the index). If you really want to delete the course components you should first click<br />
View Details and then select the individual components you wish to delete, and<br />
delete them individually. If you simply want to remove this course module index<br />
from the list of installed course modules in this class, click OK now.<br />
• To remove the index file (the reference to the selected CM and its components but not the<br />
included question banks, assignments, or web resources, click OK.<br />
• The CM is removed from the list of available CMs <strong>for</strong> this class.<br />
Saving a Course Module<br />
Use the Save button from the CM Main Menu to save the selected CM from your source class to your<br />
hard drive. This is a required step if you wish to redistribute or install your CM into a new class.<br />
• You must first create a Course Module.<br />
• Start by selecting the CM you wish to save to your hard drive by selecting the checkbox<br />
adjacent to it in the list of available CMs in your class.<br />
• Choose the Save button.<br />
• The next page displays all the related URL in<strong>for</strong>mation that is referenced in the CM you have<br />
selected. You will see a message about the URLs as follows:<br />
Your question banks will be scanned <strong>for</strong> URLs beginning with the following strings.<br />
These references will be replaced with a system-independent string that will make<br />
your module relocatable to classes on other servers.<br />
When the CM is saved, it replaces the source class-specific URL in<strong>for</strong>mation with relative<br />
references that are then localized upon reinstallation. For more in<strong>for</strong>mation on this process,<br />
click here.<br />
• Typically you will not wish to make changes to the system default behavior <strong>for</strong> URL<br />
replacements, so you would click OK to continue.<br />
• A file download box will appear, allowing you to specify the download location and to rename<br />
the file (if you wish).<br />
• When the file download/save operation is complete you are returned to the CM Main Menu.<br />
27