SmartSensor HD - Interprovincial Traffic Services
SmartSensor HD - Interprovincial Traffic Services
SmartSensor HD - Interprovincial Traffic Services

Create successful ePaper yourself
Turn your PDF publications into a flip-book with our unique Google optimized e-Paper software.
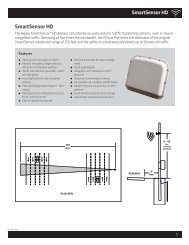
14 CHAPTER 1 • INSTALLING THE SMARTSENSOR <strong>HD</strong>Attaching the Mount Bracket to the PoleBefore attaching the mount bracket to the pole, first make sure that your cables are longenough to reach the sensor and to stretch across the distance from the sensor to the cabinet.Follow the steps below to correctly attach the mount to the pole (see Figure 1.2):1 Insert the stainless steel straps through the slots in the mount bracket.2 Position the mount bracket on the pole so that the head of the mount is pointing towardsthe middle of the lanes of interest.3 Tighten the strap screws.NoteThe sensor will need to be adjusted later, to fine-tune the alignment, so be sure tokeep the straps adjustable.Figure 1.2 – Attaching the Mount Bracket to the PoleAttaching the Sensor to the Mount BracketUse the following steps to securely fasten the sensor to the mount bracket:1 Align the bolts on the sensor’s backplate with the holes in the mount bracket. The large26-pin connector at the bottom of the unit should be pointing towards the ground.2 Place the lock washers onto the bolts after the bolts are in the mount bracket holes.3 Thread on the nuts and tighten (see Figure 1.3).