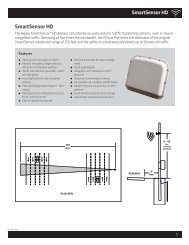
SmartSensor HD - Interprovincial Traffic Services
SmartSensor HD - Interprovincial Traffic Services
SmartSensor HD - Interprovincial Traffic Services

You also want an ePaper? Increase the reach of your titles
YUMPU automatically turns print PDFs into web optimized ePapers that Google loves.
CHAPTER 4 • COMMUNICATION 43˽˽˽˽˽˽˽˽˽˽˽˽Buffer (bytes) – Contains the number of bytes used by SSM<strong>HD</strong> to store data receivedfrom the sensor. This field should always be set to 02048 or greater.Flow Control – Is usually only used if you are connecting your computer to an RS-232device that requires hardware handshaking. If you have a slower RS-232 modem thatrequires hardware handshaking, select Hardware from the drop-down menu. You willneed to make sure you have connected the RTS and CTS lines. For information onhow to configure hardware handshaking on the sensor, see HW Handshaking in theAdvanced Tab section of Chapter 5.Initialization String – Allows you to configure the office modem being used to dial thefield modem. If the string field is left blank, the application will use a default string tocommunicate with the modem.Include Commands – Contains numerous modem settings that will automatically setthe initialization string when selected.Speaker – Allows you to adjust the volume of the modem’s speaker.Manual Dial – Allows you to manually dial the modem number.Internet ConnectionThe <strong>SmartSensor</strong> <strong>HD</strong> can be connected to the Internet, allowing access to the sensor fromanywhere with Internet access. Below is a list of three ways to connect the <strong>SmartSensor</strong> tothe Internet:˽˽˽˽˽˽Serial to Ethernet Converter – The <strong>SmartSensor</strong> <strong>HD</strong> can be connected to a local areanetwork (LAN) by using a serial to Ethernet converter. As an option, the <strong>SmartSensor</strong><strong>HD</strong> can be shipped with a Click 301 serial to Ethernet converter that is Internet addressable,which makes it possible to connect to the sensor from anywhere the adapter’saddress is accessible.Serial to 802.11b Wireless – The Click 420 is a serial to 802.11b converter that providesserial devices with an IP address on a wireless 802.11b network. The Click 420has been tested to work over a -34° C to 74° C temperature range.Internet Service Providers – Cellular providers of wireless Internet services maintainnetworks in most metropolitan areas in the United States and coverage continues toexpand. The <strong>SmartSensor</strong> <strong>HD</strong> can be equipped with an optional external modems—for example, CDMA, GMS or GPRS—and assigned an Internet address on thesenetworks.Use the steps below to connect to the <strong>SmartSensor</strong> <strong>HD</strong> using an Internet connection:1 Click on Communication.2 Click the Internet tab and the Internet setting options will appear (see Figure 4.5).3 Enter the IP address or URL of the sensor of interest. The IP address consists of fournumbers ranging from 0–255 separated by dots. Enter the IP address assigned to eitherthe CDMA modem or the Click 301 serial to Ethernet converter.4 Enter the port number assigned to the CDMA modem or the Click 301 serial to Ethernetconverter in the Port field. This will be an integer value in the range of 0–65536.