Boiler Manual - Weil-McLain
Boiler Manual - Weil-McLain
Boiler Manual - Weil-McLain

You also want an ePaper? Increase the reach of your titles
YUMPU automatically turns print PDFs into web optimized ePapers that Google loves.
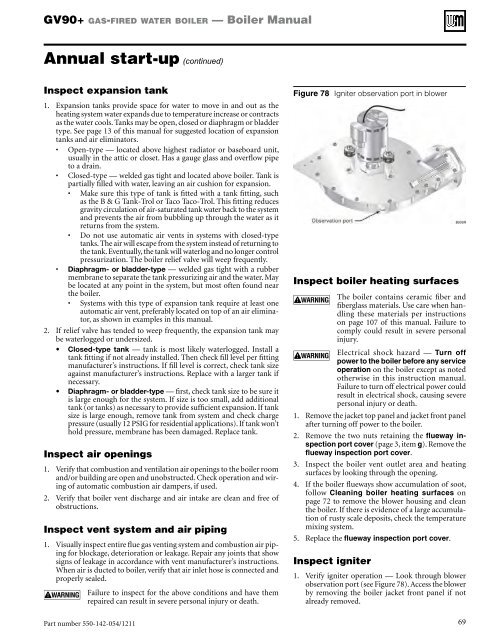
GV90+ gas-fired water boiler — <strong>Boiler</strong> <strong>Manual</strong>Annual start-up (continued)Inspect expansion tank1. Expansion tanks provide space for water to move in and out as theheating system water expands due to temperature increase or contractsas the water cools. Tanks may be open, closed or diaphragm or bladdertype. See page 13 of this manual for suggested location of expansiontanks and air eliminators.• Open-type — located above highest radiator or baseboard unit,usually in the attic or closet. Has a gauge glass and overflow pipeto a drain.• Closed-type — welded gas tight and located above boiler. Tank ispartially filled with water, leaving an air cushion for expansion.• Make sure this type of tank is fitted with a tank fitting, suchas the B & G Tank-Trol or Taco Taco-Trol. This fitting reducesgravity circulation of air-saturated tank water back to the systemand prevents the air from bubbling up through the water as itreturns from the system.• Do not use automatic air vents in systems with closed-typetanks. The air will escape from the system instead of returning tothe tank. Eventually, the tank will waterlog and no longer controlpressurization. The boiler relief valve will weep frequently.• Diaphragm- or bladder-type — welded gas tight with a rubbermembrane to separate the tank pressurizing air and the water. Maybe located at any point in the system, but most often found nearthe boiler.• Systems with this type of expansion tank require at least oneautomatic air vent, preferably located on top of an air eliminator,as shown in examples in this manual.2. If relief valve has tended to weep frequently, the expansion tank maybe waterlogged or undersized.• Closed-type tank — tank is most likely waterlogged. Install atank fitting if not already installed. Then check fill level per fittingmanufacturer’s instructions. If fill level is correct, check tank sizeagainst manufacturer’s instructions. Replace with a larger tank ifnecessary.• Diaphragm- or bladder-type — first, check tank size to be sure itis large enough for the system. If size is too small, add additionaltank (or tanks) as necessary to provide sufficient expansion. If tanksize is large enough, remove tank from system and check chargepressure (usually 12 PSIG for residential applications). If tank won’thold pressure, membrane has been damaged. Replace tank.Inspect air openings1. Verify that combustion and ventilation air openings to the boiler roomand/or building are open and unobstructed. Check operation and wiringof automatic combustion air dampers, if used.2. Verify that boiler vent discharge and air intake are clean and free ofobstructions.Inspect vent system and air piping1. Visually inspect entire flue gas venting system and combustion air pipingfor blockage, deterioration or leakage. Repair any joints that showsigns of leakage in accordance with vent manufacturer’s instructions.When air is ducted to boiler, verify that air inlet hose is connected andproperly sealed.Failure to inspect for the above conditions and have themrepaired can result in severe personal injury or death.Figure 78 Igniter observation port in blowerInspect boiler heating surfacesThe boiler contains ceramic fiber andfiberglass materials. Use care when handlingthese materials per instructionson page 107 of this manual. Failure tocomply could result in severe personalinjury.Electrical shock hazard — Turn offpower to the boiler before any serviceoperation on the boiler except as notedotherwise in this instruction manual.Failure to turn off electrical power couldresult in electrical shock, causing severepersonal injury or death.1. Remove the jacket top panel and jacket front panelafter turning off power to the boiler.2. Remove the two nuts retaining the flueway inspectionport cover (page 3, item g). Remove theflueway inspection port cover.3. Inspect the boiler vent outlet area and heatingsurfaces by looking through the opening.4. If the boiler flueways show accumulation of soot,follow Cleaning boiler heating surfaces onpage 72 to remove the blower housing and cleanthe boiler. If there is evidence of a large accumulationof rusty scale deposits, check the temperaturemixing system.5. Replace the flueway inspection port cover.Inspect igniter1. Verify igniter operation — Look through blowerobservation port (see Figure 78). Access the blowerby removing the boiler jacket front panel if notalready removed.Part number 550-142-054/1211 69