WARNING - Flannery Plant Hire
WARNING - Flannery Plant Hire
WARNING - Flannery Plant Hire

Create successful ePaper yourself
Turn your PDF publications into a flip-book with our unique Google optimized e-Paper software.
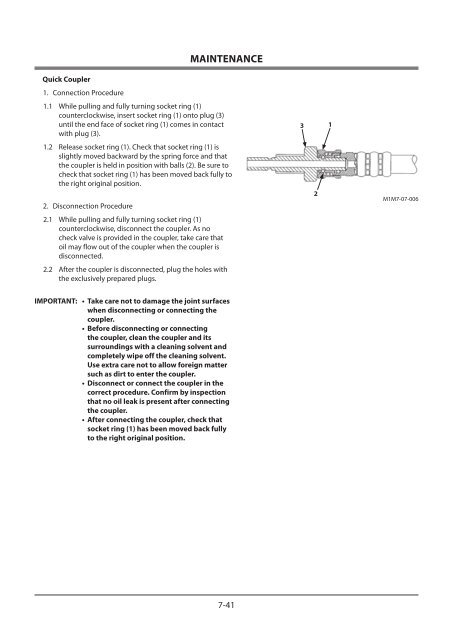
Quick Coupler<br />
1. Connection Procedure<br />
1.1 While pulling and fully turning socket ring (1)<br />
counterclockwise, insert socket ring (1) onto plug (3)<br />
until the end face of socket ring (1) comes in contact<br />
with plug (3).<br />
MAINTENANCE<br />
1.2 Release socket ring (1). Check that socket ring (1) is<br />
slightly moved backward by the spring force and that<br />
the coupler is held in position with balls (2). Be sure to<br />
check that socket ring (1) has been moved back fully to<br />
the right original position.<br />
2. Disconnection Procedure<br />
2.1 While pulling and fully turning socket ring (1)<br />
counterclockwise, disconnect the coupler. As no<br />
check valve is provided in the coupler, take care that<br />
oil may flow out of the coupler when the coupler is<br />
disconnected.<br />
2.2 After the coupler is disconnected, plug the holes with<br />
the exclusively prepared plugs.<br />
IMPORTANT: • Take care not to damage the joint surfaces<br />
when disconnecting or connecting the<br />
coupler.<br />
• Before disconnecting or connecting<br />
the coupler, clean the coupler and its<br />
surroundings with a cleaning solvent and<br />
completely wipe off the cleaning solvent.<br />
Use extra care not to allow foreign matter<br />
such as dirt to enter the coupler.<br />
• Disconnect or connect the coupler in the<br />
correct procedure. Confirm by inspection<br />
that no oil leak is present after connecting<br />
the coupler.<br />
• After connecting the coupler, check that<br />
socket ring (1) has been moved back fully<br />
to the right original position.<br />
7-41<br />
3<br />
2<br />
1<br />
M1M7-07-006