WARNING - Flannery Plant Hire
WARNING - Flannery Plant Hire
WARNING - Flannery Plant Hire

You also want an ePaper? Increase the reach of your titles
YUMPU automatically turns print PDFs into web optimized ePapers that Google loves.
fNOTE: When disconnecting a coupler located in a narrow<br />
space that is difficult for your hand to enter, use a<br />
screwdriver following the procedures as described<br />
below.<br />
Using Screwdriver<br />
A screwdriver with a tip thickness of less than 1 mm and a<br />
tip width of approx. 5 mm is appropriate to this work.<br />
MAINTENANCE<br />
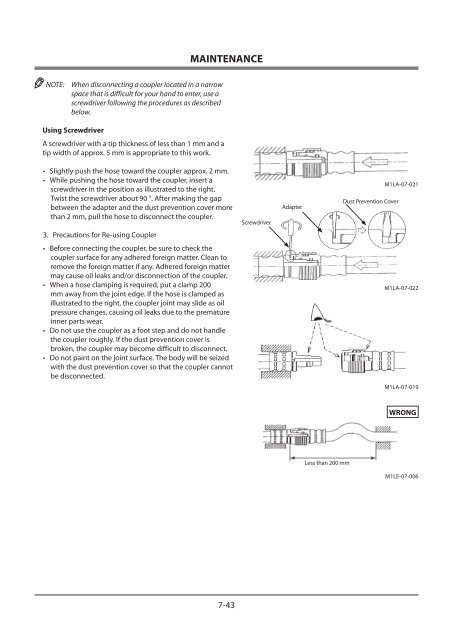
• Slightly push the hose toward the coupler approx. 2 mm.<br />
• While pushing the hose toward the coupler, insert a<br />
screwdriver in the position as illustrated to the right.<br />
Twist the screwdriver about 90 °. After making the gap<br />
between the adapter and the dust prevention cover more<br />
than 2 mm, pull the hose to disconnect the coupler.<br />
3. Precautions for Re-using Coupler<br />
• Before connecting the coupler, be sure to check the<br />
coupler surface for any adhered foreign matter. Clean to<br />
remove the foreign matter if any. Adhered foreign matter<br />
may cause oil leaks and/or disconnection of the coupler.<br />
• When a hose clamping is required, put a clamp 200<br />
mm away from the joint edge. If the hose is clamped as<br />
illustrated to the right, the coupler joint may slide as oil<br />
pressure changes, causing oil leaks due to the premature<br />
inner parts wear.<br />
• Do not use the coupler as a foot step and do not handle<br />
the coupler roughly. If the dust prevention cover is<br />
broken, the coupler may become difficult to disconnect.<br />
• Do not paint on the joint surface. The body will be seized<br />
with the dust prevention cover so that the coupler cannot<br />
be disconnected.<br />
7-43<br />
Screwdriver<br />
Adapter<br />
Less than 200 mm<br />
Dust Prevention Cover<br />
M1LA-07-021<br />
M1LA-07-022<br />
M1LA-07-019<br />
WRONG<br />
M1LE-07-006