WARNING - Flannery Plant Hire
WARNING - Flannery Plant Hire
WARNING - Flannery Plant Hire

You also want an ePaper? Increase the reach of your titles
YUMPU automatically turns print PDFs into web optimized ePapers that Google loves.
d<br />
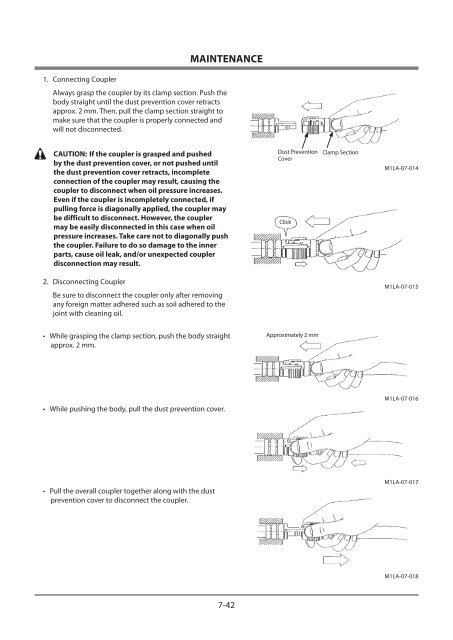
1. Connecting Coupler<br />
MAINTENANCE<br />
Always grasp the coupler by its clamp section. Push the<br />
body straight until the dust prevention cover retracts<br />
approx. 2 mm. Then, pull the clamp section straight to<br />
make sure that the coupler is properly connected and<br />
will not disconnected.<br />
CAUTION: If the coupler is grasped and pushed<br />
by the dust prevention cover, or not pushed until<br />
the dust prevention cover retracts, incomplete<br />
connection of the coupler may result, causing the<br />
coupler to disconnect when oil pressure increases.<br />
Even if the coupler is incompletely connected, if<br />
pulling force is diagonally applied, the coupler may<br />
be difficult to disconnect. However, the coupler<br />
may be easily disconnected in this case when oil<br />
pressure increases. Take care not to diagonally push<br />
the coupler. Failure to do so damage to the inner<br />
parts, cause oil leak, and/or unexpected coupler<br />
disconnection may result.<br />
2. Disconnecting Coupler<br />
Be sure to disconnect the coupler only after removing<br />
any foreign matter adhered such as soil adhered to the<br />
joint with cleaning oil.<br />
• While grasping the clamp section, push the body straight<br />
approx. 2 mm.<br />
• While pushing the body, pull the dust prevention cover.<br />
• Pull the overall coupler together along with the dust<br />
prevention cover to disconnect the coupler.<br />
7-42<br />
Dust Prevention<br />
Cover<br />
Click<br />
Approximately 2 mm<br />
Clamp Section<br />
M1LA-07-014<br />
M1LA-07-015<br />
M1LA-07-016<br />
M1LA-07-017<br />
M1LA-07-018