

The Virtualization Cookbook for SLES 10 SP2 - z/VM - IBM
The Virtualization Cookbook for SLES 10 SP2 - z/VM - IBM
The Virtualization Cookbook for SLES 10 SP2 - z/VM - IBM

You also want an ePaper? Increase the reach of your titles
YUMPU automatically turns print PDFs into web optimized ePapers that Google loves.
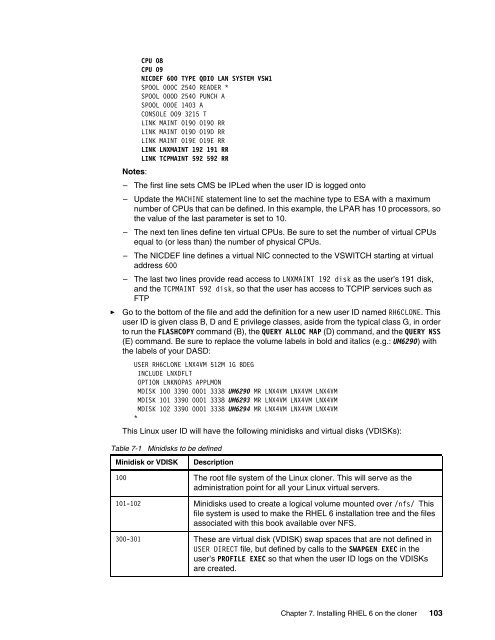
CPU 08<br />
CPU 09<br />
NICDEF 600 TYPE QDIO LAN SYSTEM VSW1<br />
SPOOL 000C 2540 READER *<br />
SPOOL 000D 2540 PUNCH A<br />
SPOOL 000E 1403 A<br />
CONSOLE 009 3215 T<br />
LINK MAINT 0190 0190 RR<br />
LINK MAINT 019D 019D RR<br />
LINK MAINT 019E 019E RR<br />
LINK LNXMAINT 192 191 RR<br />
LINK TCPMAINT 592 592 RR<br />
Notes:<br />
– <strong>The</strong> first line sets CMS be IPLed when the user ID is logged onto<br />
– Update the MACHINE statement line to set the machine type to ESA with a maximum<br />
number of CPUs that can be defined. In this example, the LPAR has <strong>10</strong> processors, so<br />
the value of the last parameter is set to <strong>10</strong>.<br />
– <strong>The</strong> next ten lines define ten virtual CPUs. Be sure to set the number of virtual CPUs<br />
equal to (or less than) the number of physical CPUs.<br />
– <strong>The</strong> NICDEF line defines a virtual NIC connected to the VSWITCH starting at virtual<br />
address 600<br />
– <strong>The</strong> last two lines provide read access to LNXMAINT 192 disk as the user’s 191 disk,<br />
and the TCPMAINT 592 disk, so that the user has access to TCPIP services such as<br />
FTP<br />
► Go to the bottom of the file and add the definition <strong>for</strong> a new user ID named RH6CLONE. This<br />
user ID is given class B, D and E privilege classes, aside from the typical class G, in order<br />
to run the FLASHCOPY command (B), the QUERY ALLOC MAP (D) command, and the QUERY NSS<br />
(E) command. Be sure to replace the volume labels in bold and italics (e.g.: UM6290) with<br />
the labels of your DASD:<br />
USER RH6CLONE LNX4<strong>VM</strong> 512M 1G BDEG<br />
INCLUDE LNXDFLT<br />
OPTION LNKNOPAS APPLMON<br />
MDISK <strong>10</strong>0 3390 0001 3338 UM6290 MR LNX4<strong>VM</strong> LNX4<strong>VM</strong> LNX4<strong>VM</strong><br />
MDISK <strong>10</strong>1 3390 0001 3338 UM6293 MR LNX4<strong>VM</strong> LNX4<strong>VM</strong> LNX4<strong>VM</strong><br />
MDISK <strong>10</strong>2 3390 0001 3338 UM6294 MR LNX4<strong>VM</strong> LNX4<strong>VM</strong> LNX4<strong>VM</strong><br />
*<br />
This Linux user ID will have the following minidisks and virtual disks (VDISKs):<br />
Table 7-1 Minidisks to be defined<br />
Minidisk or VDISK Description<br />
<strong>10</strong>0 <strong>The</strong> root file system of the Linux cloner. This will serve as the<br />
administration point <strong>for</strong> all your Linux virtual servers.<br />
<strong>10</strong>1-<strong>10</strong>2 Minidisks used to create a logical volume mounted over /nfs/ This<br />
file system is used to make the RHEL 6 installation tree and the files<br />
associated with this book available over NFS.<br />
300-301 <strong>The</strong>se are virtual disk (VDISK) swap spaces that are not defined in<br />
USER DIRECT file, but defined by calls to the SWAPGEN EXEC in the<br />
user’s PROFILE EXEC so that when the user ID logs on the VDISKs<br />
are created.<br />
Chapter 7. Installing RHEL 6 on the cloner <strong>10</strong>3


