

The Virtualization Cookbook for SLES 10 SP2 - z/VM - IBM
The Virtualization Cookbook for SLES 10 SP2 - z/VM - IBM
The Virtualization Cookbook for SLES 10 SP2 - z/VM - IBM

You also want an ePaper? Increase the reach of your titles
YUMPU automatically turns print PDFs into web optimized ePapers that Google loves.
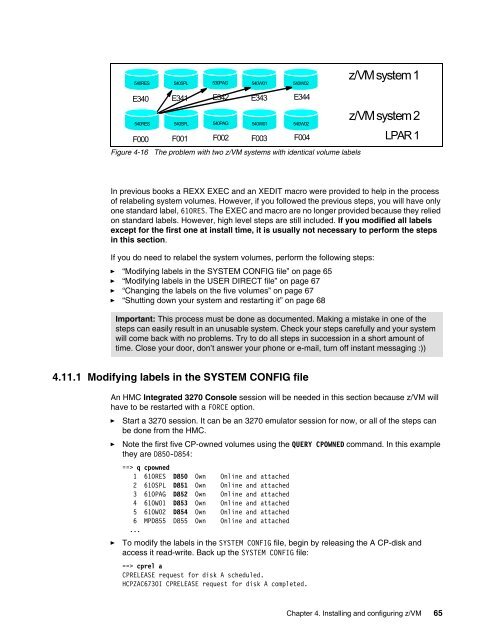
540RES 540SPL 530PAG 540W01<br />
E340<br />
E341<br />
E342<br />
E343<br />
540RES 540SPL 540PAG 540W01<br />
F000<br />
F001<br />
F002<br />
F003<br />
Figure 4-16 <strong>The</strong> problem with two z/<strong>VM</strong> systems with identical volume labels<br />
In previous books a REXX EXEC and an XEDIT macro were provided to help in the process<br />
of relabeling system volumes. However, if you followed the previous steps, you will have only<br />
one standard label, 6<strong>10</strong>RES. <strong>The</strong> EXEC and macro are no longer provided because they relied<br />
on standard labels. However, high level steps are still included. If you modified all labels<br />
except <strong>for</strong> the first one at install time, it is usually not necessary to per<strong>for</strong>m the steps<br />
in this section.<br />
If you do need to relabel the system volumes, per<strong>for</strong>m the following steps:<br />
► “Modifying labels in the SYSTEM CONFIG file” on page 65<br />
► “Modifying labels in the USER DIRECT file” on page 67<br />
► “Changing the labels on the five volumes” on page 67<br />
► “Shutting down your system and restarting it” on page 68<br />
Important: This process must be done as documented. Making a mistake in one of the<br />
steps can easily result in an unusable system. Check your steps carefully and your system<br />
will come back with no problems. Try to do all steps in succession in a short amount of<br />
time. Close your door, don’t answer your phone or e-mail, turn off instant messaging :))<br />
4.11.1 Modifying labels in the SYSTEM CONFIG file<br />
An HMC Integrated 3270 Console session will be needed in this section because z/<strong>VM</strong> will<br />
have to be restarted with a FORCE option.<br />
► Start a 3270 session. It can be an 3270 emulator session <strong>for</strong> now, or all of the steps can<br />
be done from the HMC.<br />
► Note the first five CP-owned volumes using the QUERY CPOWNED command. In this example<br />
they are D850-D854:<br />
540W02<br />
E344<br />
540W02<br />
F004<br />
==> q cpowned<br />
1 6<strong>10</strong>RES D850 Own Online and attached<br />
2 6<strong>10</strong>SPL D851 Own Online and attached<br />
3 6<strong>10</strong>PAG D852 Own Online and attached<br />
4 6<strong>10</strong>W01 D853 Own Online and attached<br />
5 6<strong>10</strong>W02 D854 Own Online and attached<br />
6 MPD855 D855 Own Online and attached<br />
...<br />
► To modify the labels in the SYSTEM CONFIG file, begin by releasing the A CP-disk and<br />
access it read-write. Back up the SYSTEM CONFIG file:<br />
==> cprel a<br />
CPRELEASE request <strong>for</strong> disk A scheduled.<br />
HCPZAC6730I CPRELEASE request <strong>for</strong> disk A completed.<br />
z/<strong>VM</strong> system 1<br />
z/<strong>VM</strong> system 2<br />
LPAR 1<br />
Chapter 4. Installing and configuring z/<strong>VM</strong> 65


