

The Virtualization Cookbook for SLES 10 SP2 - z/VM - IBM
The Virtualization Cookbook for SLES 10 SP2 - z/VM - IBM
The Virtualization Cookbook for SLES 10 SP2 - z/VM - IBM

You also want an ePaper? Increase the reach of your titles
YUMPU automatically turns print PDFs into web optimized ePapers that Google loves.
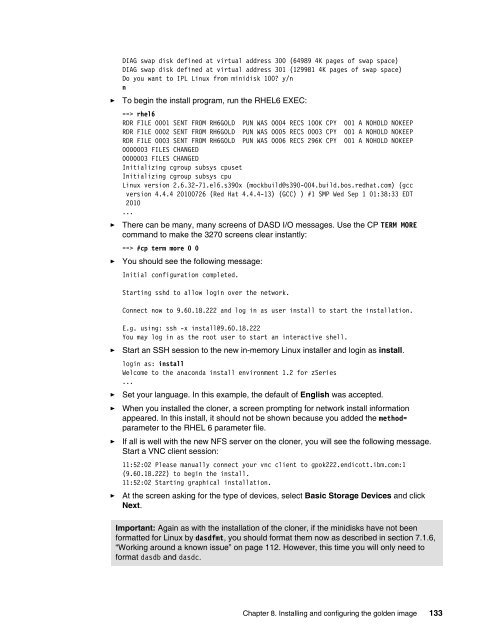
DIAG swap disk defined at virtual address 300 (64989 4K pages of swap space)<br />
DIAG swap disk defined at virtual address 301 (129981 4K pages of swap space)<br />
Do you want to IPL Linux from minidisk <strong>10</strong>0? y/n<br />
n<br />
► To begin the install program, run the RHEL6 EXEC:<br />
==> rhel6<br />
RDR FILE 0001 SENT FROM RH6GOLD PUN WAS 0004 RECS <strong>10</strong>0K CPY 001 A NOHOLD NOKEEP<br />
RDR FILE 0002 SENT FROM RH6GOLD PUN WAS 0005 RECS 0003 CPY 001 A NOHOLD NOKEEP<br />
RDR FILE 0003 SENT FROM RH6GOLD PUN WAS 0006 RECS 296K CPY 001 A NOHOLD NOKEEP<br />
0000003 FILES CHANGED<br />
0000003 FILES CHANGED<br />
Initializing cgroup subsys cpuset<br />
Initializing cgroup subsys cpu<br />
Linux version 2.6.32-71.el6.s390x (mockbuild@s390-004.build.bos.redhat.com) (gcc<br />
version 4.4.4 20<strong>10</strong>0726 (Red Hat 4.4.4-13) (GCC) ) #1 SMP Wed Sep 1 01:38:33 EDT<br />
20<strong>10</strong><br />
...<br />
► <strong>The</strong>re can be many, many screens of DASD I/O messages. Use the CP TERM MORE<br />
command to make the 3270 screens clear instantly:<br />
==> #cp term more 0 0<br />
► You should see the following message:<br />
Initial configuration completed.<br />
Starting sshd to allow login over the network.<br />
Connect now to 9.60.18.222 and log in as user install to start the installation.<br />
E.g. using: ssh -x install@9.60.18.222<br />
You may log in as the root user to start an interactive shell.<br />
► Start an SSH session to the new in-memory Linux installer and login as install.<br />
login as: install<br />
Welcome to the anaconda install environment 1.2 <strong>for</strong> zSeries<br />
...<br />
► Set your language. In this example, the default of English was accepted.<br />
► When you installed the cloner, a screen prompting <strong>for</strong> network install in<strong>for</strong>mation<br />
appeared. In this install, it should not be shown because you added the method=<br />
parameter to the RHEL 6 parameter file.<br />
► If all is well with the new NFS server on the cloner, you will see the following message.<br />
Start a VNC client session:<br />
11:52:02 Please manually connect your vnc client to gpok222.endicott.ibm.com:1<br />
(9.60.18.222) to begin the install.<br />
11:52:02 Starting graphical installation.<br />
► At the screen asking <strong>for</strong> the type of devices, select Basic Storage Devices and click<br />
Next.<br />
Important: Again as with the installation of the cloner, if the minidisks have not been<br />
<strong>for</strong>matted <strong>for</strong> Linux by dasdfmt, you should <strong>for</strong>mat them now as described in section 7.1.6,<br />
“Working around a known issue” on page 112. However, this time you will only need to<br />
<strong>for</strong>mat dasdb and dasdc.<br />
Chapter 8. Installing and configuring the golden image 133


