- Page 1:
z/VM and Linux on IBM System z: The
- Page 4 and 5:
4.1.3 Copying a vanilla z/VM system
- Page 6 and 7:
8.2.4 Configuring the VNC server .
- Page 8 and 9:
14.4 Viewing Linux data in the Perf
- Page 10 and 11:
► Chapter 9, “Configuring RHEL
- Page 12 and 13:
Sue Baloga, Bill Bitner, Carol Ever
- Page 14 and 15:
z/VM 6.1 z/VM 6.1, available in Oct
- Page 16 and 17:
► Shared read-only Linux /usr/ fi
- Page 18 and 19:
6 The Virtualization Cookbook for R
- Page 20 and 21:
- DASD: 27 3390-3s or 9 3390-9s at
- Page 22 and 23:
2.2.2 Backup file naming convention
- Page 24 and 25:
One rule that can be recommended is
- Page 26 and 27:
2.6.2 z/VM DASD used in this book T
- Page 28 and 29:
2.7 Blank worksheets Blank copies o
- Page 30 and 31:
2.7.3 Linux resources worksheet Use
- Page 32 and 33:
Figure 3-1 PuTTY Configuration wind
- Page 34 and 35:
9. You may choose a larger screen s
- Page 36 and 37:
Click the Download and Use button.
- Page 38 and 39:
26 The Virtualization Cookbook for
- Page 40 and 41:
4.1 Installing z/VM from DVD or FTP
- Page 42 and 43:
Figure 4-2 Choosing two files to be
- Page 44 and 45:
► The LPAR that z/VM will be inst
- Page 46 and 47:
c. You should see the Disruptive Ta
- Page 48 and 49:
► You may need to clear the scree
- Page 50 and 51:
Figure 4-11 Load window ► When yo
- Page 52 and 53:
==> Press Enter at the VM READ prom
- Page 54 and 55:
Figure 4-14 IPWIZARD screen 2 ► A
- Page 56 and 57:
One default setting that can be dan
- Page 58 and 59:
Pay attention to the output. If you
- Page 60 and 61:
==> rename profile tcpip d poksnd61
- Page 62 and 63:
You should see that the VSWITCH VSW
- Page 64 and 65:
6285-6287 ATTACHED TO MAINT ► Use
- Page 66 and 67:
CP_Owned Slot 6 UP6285 CP_Owned Slo
- Page 68 and 69:
==> x user direct c ====> bottom ==
- Page 70 and 71:
4.7.2 Logging and customizing the n
- Page 72 and 73: 4.7.5 Copying files associated with
- Page 74 and 75: 4.8.2 Testing the changes To test y
- Page 76 and 77: HCPDIR494I User directory occupies
- Page 78 and 79: ==> link * cf1 cf1 mr ==> acc cf1 f
- Page 80 and 81: ... ==> link $page$ a03 a03 mr ==>
- Page 82 and 83: 70 The Virtualization Cookbook for
- Page 84 and 85: When SERVICE is successfully comple
- Page 86 and 87: 5.1.2 Downloading the service files
- Page 88 and 89: ==> deterse s8873950 shiprsu1 f = s
- Page 90 and 91: ***********************************
- Page 92 and 93: APAR Component Description VM64774
- Page 94 and 95: Figure 5-4 Downloading service for
- Page 96 and 97: 5.2.3 Verifying the zEnterprise 196
- Page 98 and 99: 5.4.1 Getting service using ShopzSe
- Page 100 and 101: Figure 5-7 Getting fixes from Shopz
- Page 102 and 103: ► Use the SERVICE ALL command spe
- Page 104 and 105: 92 The Virtualization Cookbook for
- Page 106 and 107: 6.1 Installing Linux on the PC If y
- Page 108 and 109: 6.3.3 Copying the DVD contents Copy
- Page 110 and 111: 6.5 Configuring an FTP server for z
- Page 112 and 113: 6.5.3 Testing the anonymous FTP ser
- Page 114 and 115: ==> copy user direct c = direwrks =
- Page 116 and 117: ► Go back to the top of the file
- Page 118 and 119: 8016384 bytes sent in 00:01 (6.01 M
- Page 120 and 121: LOGON AT 07:41:38 EDT WEDNESDAY 09/
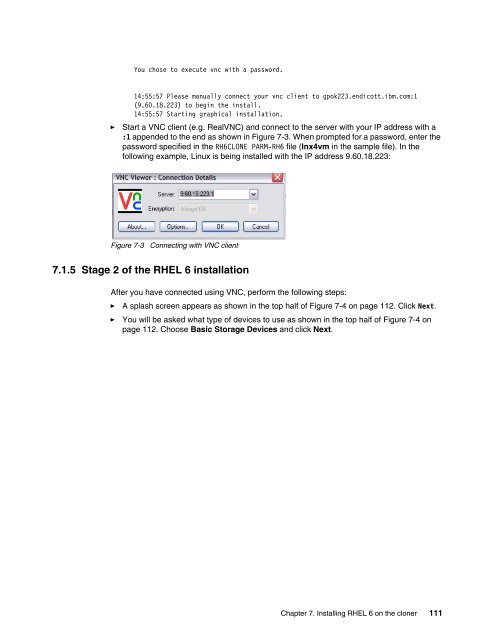
- Page 124 and 125: Figure 7-4 Splash screen and device
- Page 126 and 127: ► On the next screen the host nam
- Page 128 and 129: ► On the Add Partition screen, cr
- Page 130 and 131: Figure 7-12 Creating a volume group
- Page 132 and 133: # mount 9.60.18.240:/nfs/rhel6/dvd1
- Page 134 and 135: # chkconfig --list | grep 3:on abrt
- Page 136 and 137: ► Edit /etc/init/control-alt-dele
- Page 138 and 139: ► View your order with the swapon
- Page 140 and 141: 128 The Virtualization Cookbook for
- Page 142 and 143: MDISK 100 3390 0001 3338 UM63A2 MR
- Page 144 and 145: NFS server directory you just set u
- Page 146 and 147: ► A warning screen will appear as
- Page 148 and 149: ► Click Create and on the resulti
- Page 150 and 151: dev/dasda1 on / type ext4 (rw) proc
- Page 152 and 153: ► Import the RPM GPG key so that
- Page 154 and 155: This allows the cloner to initiate
- Page 156 and 157: 144 The Virtualization Cookbook for
- Page 158 and 159: DASD 63AA FR63AA , DASD 63AB FR63AB
- Page 160 and 161: There are many ways to clone Linux
- Page 162 and 163: 0.0.0100 active dasda 94:0 ECKD 409
- Page 164 and 165: Initializing cgroup subsys cpuset I
- Page 166 and 167: 4 If you specified a value for 3 ab
- Page 168 and 169: Then the SSH keys are regenerated i
- Page 170 and 171: USER $ALLOC$ NOLOG MDISK A01 3390 0
- Page 172 and 173:
► Verify that the new user IDs ha
- Page 174 and 175:
162 The Virtualization Cookbook for
- Page 176 and 177:
# cd /nfs # mkdir ks # cd ks ► Co
- Page 178 and 179:
RUNKS=1 cmdline ====> file ► Next
- Page 180 and 181:
168 The Virtualization Cookbook for
- Page 182 and 183:
11.1.2 Testing Apache apr-util-ldap
- Page 184 and 185:
► To allow Web traffic through, y
- Page 186 and 187:
Complete! OpenLDAP should now be in
- Page 188 and 189:
gidNumber: 10000 homeDirectory: /ho
- Page 190 and 191:
178 The Virtualization Cookbook for
- Page 192 and 193:
This change will create an SMB shar
- Page 194 and 195:
Figure 11-2 Mapping a network drive
- Page 196 and 197:
Dependency Installed: apr.s390x 0:1
- Page 198 and 199:
186 The Virtualization Cookbook for
- Page 200 and 201:
discarded, and later when all is te
- Page 202 and 203:
190 The Virtualization Cookbook for
- Page 204 and 205:
► Add minidisk statements to defi
- Page 206 and 207:
13.2 Adding a logical volume There
- Page 208 and 209:
In this example, there are 586 free
- Page 210 and 211:
# reboot Broadcast message from roo
- Page 212 and 213:
old desc_blocks = 1, new_desc_block
- Page 214 and 215:
card_version hardware_version peer_
- Page 216 and 217:
# ls access_denied in_recovery stat
- Page 218 and 219:
==> #cp vi vmsg 0 1 In single user
- Page 220 and 221:
Note: if the rescue image cannot fi
- Page 222 and 223:
-/+ buffers/cache: 98 654 Swap: 761
- Page 224 and 225:
idle The current idle percentage Th
- Page 226 and 227:
200+0 records out 209715200 bytes (
- Page 228 and 229:
► Rerun the same scp commands: #
- Page 230 and 231:
Figure 13-2 Manual setting of DISPL
- Page 232 and 233:
Using embedded SSH It is also possi
- Page 234 and 235:
222 The Virtualization Cookbook for
- Page 236 and 237:
14.1.1 Using the INDICATE command z
- Page 238 and 239:
list. Normal virtual processors in
- Page 240 and 241:
► The Program Directory for Perfo
- Page 242 and 243:
a. Use the VMLINK command to both l
- Page 244 and 245:
14.2.4 Increasing the size of the M
- Page 246 and 247:
Figure 14-1 Performance Toolkit log
- Page 248 and 249:
Figure 14-3 Performance Toolkit 327
- Page 250 and 251:
14.4 Viewing Linux data in the Perf
- Page 252 and 253:
A.2 Online resources These Web site
- Page 254 and 255:
1. Input mode - the Insert key, i,
- Page 256 and 257:
B.2 z/VM REXX EXECs and XEDIT macro
- Page 258 and 259:
parse upper var dasds dasd dasds da
- Page 260 and 261:
eturn retVal /* from formatOne */ /
- Page 262 and 263:
'command c/USER 6VMRSC10 6VMRSC10/U
- Page 264 and 265:
B.3 Linux code end /* else */ This
- Page 266 and 267:
# If there are still command line a
- Page 268 and 269:
cp_cmd LINK $source_id $source_mdis
- Page 270 and 271:
3) # user ID does not exist echo "$
- Page 272 and 273:
[ $? -ne 0 ] && echo "Error: timed
- Page 274 and 275:
shift fi # If no command line optio
- Page 276:
264 The Virtualization Cookbook for


