kd-r618 / kd-a615 / kd-r610 instructions - Sonic Electronix
kd-r618 / kd-a615 / kd-r610 instructions - Sonic Electronix
kd-r618 / kd-a615 / kd-r610 instructions - Sonic Electronix

You also want an ePaper? Increase the reach of your titles
YUMPU automatically turns print PDFs into web optimized ePapers that Google loves.
GET0640-010A<br />
[E/EU]<br />
Flat head screws (M5 × 8 mm) /<br />
Vis à tête plate (M5 × 8 mm) * 2<br />
Pocket / Poche<br />
KD-R611<br />
Installation/Connection Manual<br />
Manuel d’installation/raccordement<br />
You need the installation kits which corresponds to your car. / Vous avez besoin des kits<br />
d’installation correspondants à votre voiture.<br />
• To prevent short circuits:<br />
– Disconnect the battery’s negative terminal and make all electrical connections before installing the unit.<br />
– Cover the terminals of the UNUSED leads with insulating tape.<br />
• Be sure to ground this unit to the car’s chassis again after installation.<br />
• Replace the fuse with one of the specified rating.<br />
• Connect speakers with a maximum power of more than 50 W<br />
(impedance of 4 Ω to 8 Ω). Otherwise, change the setting.<br />
(See page 27 of the INSTRUCTIONS.)<br />
• The heat sink becomes very hot after use. Be careful not to touch it<br />
when removing this unit.<br />
Heat sink / Dissipateur de chaleur<br />
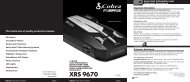
PRECAUTIONS on power supply and speaker connections<br />
• DO NOT connect the speaker leads of the power cord to the car battery; otherwise, the unit will be<br />
seriously damaged.<br />
• BEFORE connecting the speaker leads of the power cord to the speakers, check the speaker wiring in<br />
your car.<br />
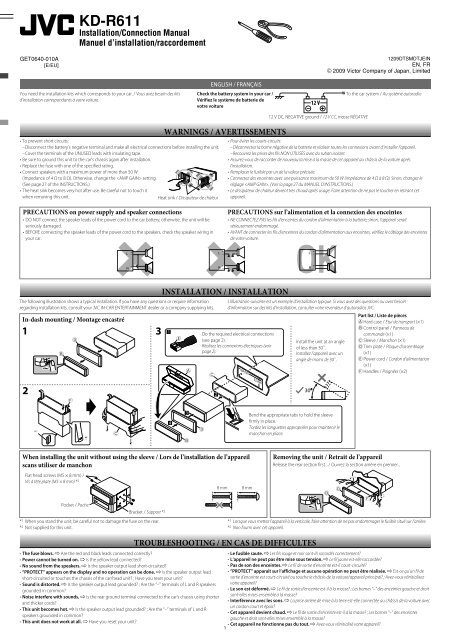
The following illustration shows a typical installation. If you have any questions or require information<br />
regarding installation kits, consult your JVC IN-CAR ENTERTAINMENT dealer or a company supplying kits.<br />
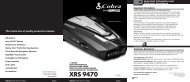
In-dash mounting / Montage encastré<br />
* 1<br />
Bracket / Support * 2<br />
ENGLISH / FRANÇAIS<br />
Check the battery system in your car /<br />
Vérifiez le système de batterie de<br />
votre voiture<br />
WARNINGS / AVERTISSEMENTS<br />
INSTALLATION / INSTALLATION<br />
When installing the unit without using the sleeve / Lors de l’installation de l’appareil<br />
scans utiliser de manchon<br />
* 1 When you stand the unit, be careful not to damage the fuse on the rear.<br />
* 2 Not supplied for this unit.<br />
• The fuse blows. ] Are the red and black leads connected correctly?<br />
• Power cannot be turned on. ] Is the yellow lead connected?<br />
• No sound from the speakers. ] Is the speaker output lead short-circuited?<br />
• “PROTECT” appears on the display and no operation can be done. ] Is the speaker output lead<br />
short-circuited or touches the chassis of the car/head unit? ; Have you reset your unit?<br />
• Sound is distorted. ] Is the speaker output lead grounded? ; Are the “–” terminals of L and R speakers<br />
grounded in common?<br />
• Noise interfere with sounds. ] Is the rear ground terminal connected to the car’s chassis using shorter<br />
and thicker cords?<br />
• This unit becomes hot. ] Is the speaker output lead grounded? ; Are the “–” terminals of L and R<br />
speakers grounded in common?<br />
• This unit does not work at all. ] Have you reset your unit?<br />
12 V DC, NEGATIVE ground / 12 V CC, masse NÉGATIVE<br />
1209DTSMDTJEIN<br />
EN, FR<br />
© 2009 Victor Company of Japan, Limited<br />
To the car system / Au système autoradio<br />
• Pour éviter les courts-circuits:<br />
– Déconnectez la borne négative de la batterie et réaliser toutes les connexions avant d’installer l’appareil.<br />
– Recouvrez les prises des fils NON UTILISÉS avec du ruban isolant.<br />
• Assurez-vous de raccorder de nouveau la mise à la masse de cet appareil au châssis de la voiture après<br />
l’installation.<br />
• Remplacer le fusible par un de la valeur précisée.<br />
• Connectez des enceintes avec une puissance maximum de 50 W (impédance de 4 Ω à 8 Ω). Sinon, changez le<br />
réglage . (Voir la page 27 du MANUEL D’INSTRUCTIONS.)<br />
• Le dissipateur de chaleur devient très chaud après usage. Faire attention de ne pas le toucher en retirant cet<br />
appareil.<br />
PRECAUTIONS sur l’alimentation et la connexion des enceintes<br />
• NE CONNECTEZ PAS les fils d’enceintes du cordon d’alimentation à la batterie; sinon, l’appareil serait<br />
sérieusement endommagé.<br />
• AVANT de connecter les fils d’enceintes du cordon d’alimentation aux enceintes, vérifiez le câblage des enceintes<br />
de votre voiture.<br />
L’illustration suivante est un exemple d’installation typique. Si vous avez des questions ou avez besoin<br />
d’information sur des kits d’installation, consulter votre revendeur d’autoradios JVC.<br />
Do the required electrical connections<br />
(see page 2).<br />
Réalisez les connexions électriques (voir<br />
page 2).<br />
Install the unit at an angle<br />
of less than 30˚.<br />
Installez l’appareil avec un<br />
angle de moins de 30˚.<br />
Bend the appropriate tabs to hold the sleeve<br />
firmly in place.<br />
Tordez les languettes appropriées pour maintenir le<br />
manchon en place.<br />
TROUBLESHOOTING / EN CAS DE DIFFICULTES<br />
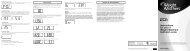
Part list / Liste de pièces<br />
A Hard case / Etui de transport (×1)<br />
B Control panel / Panneau de<br />
commande (×1)<br />
C Sleeve / Manchon (×1)<br />
D Trim plate / Plaque d’assemblage<br />
(×1)<br />
E Power cord / Cordon d’alimentation<br />
(×1)<br />
F Handles / Poignées (×2)<br />
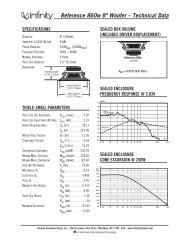
Removing the unit / Retrait de l’appareil<br />
Release the rear section first... / Ouvrez la section arrière en premier...<br />
* 1 Lorsque vous mettez l’appareil à la verticale, faire attention de ne pas endommager le fusible situé sur l’arrière.<br />
* 2 Non fourni avec cet appareil.<br />
• Le fusible saute. ] Les fils rouge et noir sont-ils racordés correctement?<br />
• L’appareil ne peut pas être mise sous tension. ] Le fil jaune est-elle raccordée?<br />
• Pas de son des enceintes. ] Le fil de sortie d’enceinte est-il court-circuité?<br />
• “PROTECT” apparaît sur l’affichage et aucune opération ne peut être réalisée. ] Est-ce qu’un fil de<br />
sortie d’enceinte est court-circuité ou touche le châssis de la voiture/appareil principal? ; Avez-vous réinitialisez<br />
votre appareil?<br />
• Le son est déformé. ] Le fil de sortie d’enceinte est-il à la masse? ; Les bornes “–” des enceintes gauche et droit<br />
sont-elles mises ensemble à la masse?<br />
• Interférence avec les sons. ] La prise arrière de mise à la terre est-elle connectée au châssis de la voiture avec<br />
un cordon court et épais?<br />
• Cet appareil devient chaud. ] Le fil de sortie d’enceinte est-il à la masse? ; Les bornes “–” des enceintes<br />
gauche et droit sont-elles mises ensemble à la masse?<br />
• Cet appareil ne fonctionne pas du tout. ] Avez-vous réinitialisé votre appareil?<br />
1