kd-r618 / kd-a615 / kd-r610 instructions - Sonic Electronix
kd-r618 / kd-a615 / kd-r610 instructions - Sonic Electronix
kd-r618 / kd-a615 / kd-r610 instructions - Sonic Electronix

You also want an ePaper? Increase the reach of your titles
YUMPU automatically turns print PDFs into web optimized ePapers that Google loves.
GET0639-006A<br />
[U/UH]<br />
Pocket / กระเป๋ า<br />
KD-R616<br />
Installation/Connection Manual<br />
การติดตั้ง/คู่มือการติดตั้ง<br />
You need the installation kits which corresponds to your car. /<br />
ต้องใช้ชุดติดตั้งที่เหมาะสมกับรถของท่าน<br />
• To prevent short circuits:<br />
– Disconnect the battery’s negative terminal and make all electrical connections before installing the unit.<br />
– Cover the terminals of the UNUSED leads with insulating tape.<br />
• Be sure to ground this unit to the car’s chassis again after installation.<br />
• Replace the fuse with one of the specified rating.<br />
• Connect speakers with a maximum power of more than 50 W (impedance of 4 Ω to 8 Ω). Otherwise,<br />
change the setting. (See page 23 of the INSTRUCTIONS.)<br />
• The heat sink becomes very hot after use. Be careful not to touch it when removing this unit.<br />
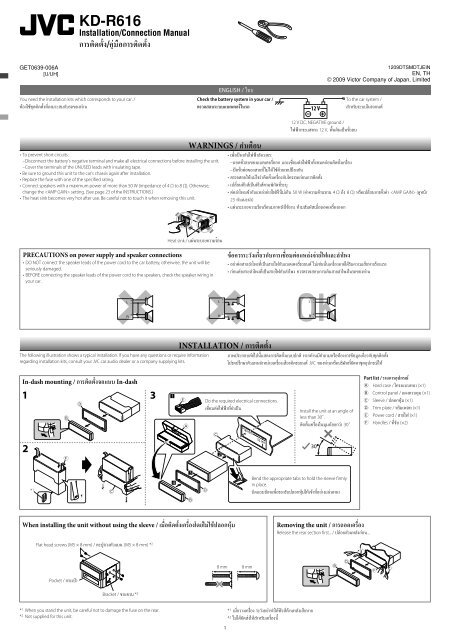
The following illustration shows a typical installation. If you have any questions or require information<br />
regarding installation kits, consult your JVC car audio dealer or a company supplying kits.<br />
In-dash mounting / การติดตั<br />
้งจอแบบ In-dash<br />
* 1<br />
Flat head screws (M5 × 8 mm) / ตะปูควงหัวแบน (M5 × 8 mm) * 2<br />
Bracket / ขาแขวน * 2<br />
ENGLISH / ไทย<br />
Check the battery system in your car /<br />
ตรวจสอบระบบแบตเตอรี่ในรถ<br />
WARNINGS / คำเตือน<br />
Heat sink / แผ่นระบายความร้อน<br />
PRECAUTIONS on power supply and speaker connections<br />
• DO NOT connect the speaker leads of the power cord to the car battery; otherwise, the unit will be<br />
seriously damaged.<br />
• BEFORE connecting the speaker leads of the power cord to the speakers, check the speaker wiring in<br />
your car.<br />
INSTALLATION / การติดตั้ง<br />
When installing the unit without using the sleeve / เมื่อติดตั้งเครื่องโดยไม่ใช้ปลอกหุ้ม<br />
* 1 When you stand the unit, be careful not to damage the fuse on the rear.<br />
* 2 Not supplied for this unit.<br />
1<br />
12 V DC, NEGATIVE ground /<br />
ไฟฟ้ ากระแสตรง 12 V, พื้นดินเป็นขั้วลบ<br />
1209DTSMDTJEIN<br />
EN, TH<br />
© 2009 Victor Company of Japan, Limited<br />
To the car system /<br />
สำหรับระบบในรถยนต์<br />
• เพื่อป้<br />
องกันไฟฟ้ าลัดวงจร:<br />
– ถอดขั้วลบของแบตเตอรี่ออก<br />
และเชื่อมต่อไฟฟ้<br />
าทั้งหมดก่อนติดตั้งเครื่อง<br />
– ปิดขั้วต่อของสายที่ไม่ได้ใช้ด้วยเทปป้<br />
องกัน<br />
• ตรวจสอบให้แน่ใจว่าติดตั้งเครื่องกับโครงรถก่อนการติดตั้ง<br />
• เปลี่ยนฟิวส์เป็นฟิวส์ตามพิกัดที่ระบุ<br />
• ต่อลำโพงเข้ากับแหล่งจ่ายไฟฟ้ าไม่เกิน 50 W (ค่าความต้านทาน 4 Ω ถึง 8 Ω) หรือเปลี่ยนการตั้งค่า<br />
(ดูหน้า<br />
23 คำแนะนำ)<br />
• แผ่นระบายความร้อนร้อนมากหลังใช้งาน ห้ามสัมผัสเมื่อถอดเครื่องออก<br />
ข้อควรระวังเกี่ยวกับการเชื่อมต่อแหล่งจ่ายไฟและลำโพง<br />
• อย่าต่อสายลำโพงที่เป็นสายไฟกับแบตเตอรี่รถยนต์<br />
ไม่เช่นนั้นเครื่องอาจได้รับความเสียหายร้ายแรง<br />
• ก่อนต่อสายลำโพงที่เป็นสายไฟกับลำโพง<br />
ควรตรวจสอบการเดินสายลำโพงในรถของท่าน<br />
ภาพประกอบต่อไปนี ้แสดงการติดตั้งแบบปกติ<br />
หากท่านมีคำถามหรือต้องการข้อมูลเกี่ยวกับชุดติดตั้ง<br />
โปรดปรึกษาตัวแทนจำหน่ายเครื่องเสียงติดรถยนต์ JVC ของท่านหรือบริษัทที่จัดหาชุดอุปกรณ์ให้<br />
Do the required electrical connections.<br />
เชื่อมต่อไฟฟ้<br />
าที่จำเป็น<br />
Install the unit at an angle of<br />
less than 30˚.<br />
ติดตั้งเครื่องในมุมน้อยกว่า<br />
30˚<br />
Bend the appropriate tabs to hold the sleeve firmly<br />
in place.<br />
บิดแถบล็อคเพื่อรองรับปลอกหุ้มให้เข้าที่อย่างแน่นหนา<br />
* 1 เมื่อวางเครื่อง<br />
ระวังอย่าทำให้ฟิวส์ด้านหลังเสียหาย<br />
* 2 ไมได้จัดส่งให้สำหรับเครื่องนี้<br />
Removing the unit / การถอดเครื่อง<br />
Release the rear section first... / ปล่อยส่วนหลังก่อน...<br />
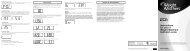
Part list / รายการอุปกรณ์<br />
A Hard case / โครงแบบหนา (×1)<br />
B Control panel / แผงควบคุม (×1)<br />
C Sleeve / ปลอกหุ้ม<br />
(×1)<br />
D Trim plate / ทริมเพลท (×1)<br />
E Power cord / สายไฟ (×1)<br />
F Handles / ที่จับ<br />
(×2)