DM-4800 OWNER'S MANUAL - zZounds.com - Tascam
DM-4800 OWNER'S MANUAL - zZounds.com - Tascam
DM-4800 OWNER'S MANUAL - zZounds.com - Tascam

You also want an ePaper? Increase the reach of your titles
YUMPU automatically turns print PDFs into web optimized ePapers that Google loves.
Otherwise, if the AUTOMATION option is selected,<br />
these indicators show the current automation status<br />
of the channels, as explained in the separate Automation<br />
Manual.<br />
FADER SENSITIVITY This parameter allows you<br />
to specify the sensitivity of the faders, as used in the<br />
automation process.<br />
The <strong>DM</strong>-<strong>4800</strong> fader touch sensing capabilities are<br />
dependent on the ambient humidity and environment.<br />
Depending on these factors, it may sometimes happen<br />
that faders which have been touched are not recognized<br />
as having been touched, or the faders are<br />
recognized as having been touched when they have<br />
not actually been touched.<br />
PREFERENCES<br />
The following general working preference settings<br />
are available from this screen:<br />
Figure 2.40: The PREFERENCES screen<br />
Fader Auto MODULE Select When enabled,<br />
this option allows a module to be selected whenever<br />
its fader is touched, in addition to the usual method<br />
of pressing the SEL key. In some screens, when this<br />
option is enabled, this may only mean that the module<br />
shown at the top left of the screen changes when<br />
its fader is touched.<br />
CH SOLO Key Auto MODULE Select When<br />
this is enabled, soloing a channel selects the module.<br />
Select MODULE Return When checked, this<br />
option allows the MODULE screen of the appropriate<br />
module to appear if the SEL key of the module is<br />
pressed and held for about two seconds.<br />
ST Link by SEL key When checked, this option<br />
allows the stereo linking of two adjacent modules<br />
2 – Basic operational concepts : Options<br />
The value of the sensitivity is set by default to<br />
3.3kHz, but you may wish to set it to any of the following<br />
values: 1.2kHz, 1.4kHz, 1.7kHz, 2.0kHz,<br />
2.5kHz, 3.3kHz, 5.0kHz. High values mean higher<br />
touch sensitivity.<br />
While the FADER SENSITIVITY on-screen button is<br />
switched ON and this screen is visible, touching any<br />
of the faders with your fingers will illuminate the<br />
STATUS/OL indicator for as long as the fader is<br />
touched. This provides a useful check for the sensitivity<br />
of the faders.<br />
TIP<br />
Set this to a higher value if the indicators do not light<br />
when you touch some faders, and to a lower value if<br />
they remain lit when you release some faders.<br />
(when the left module of the pair is odd-numbered)<br />
by pressing and holding the SEL key of one module<br />
and pressing the SEL key of the other.<br />
SEL Key Follows Fader Layer Status allows<br />
the setup of the automatic linking of the selected<br />
channel to the selected fader layer.<br />
When this option is checked, if a channel is selected,<br />
the fader layer is changed, and then the fader layer is<br />
changed back again, the originally-selected channel<br />
is automatically selected.<br />
For example, if this option is active, and SEL 2 key is<br />
lit with fader layer 1-16 active, fader layer 17-32 is<br />
then selected, SEL key 3 (channel 19) is selected,<br />
and then fader layer 1-16 is then re-selected, SEL key<br />
2 will be active.<br />
If the option is not active, no SEL key which is lit<br />
remains lit when the fader layer is changed.<br />
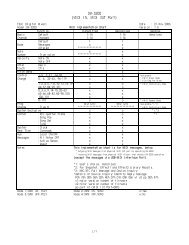
Meter Follows SEL key When this option is<br />
checked, and the previous SEL Key Follows Fader Layer<br />
Status option is also checked, the meter layer automatically<br />
changes when the fader layer is changed<br />
(see “Meters” on page 69). The modes are as follows:<br />
Fader layer SEL keys Meter layer<br />
CH 1–24 CH 1–24 CH 1–24<br />
CH 25–48 CH 25–48 CH 25–48<br />
CH 49–64 CH 49–64 CH 49–64<br />
BUSS 1–24 BUSS 1–246 BUSS<br />
AUX 1–12 AUX 1–12 AUX<br />
Figure 2.41: Layer/SEL key matching<br />
TASCAM <strong>DM</strong>-<strong>4800</strong> User’s Manual 43