DM-4800 OWNER'S MANUAL - zZounds.com - Tascam
DM-4800 OWNER'S MANUAL - zZounds.com - Tascam
DM-4800 OWNER'S MANUAL - zZounds.com - Tascam

You also want an ePaper? Increase the reach of your titles
YUMPU automatically turns print PDFs into web optimized ePapers that Google loves.
2 – Basic operational concepts : Utilities<br />
Making connections The specifications of the<br />
GPI ports on the rear panel are as follows:<br />
Arrangement of the serial port pins:<br />
Pin number Function<br />
1 GPI output port 1<br />
2 GPI output port 2<br />
3 GPI output port 3<br />
4 GPI output port 4<br />
5 GND<br />
6 GPI output port 5<br />
7 GPI output port 6<br />
8 GPI output port 7<br />
9 GPI output port 8<br />
Table 2.4: GPI pin assignments (output level: 5V)<br />
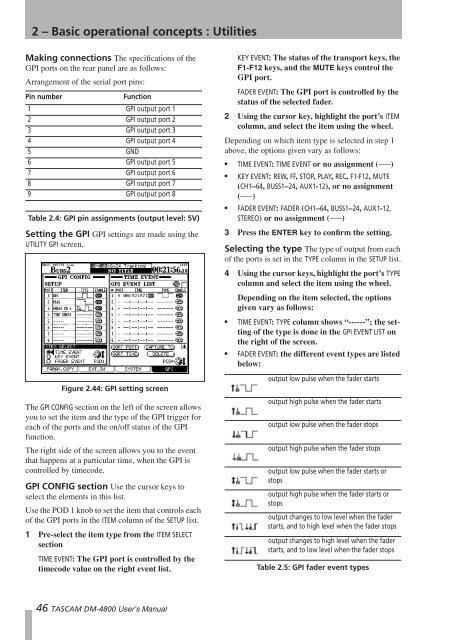
Setting the GPI GPI settings are made using the<br />
UTILITY GPI screen.<br />
Figure 2.44: GPI setting screen<br />
The GPI CONFIG section on the left of the screen allows<br />
you to set the item and the type of the GPI trigger for<br />
each of the ports and the on/off status of the GPI<br />
function.<br />
The right side of the screen allows you to the event<br />
that happens at a particular time, when the GPI is<br />
controlled by timecode.<br />
GPI CONFIG section Use the cursor keys to<br />
select the elements in this list.<br />
Use the POD 1 knob to set the item that controls each<br />
of the GPI ports in the ITEM column of the SETUP list.<br />
1 Pre-select the item type from the ITEM SELECT<br />
section<br />
TIME EVENT: The GPI port is controlled by the<br />
timecode value on the right event list.<br />
46 TASCAM <strong>DM</strong>-<strong>4800</strong> User’s Manual<br />
KEY EVENT: The status of the transport keys, the<br />
F1-F12 keys, and the MUTE keys control the<br />
GPI port.<br />
FADER EVENT: The GPI port is controlled by the<br />
status of the selected fader.<br />
2 Using the cursor key, highlight the port’s ITEM<br />
column, and select the item using the wheel.<br />
Depending on which item type is selected in step 1<br />
above, the options given vary as follows:<br />
• TIME EVENT: TIME EVENT or no assignment (------)<br />
• KEY EVENT: REW, FF, STOP, PLAY, REC, F1-F12, MUTE<br />
(CH1–64, BUSS1–24, AUX1-12), or no assignment<br />
(------)<br />
• FADER EVENT: FADER (CH1–64, BUSS1–24, AUX1-12,<br />
STEREO) or no assignment (------)<br />
3 Press the ENTER key to confirm the setting.<br />
Selecting the type The type of output from each<br />
of the ports is set in the TYPE column in the SETUP list.<br />
4 Using the cursor keys, highlight the port’s TYPE<br />
column and select the item using the wheel.<br />
Depending on the item selected, the options<br />
given vary as follows:<br />
• TIME EVENT: TYPE column shows “------”; the setting<br />
of the type is done in the GPI EVENT LIST on<br />
the right of the screen.<br />
• FADER EVENT: the different event types are listed<br />
below:<br />
i<br />
output low pulse when the fader starts<br />
output high pulse when the fader starts<br />
output low pulse when the fader stops<br />
output high pulse when the fader stops<br />
output low pulse when the fader starts or<br />
stops<br />
output high pulse when the fader starts or<br />
stops<br />
output changes to low level when the fader<br />
starts, and to high level when the fader stops<br />
output changes to high level when the fader<br />
starts, and to low level when the fader stops<br />
Table 2.5: GPI fader event types