
Create successful ePaper yourself
Turn your PDF publications into a flip-book with our unique Google optimized e-Paper software.
14. Press Ctrl+S to save the workbook.<br />
15. Change column width on a range of columns.<br />
a. Click and drag to select the column headings B:H.<br />
b. Click the Format button [Home tab, Cells group].<br />
c. Select Column Width from the menu.<br />
d. Enter 15.0 characters as the new width.<br />
e. Click OK.<br />
16. Apply new row heights.<br />
a. Click row heading 4, hold down Ctrl, and click row heading 10.<br />
b. Right-click row heading 4.<br />
c. Choose Row Height from the context menu.<br />
d. Enter 21.0 as the new height.<br />
e. Click OK.<br />
17. Insert a new row and row heading.<br />
a. Right-click row heading 9.<br />
b. Choose Insert from the context menu to add a new row. The new row appears directly above the<br />
originally selected row.<br />
c. Select cell A9 and type: Cages & Equipment.<br />
18. Increase the width of column A to 29.00.<br />
19. Enter the following information into the cell range B9:H9.<br />
B C D E F G H<br />
9 199.03 209.25 198.90 229.05 245.09 351.98 205.55<br />
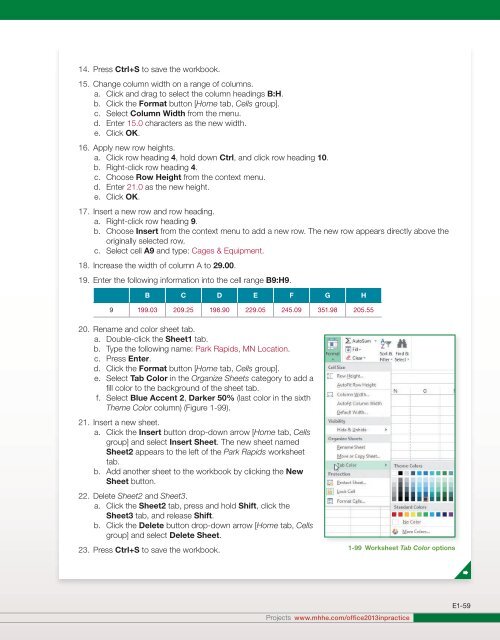
20. Rename and color sheet tab.<br />
a. Double-click the Sheet1 tab.<br />
b. Type the following name: Park Rapids, MN Location.<br />
c. Press Enter.<br />
d. Click the Format button [Home tab, Cells group].<br />
e. Select Tab Color in the Organize Sheets category to add a<br />
fill color to the background of the sheet tab.<br />
f. Select Blue Accent 2, Darker 50% (last color in the sixth<br />
Theme Color column) (Figure 1-99).<br />
21. Insert a new sheet.<br />
a. Click the Insert button drop-down arrow [Home tab, Cells<br />
group] and select Insert Sheet. The new sheet named<br />
Sheet2 appears to the left of the Park Rapids worksheet<br />
tab.<br />
b. Add another sheet to the workbook by clicking the New<br />
Sheet button.<br />
22. Delete Sheet2 and Sheet3.<br />
a. Click the Sheet2 tab, press and hold Shift, click the<br />
Sheet3 tab, and release Shift.<br />
b. Click the Delete button drop-down arrow [Home tab, Cells<br />
group] and select Delete Sheet.<br />
23. Press Ctrl+S to save the workbook. 1-99 Worksheet Tab Color options<br />
Projects www.mhhe.com/office2013inpractice<br />
E1-59