
You also want an ePaper? Increase the reach of your titles
YUMPU automatically turns print PDFs into web optimized ePapers that Google loves.
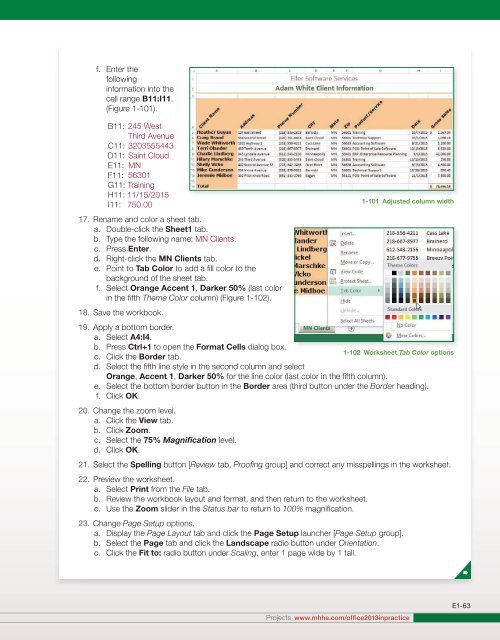
f. Enter the<br />
following<br />
information into the<br />
cell range B11:I11.<br />
(Figure 1-101).<br />
B11: 245 West<br />
Third Avenue<br />
C11: 3203555443<br />
D11: Saint Cloud<br />
E11: MN<br />
F11: 56301<br />
G11: Training<br />
H11: 11/15/2015<br />
I11: 750.00<br />
17. Rename and color a sheet tab.<br />
a. Double-click the Sheet1 tab.<br />
b. Type the following name: MN Clients.<br />
c. Press Enter.<br />
d. Right-click the MN Clients tab.<br />
e. Point to Tab Color to add a fill color to the<br />
background of the sheet tab.<br />
f. Select Orange Accent 1, Darker 50% (last color<br />
in the fifth Theme Color column) (Figure 1-102).<br />
18. Save the workbook.<br />
19. Apply a bottom border.<br />
a. Select A4:I4.<br />
b. Press Ctrl+1 to open the Format Cells dialog box.<br />
1-102 Worksheet Tab Color options<br />
c. Click the Border tab.<br />
d. Select the fifth line style in the second column and select<br />
Orange, Accent 1, Darker 50% for the line color (last color in the fifth column).<br />
e. Select the bottom border button in the Border area (third button under the Border heading).<br />
f. Click OK.<br />
20. Change the zoom level.<br />
a. Click the View tab.<br />
b. Click Zoom.<br />
c. Select the 75% Magnification level.<br />
d. Click OK.<br />
21. Select the Spelling button [Review tab, Proofing group] and correct any misspellings in the worksheet.<br />
22. Preview the worksheet.<br />
a. Select Print from the File tab.<br />
b. Review the workbook layout and format, and then return to the worksheet.<br />
c. Use the Zoom slider in the Status bar to return to 100% magnification.<br />
23. Change Page Setup options.<br />
a. Display the Page Layout tab and click the Page Setup launcher [Page Setup group].<br />
b. Select the Page tab and click the Landscape radio button under Orientation.<br />
c. Click the Fit to: radio button under Scaling, enter 1 page wide by 1 tall.<br />
1-101 Adjusted column width<br />
Projects www.mhhe.com/office2013inpractice<br />
E1-63