GR-DVL9600 GR-DVL9500 - JVC
GR-DVL9600 GR-DVL9500 - JVC
GR-DVL9600 GR-DVL9500 - JVC
You also want an ePaper? Increase the reach of your titles
YUMPU automatically turns print PDFs into web optimized ePapers that Google loves.
14 EN<br />
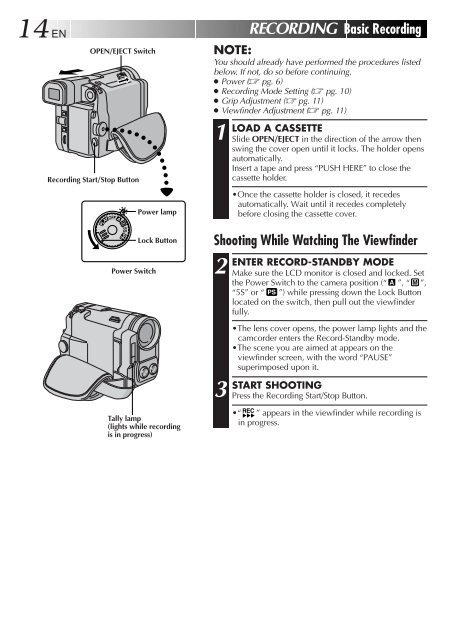
OPEN/EJECT Switch<br />
Recording Start/Stop Button<br />
PLAYOFF<br />
5S<br />
Power Switch<br />
Power lamp<br />
Lock Button<br />
Tally lamp<br />
(lights while recording<br />
is in progress)<br />
RECORDING Basic Recording<br />
NOTE:<br />
You should already have performed the procedures listed<br />
below. If not, do so before continuing.<br />
● Power ( pg. 6)<br />
● Recording Mode Setting ( pg. 10)<br />
● Grip Adjustment ( pg. 11)<br />
● Viewfinder Adjustment ( pg. 11)<br />
1<br />
LOAD A CASSETTE<br />
Slide OPEN/EJECT in the direction of the arrow then<br />
swing the cover open until it locks. The holder opens<br />
automatically.<br />
Insert a tape and press “PUSH HERE” to close the<br />
cassette holder.<br />
•Once the cassette holder is closed, it recedes<br />
automatically. Wait until it recedes completely<br />
before closing the cassette cover.<br />
Shooting While Watching The Viewfinder<br />
2<br />
ENTER RECORD-STANDBY MODE<br />
Make sure the LCD monitor is closed and locked. Set<br />
the Power Switch to the camera position (“ ”, “ ”,<br />
“5S” or “ ”) while pressing down the Lock Button<br />
located on the switch, then pull out the viewfinder<br />
fully.<br />
•The lens cover opens, the power lamp lights and the<br />
camcorder enters the Record-Standby mode.<br />
•The scene you are aimed at appears on the<br />
viewfinder screen, with the word “PAUSE”<br />
superimposed upon it.<br />
3<br />
START SHOOTING<br />
Press the Recording Start/Stop Button.<br />
•“ ” appears in the viewfinder while recording is<br />
in progress.





![TH-V70R[B] revision - JVC](https://img.yumpu.com/23738839/1/184x260/th-v70rb-revision-jvc.jpg?quality=85)
