GR-DVL9600 GR-DVL9500 - JVC
GR-DVL9600 GR-DVL9500 - JVC
GR-DVL9600 GR-DVL9500 - JVC

Create successful ePaper yourself
Turn your PDF publications into a flip-book with our unique Google optimized e-Paper software.
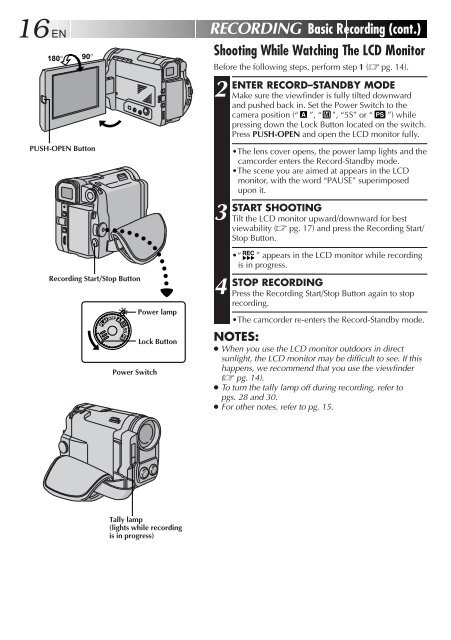
16 EN RECORDING Basic Recording (cont.)<br />
180° 90°<br />
PUSH-OPEN Button<br />
Recording Start/Stop Button<br />
PLAYOFF<br />
5S<br />
Power Switch<br />
Power lamp<br />
Lock Button<br />
Shooting While Watching The LCD Monitor<br />
Before the following steps, perform step 1 ( pg. 14).<br />
2<br />
ENTER RECORD–STANDBY MODE<br />
Make sure the viewfinder is fully tilted downward<br />
and pushed back in. Set the Power Switch to the<br />
camera position (“ ”, “ ”, “5S” or “ ”) while<br />
pressing down the Lock Button located on the switch.<br />
Press PUSH-OPEN and open the LCD monitor fully.<br />
•The lens cover opens, the power lamp lights and the<br />
camcorder enters the Record-Standby mode.<br />
•The scene you are aimed at appears in the LCD<br />
monitor, with the word “PAUSE” superimposed<br />
upon it.<br />
3<br />
START SHOOTING<br />
Tilt the LCD monitor upward/downward for best<br />
viewability ( pg. 17) and press the Recording Start/<br />
Stop Button.<br />
•“ ” appears in the LCD monitor while recording<br />
is in progress.<br />
4<br />
STOP RECORDING<br />
Press the Recording Start/Stop Button again to stop<br />
recording.<br />
•The camcorder re-enters the Record-Standby mode.<br />
NOTES:<br />
● When you use the LCD monitor outdoors in direct<br />
sunlight, the LCD monitor may be difficult to see. If this<br />
happens, we recommend that you use the viewfinder<br />
( pg. 14).<br />
● To turn the tally lamp off during recording, refer to<br />
pgs. 28 and 30.<br />
● For other notes, refer to pg. 15.<br />
Tally lamp<br />
(lights while recording<br />
is in progress)


![TH-V70R[B] revision - JVC](https://img.yumpu.com/23738839/1/184x260/th-v70rb-revision-jvc.jpg?quality=85)