GR-DVL9600 GR-DVL9500 - JVC
GR-DVL9600 GR-DVL9500 - JVC
GR-DVL9600 GR-DVL9500 - JVC

Create successful ePaper yourself
Turn your PDF publications into a flip-book with our unique Google optimized e-Paper software.
40 EN<br />
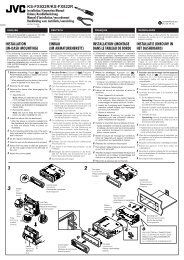
Select Dial<br />
FOCUS<br />
EXPOSURE<br />
W. BALANCE<br />
FADER<br />
/ WIPE<br />
P. AE<br />
/ EFFECT<br />
FLASH ADJ.<br />
4END<br />
FOCUS<br />
EXPOSURE<br />
4W. BALANCE<br />
FADER<br />
/ WIPE<br />
P. AE<br />
/ EFFECT<br />
FLASH ADJ.<br />
END<br />
W . BAL .<br />
AUTO<br />
Display<br />
AUTO<br />
AUTO<br />
AUTO<br />
OFF<br />
OFF<br />
0<br />
AUTO<br />
AUTO<br />
AUTO<br />
OFF<br />
OFF<br />
0<br />
PLAYOFF<br />
5S<br />
Power Switch<br />
Power lamp<br />
Lock Button<br />
Manual Mode Item<br />
Menu<br />
White Balance<br />
Adjustment<br />
RECORDING Advanced Features (cont.)<br />
White Balance Adjustment<br />
A term that refers to the correctness of colour reproduction<br />
under various lighting. If the white balance is correct, all<br />
other colours will be accurately reproduced.<br />
The white balance is usually adjusted automatically.<br />
However, the more advanced camcorder operator would<br />
prefer to control this function manually and achieve a<br />
more professional colour/tint reproduction.<br />
1<br />
SELECT OPERATION MODE<br />
Set the Power Switch to “ ” or “ ” while pressing<br />
down the Lock Button located on the switch, and pull<br />
out the viewfinder fully or open the LCD monitor<br />
fully.<br />
2<br />
ACCESS MANUAL MODE ITEM MENU<br />
Press the Select Dial. The Manual Mode Item Menu<br />
appears.<br />
3<br />
ACCESS WHITE BALANCE ADJUST-<br />
MENT<br />
Move the highlight bar to “W.BALANCE” by rotating<br />
the Select Dial. Then press it. The Manual Mode Item<br />
Menu disappears. “W.BAL.” appears in the upper left<br />
corner and the currently selected mode indication is<br />
also displayed.<br />
4<br />
SET FUNCTION PARAMETERS<br />
Cycle through the available settings of the selected<br />
functions by rotating the Select Dial, and stop when<br />
the one you want is displayed.<br />
“AUTO” – The white balance is adjusted automatically.<br />
This is the factory preset position.<br />
“ ” – When shooting with the white balance<br />
already having been set on the subject<br />
( pg. 41).<br />
“ ” – When shooting outdoors on a sunny day.<br />
“ ” – When shooting outdoors on a cloudy day.<br />
“ ” – When using a video light or other similar<br />
type of lighting.<br />
5<br />
CLOSE WHITE BALANCE ADJUSTMENT<br />
Press the Select Dial again. Selection is complete.<br />
The indication “W.BAL.” changes to “MANUAL”.<br />
To Return To Automatic White Balance . . .<br />
.... select “AUTO” in step 4. Or set the Power Switch to<br />
“ ”.<br />
NOTE:<br />
White balance cannot be used when Sepia or Monotone<br />
( pg. 35) is activated.


![TH-V70R[B] revision - JVC](https://img.yumpu.com/23738839/1/184x260/th-v70rb-revision-jvc.jpg?quality=85)