Download - TRENDnet
Download - TRENDnet
Download - TRENDnet

Create successful ePaper yourself
Turn your PDF publications into a flip-book with our unique Google optimized e-Paper software.
<strong>TRENDnet</strong> User’s Guide<br />
TEW-731BR<br />
• Domain Name (Optional) – Specifies a domain name to assign to computers or<br />
devices. (e.g. trendnet.com)<br />
• Lease Time – Click the drop-down list to select the lease time.<br />
Note: The DHCP lease time is the amount of time a computer or device can keep an<br />
IP address assigned by the DHCP server. When the lease time expires, the computer<br />
or device will renew the IP address lease with the DHCP server, otherwise, if there is<br />
no attempt to renew the lease, the DHCP server will reallocate the IP address to be<br />
assigned to another computer or device.<br />
4. To save changes, click Apply.<br />
Set up DHCP reservation<br />
Main > LAN & DHCP Server<br />
DHCP (Dynamic Host Configuration Protocol) reservation (also called Static DHCP) allows<br />
your router to assign a fixed IP address from the DHCP server IP address range to a<br />
specific device on your network. Assigning a fixed IP address can allow you to easily<br />
keep track of the IP addresses used on your network by your computers or devices for<br />
future reference or configuration such as virtual server (also called port forwarding, see<br />
“Virtual Server” on page 35) or special applications (also called port triggering, see<br />
“Special Applications” on page 36).<br />
1. Log into your router management page (see “Access your router management page”<br />
on page 27).<br />
2. Click on Main, and click on LAN & DHCP Server.<br />
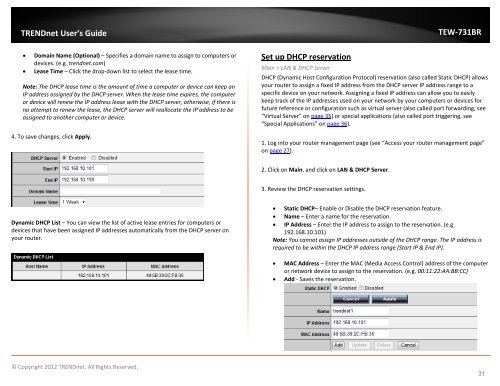
3. Review the DHCP reservation settings.<br />
Dynamic DHCP List – You can view the list of active lease entries for computers or<br />
devices that have been assigned IP addresses automatically from the DHCP server on<br />
your router.<br />
• Static DHCP– Enable or Disable the DHCP reservation feature.<br />
• Name – Enter a name for the reservation.<br />
• IP Address – Enter the IP address to assign to the reservation. (e.g.<br />
192.168.10.101)<br />
Note: You cannot assign IP addresses outside of the DHCP range. The IP address is<br />
required to be within the DHCP IP address range (Start IP & End IP).<br />
• MAC Address – Enter the MAC (Media Access Control) address of the computer<br />
or network device to assign to the reservation. (e.g. 00:11:22:AA:BB:CC)<br />
• Add - Saves the reservation.<br />
© Copyright 2012 <strong>TRENDnet</strong>. All Rights Reserved.<br />
31