- Page 1 and 2:
QUICK & CRASH OPERATORS MANUAL IT I
- Page 3 and 4:
7. MAINTENANCE ....................
- Page 5 and 6:
NOTES ON INSTALLATION NEVER turn th
- Page 7 and 8:
HINWEISE ZUR AUFSTELLUNG NIEMALS da
- Page 9 and 10:
PUNKTER OM INSTALLATION Tænd aldri
- Page 11 and 12:
NOTAS DE INSTALACIÓN. JAMÁS ENCIE
- Page 13 and 14:
NOTES D’INSTALLATION NE JAMAIS me
- Page 15 and 16:
ΣΗΜΕΙΩΣΕΙΣ ΓΙΑ ΤΗΝ
- Page 17 and 18:
NOTES D’INSTALLATION NON ACCENDER
- Page 19 and 20:
MERKNADER VED INSTALLASJON Slå ALD
- Page 21 and 22:
Opmerkingen aangaande Installatie S
- Page 23 and 24:
NOTAS SOBRE A INSTALAÇÃO NUNCA li
- Page 25 and 26:
ATT BEAKTA VID INSTALLATION Sätt a
- Page 27 and 28:
ASENNUSHUOMIOITA Älä koskaan kytk
- Page 29 and 30:
2. HOW TO PLAY Game Description Thi
- Page 31 and 32:
4. MOVING THE MACHINE This equipmen
- Page 33 and 34:
CETTE MACHINE EST DESTINEE UNIQUEME
- Page 35 and 36:
5-1 Joining the Front and Rear Cabi
- Page 37 and 38:
5-2 Removing the Flat Target Packin
- Page 39 and 40:
6-1 Adjustment Switches The Adjustm
- Page 41 and 42:
6-2-2 Ticket Payout Setting n Do no
- Page 43 and 44:
6-4 Adjusting the Launcher Solenoid
- Page 45 and 46:
6-6 Adjusting the Flat Target (U)/(
- Page 47 and 48:
O Aanpassingen of onderhoud aan dez
- Page 49 and 50:
7-1-3 Cleaning the Cup Target Senso
- Page 51 and 52:
7-1-5 Cleaning the Fibre Optic Cabl
- Page 53 and 54:
7-2 Replacing the Game PC Board Not
- Page 55 and 56:
7-4 Replacing the Rear Glass 1. Rem
- Page 57 and 58:
7-6 Replacing the Rear Fluorescent
- Page 59 and 60:
4. Remove the 4off Security screws
- Page 61 and 62: 4. Hold the mirror both top and bot
- Page 63 and 64: 3. Remove 6off pozi head screws (M4
- Page 65 and 66: 3. Only loosen 2off Pozi flange hea
- Page 67 and 68: 5. Remove 3off Pozi head head screw
- Page 69 and 70: 7-13 Replacing the Header Lamp 1. R
- Page 71 and 72: 4. Disconnect the connectors (CN45
- Page 73 and 74: 7-16 Replacing the Launcher Sensor
- Page 75 and 76: 4. To remove the solenoid plunger r
- Page 77 and 78: 7-18 Removing the Flat Target Assem
- Page 79 and 80: 4. To remove the solenoid plunger,
- Page 81 and 82: 7-21 Replacing the Flat Target Moto
- Page 83 and 84: 7-22 Replacing the Flat Target Sens
- Page 85 and 86: 7-24 Replacing the Flat Target Sens
- Page 87 and 88: 7-26 Replacing the Gun Detection Se
- Page 89 and 90: 7-27 Replacing the [SET] and [START
- Page 91 and 92: 3. Remove the 4off Self Tapping scr
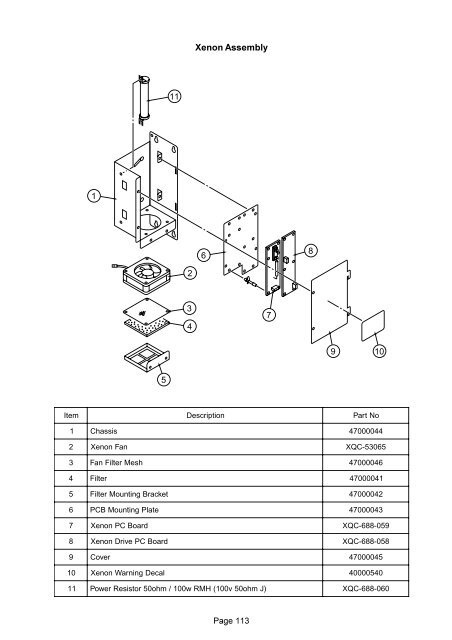
- Page 93 and 94: 7-30 Replacing the Xenon PC Board C
- Page 95 and 96: 5. Reassemble in reverse order. Not
- Page 97 and 98: 7-32 Removing the Xenon Fan and Fil
- Page 99 and 100: 7-34 Replacing the Gun Switch, Trig
- Page 101 and 102: 7-35 Replacing the Gun Harness Assy
- Page 103 and 104: 10 Reassemble in reverse order. Not
- Page 105 and 106: Page 105
- Page 107 and 108: Item Description Part No 1 Gun Moun
- Page 109 and 110: Item Description Part No 1 Front Pe
- Page 111: Item Description Part No 41 Fluores
- Page 115 and 116: Item Cup Description Explosion Mech
- Page 117 and 118: Item Description Part No Flat Targe
- Page 119 and 120: Item Description Part No 33 Base (U
- Page 121 and 122: Item Description Part No Flat Targe
- Page 123 and 124: Item Description Part No 33 Base (L
- Page 125 and 126: Item Shutter Assembly - Complete De
- Page 127 and 128: Item Description Part No 1 G rip (L
- Page 129 and 130: 10. SCHEMATICS Page 129
- Page 131: For all Parts or Technical Support