QUICK & CRASH - The International Arcade Museum
QUICK & CRASH - The International Arcade Museum
QUICK & CRASH - The International Arcade Museum

Create successful ePaper yourself
Turn your PDF publications into a flip-book with our unique Google optimized e-Paper software.
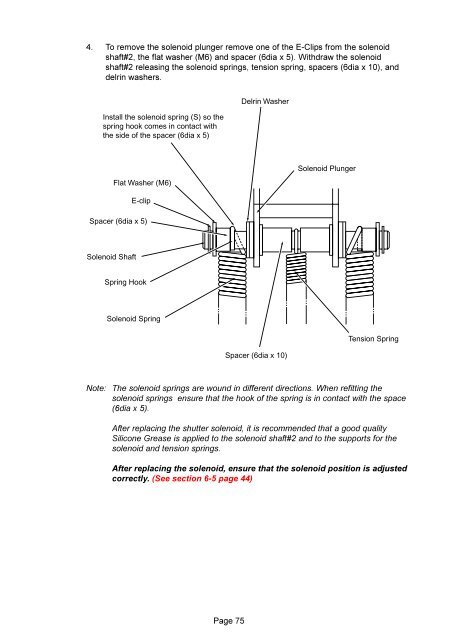
4. To remove the solenoid plunger remove one of the E-Clips from the solenoid<br />
shaft#2, the flat washer (M6) and spacer (6dia x 5). Withdraw the solenoid<br />
shaft#2 releasing the solenoid springs, tension spring, spacers (6dia x 10), and<br />
delrin washers.<br />
Install the solenoid spring (S) so the<br />
spring hook comes in contact with<br />
the side of the spacer (6dia x 5)<br />
Delrin Washer<br />
Solenoid Plunger<br />
Flat Washer (M6)<br />
E-clip<br />
Spacer (6dia x 5)<br />
Solenoid Shaft<br />
Spring Hook<br />
Solenoid Spring<br />
Spacer (6dia x 10)<br />
Tension Spring<br />
Note: <strong>The</strong> solenoid springs are wound in different directions. When refitting the<br />
solenoid springs ensure that the hook of the spring is in contact with the space<br />
(6dia x 5).<br />
After replacing the shutter solenoid, it is recommended that a good quality<br />
Silicone Grease is applied to the solenoid shaft#2 and to the supports for the<br />
solenoid and tension springs.<br />
After replacing the solenoid, ensure that the solenoid position is adjusted<br />
correctly. (See section 6-5 page 44)<br />
Page 75