QUICK & CRASH - The International Arcade Museum
QUICK & CRASH - The International Arcade Museum
QUICK & CRASH - The International Arcade Museum
Create successful ePaper yourself
Turn your PDF publications into a flip-book with our unique Google optimized e-Paper software.
7-31 Replacing the Xenon Drive PC Board<br />
CAUTION<br />
<strong>The</strong> Xenon Assy remains hot and continues to carry a high voltage charge even after<br />
turning the power OFF. Wait at least five minutes after turning the power OFF before<br />
performing any maintenance work (troubleshooting, repairs etc.) on the Xenon Assy.<br />
Note: PC Boards are susceptible to damage from static electricity. Anti static precautions<br />
should be taken when removing, handling and refitting the PC Board.<br />
1. Remove the Xenon cover. (See section 7-30 page 93)<br />
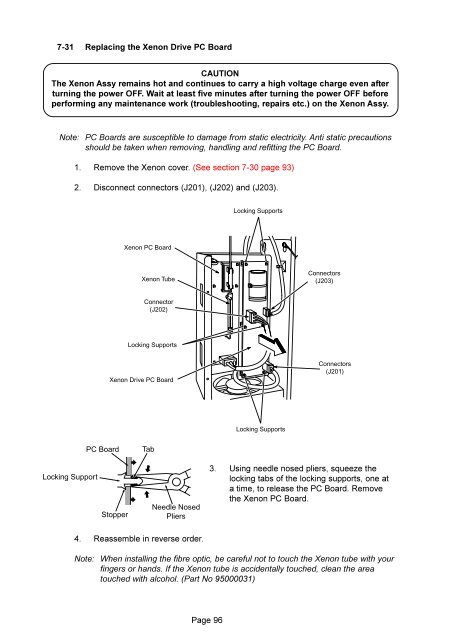
2. Disconnect connectors (J201), (J202) and (J203).<br />
Locking Supports<br />
Xenon PC Board<br />
Xenon Tube<br />
Connectors<br />
(J203)<br />
Connector<br />
(J202)<br />
Locking Supports<br />
Xenon Drive PC Board<br />
Connectors<br />
(J201)<br />
Locking Supports<br />
PC Board<br />
Tab<br />
Locking Support<br />
Stopper<br />
Needle Nosed<br />
Pliers<br />
3. Using needle nosed pliers, squeeze the<br />
locking tabs of the locking supports, one at<br />
a time, to release the PC Board. Remove<br />
the Xenon PC Board.<br />
4. Reassemble in reverse order.<br />
Note: When installing the fibre optic, be careful not to touch the Xenon tube with your<br />
fingers or hands. If the Xenon tube is accidentally touched, clean the area<br />
touched with alcohol. (Part No 95000031)<br />
Page 96


