QUICK & CRASH - The International Arcade Museum
QUICK & CRASH - The International Arcade Museum
QUICK & CRASH - The International Arcade Museum

You also want an ePaper? Increase the reach of your titles
YUMPU automatically turns print PDFs into web optimized ePapers that Google loves.
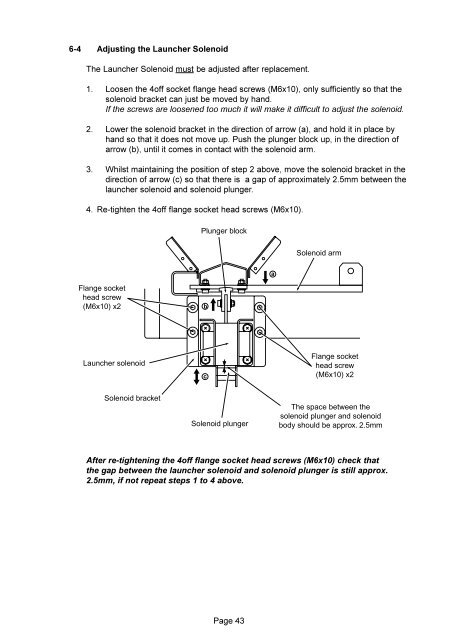
6-4 Adjusting the Launcher Solenoid<br />
<strong>The</strong> Launcher Solenoid must be adjusted after replacement.<br />
1. Loosen the 4off socket flange head screws (M6x10), only sufficiently so that the<br />
solenoid bracket can just be moved by hand.<br />
If the screws are loosened too much it will make it difficult to adjust the solenoid.<br />
2. Lower the solenoid bracket in the direction of arrow (a), and hold it in place by<br />
hand so that it does not move up. Push the plunger block up, in the direction of<br />
arrow (b), until it comes in contact with the solenoid arm.<br />
3. Whilst maintaining the position of step 2 above, move the solenoid bracket in the<br />
direction of arrow (c) so that there is a gap of approximately 2.5mm between the<br />
launcher solenoid and solenoid plunger.<br />
4. Re-tighten the 4off flange socket head screws (M6x10).<br />
Plunger block<br />
Solenoid arm<br />
a<br />
Flange socket<br />
head screw<br />
(M6x10) x2<br />
b<br />
Launcher solenoid<br />
c<br />
Flange socket<br />
head screw<br />
(M6x10) x2<br />
Solenoid bracket<br />
Solenoid plunger<br />
<strong>The</strong> space between the<br />
solenoid plunger and solenoid<br />
body should be approx. 2.5mm<br />
After re-tightening the 4off flange socket head screws (M6x10) check that<br />
the gap between the launcher solenoid and solenoid plunger is still approx.<br />
2.5mm, if not repeat steps 1 to 4 above.<br />
Page 43