

Versamark CS410 - Kodak
Versamark CS410 - Kodak
Versamark CS410 - Kodak

You also want an ePaper? Increase the reach of your titles
YUMPU automatically turns print PDFs into web optimized ePapers that Google loves.
Chapter 2. Basic Operations<br />
Print Job Operations<br />
Add a Job to the Queue<br />
NOTE<br />
A job can also be added to the print queue by putting it in the hot folder<br />
set up in “Set Up the Job Queue and Print Spool” on page 66.<br />
1. Select Job Queue.<br />
2. Select Open.<br />
NOTE<br />
The Hold box is automatically checked for *.ijp, *.a01, and *.mpc files<br />
when they are opened. The settings can be adjusted before they start<br />
printing (automatic spooling mode). The Hold box is unchecked for jobs<br />
added through the hot folder. *.ticket files have the same Hold setting<br />
from when the ticket was saved.<br />
3. Select a job file. Job file names can have these extensions:<br />
• *.ticket—This type of file stores all of the setup data for a job.<br />
Almost all data set in a setup tab (Job Queue screen), is saved in<br />
a *.ticket file when you select the Save button.<br />
• *.ijp or *.a01—IJPDS (Inkjet Printer Data Stream) job file<br />
• *.mpc—MPC (multiple printer controller) job file<br />
4. Select Open. The selected job is put at the bottom of the queue.<br />
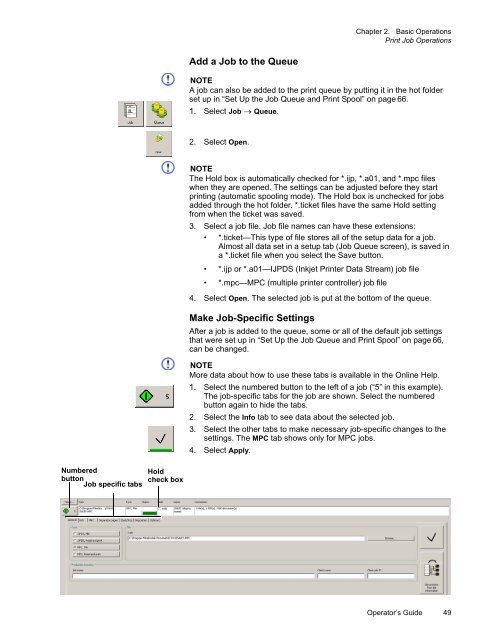
Make Job-Specific Settings<br />
After a job is added to the queue, some or all of the default job settings<br />
that were set up in “Set Up the Job Queue and Print Spool” on page 66,<br />
can be changed.<br />
NOTE<br />
More data about how to use these tabs is available in the Online Help.<br />
1. Select the numbered button to the left of a job (“5” in this example).<br />
The job-specific tabs for the job are shown. Select the numbered<br />
button again to hide the tabs.<br />
2. Select the Info tab to see data about the selected job.<br />
3. Select the other tabs to make necessary job-specific changes to the<br />
settings. The MPC tab shows only for MPC jobs.<br />
4. Select Apply.<br />
Numbered<br />
button Job specific tabs<br />
Hold<br />
check box<br />
Operator’s Guide 49


