

Versamark CS410 - Kodak
Versamark CS410 - Kodak
Versamark CS410 - Kodak

Create successful ePaper yourself
Turn your PDF publications into a flip-book with our unique Google optimized e-Paper software.
Chapter 3. Advanced Operations<br />
Identify Print Stations and Jetting Modules<br />
Figure 6 shows a setup for printing both an end page and a start page<br />
with the text of “End of job. ----- ---- ----- ----- ---- ----Start of job.” at the<br />
top of each page, measuring 8.96 in. (the jetting module width) by<br />
0.25 in. Up to 16 additional lines can be printed.<br />
d. Select Apply.<br />
e. Do step c and step d again for all other types of necessary<br />
separation page(s).<br />
f. Select Job Options.<br />
g. Select each logical printer that will print the separator pages.<br />
h. Select Apply.<br />
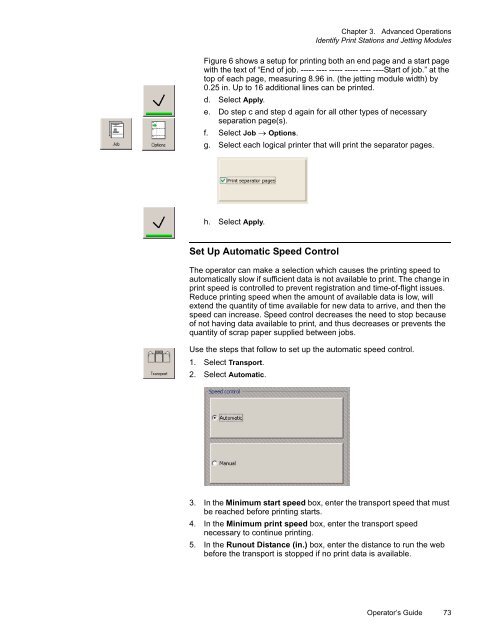
Set Up Automatic Speed Control<br />
The operator can make a selection which causes the printing speed to<br />
automatically slow if sufficient data is not available to print. The change in<br />
print speed is controlled to prevent registration and time-of-flight issues.<br />
Reduce printing speed when the amount of available data is low, will<br />
extend the quantity of time available for new data to arrive, and then the<br />
speed can increase. Speed control decreases the need to stop because<br />
of not having data available to print, and thus decreases or prevents the<br />
quantity of scrap paper supplied between jobs.<br />
Use the steps that follow to set up the automatic speed control.<br />
1. Select Transport.<br />
2. Select Automatic.<br />
3. In the Minimum start speed box, enter the transport speed that must<br />
be reached before printing starts.<br />
4. In the Minimum print speed box, enter the transport speed<br />
necessary to continue printing.<br />
5. In the Runout Distance (in.) box, enter the distance to run the web<br />
before the transport is stopped if no print data is available.<br />
Operator’s Guide 73


