Online Edition for Part no. 01 41 2 604 027 - © 03/10 BMW AG
Online Edition for Part no. 01 41 2 604 027 - © 03/10 BMW AG
Online Edition for Part no. 01 41 2 604 027 - © 03/10 BMW AG

You also want an ePaper? Increase the reach of your titles
YUMPU automatically turns print PDFs into web optimized ePapers that Google loves.
appears on the Control Display. Please check<br />
whether the safety belt is correctly fastened.<br />
The safety belt reminder is operative at speeds<br />
above approx. 5 mph/8 km/h. It can also be activated<br />
if objects are placed on the passenger<br />
seat.<br />
Releasing<br />
1. Grasp the belt firmly.<br />
2. Press the red button in the buckle.<br />
3. Guide the belt into its reel.<br />
The shoulder strap's anchorage point will be<br />
correct <strong>for</strong> adult seat occupants of every build if<br />
the seat is correctly adjusted, refer to page 43.<br />
<strong>BMW</strong> X5: the two rear safety belt buckles integrated<br />
into the rear seat are <strong>for</strong> passengers sitting<br />
on the left and right. The belt buckle<br />
embossed with the word CENTER is intended<br />
exclusively <strong>for</strong> use by passengers riding in the<br />
center position.<br />
Damage to safety belts<br />
In the event of loads caused by accidents<br />
or other damage: replace the belt system<br />
including the safety belt tensioners and any<br />
child restraint devices, and have the belt anchor<br />
points checked. Only have this work carried out<br />
at a <strong>BMW</strong> Sports Activity Vehicle Center or at a<br />
workshop that works according to <strong>BMW</strong> repair<br />
procedures with correspondingly trained personnel.<br />
Otherwise correct operation of this<br />
safety equipment is <strong>no</strong>t guaranteed.<<br />
Belt-<strong>for</strong>ce limiter<br />
The effect of the belt-<strong>for</strong>ce limiter on the<br />
driver's seat is dependent on the position of the<br />
driver's seat.<br />
To maintain the long-term accuracy of this<br />
function, the driver's seat must be calibrated if a<br />
corresponding message is displayed on the<br />
Control Display.<br />
Calibrating driver's seat<br />
The warning lamp lights up. A message<br />
also appears on the Control Display.<br />
Please calibrate the driver's seat.<br />
1. Move the driver's seat <strong>for</strong>ward until it stops.<br />
2. Move the driver's seat <strong>for</strong>ward again. It<br />
briefly moves toward the front in the process.<br />
3. Set the desired seating position again.<br />
The calibration is completed when the message<br />
on the Control Display disappears. Should this<br />
message continue to be displayed, repeat the<br />
calibration. If the message does <strong>no</strong>t disappear<br />
even after repeated calibration, have the system<br />
checked as soon as possible.<br />
Never carry out calibration while the vehicle<br />
is moving, as this can cause accidents.<br />
Make sure that <strong>no</strong> persons or objects become<br />
wedged during the calibration process, as this<br />
can cause injuries or damage.<<br />
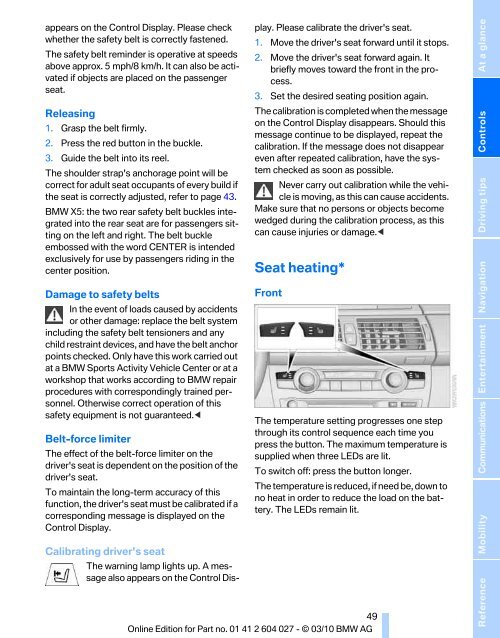
Seat heating*<br />
Front<br />
The temperature setting progresses one step<br />
through its control sequence each time you<br />
press the button. The maximum temperature is<br />
supplied when three LEDs are lit.<br />
To switch off: press the button longer.<br />
The temperature is reduced, if need be, down to<br />
<strong>no</strong> heat in order to reduce the load on the battery.<br />
The LEDs remain lit.<br />
49<br />
Reference Mobility<br />
Communications Entertainment Navigation Driving tips Controls<br />
At a glance