FortiGate IPSec VPN User Guide - FirewallShop.com
FortiGate IPSec VPN User Guide - FirewallShop.com
FortiGate IPSec VPN User Guide - FirewallShop.com
You also want an ePaper? Increase the reach of your titles
YUMPU automatically turns print PDFs into web optimized ePapers that Google loves.
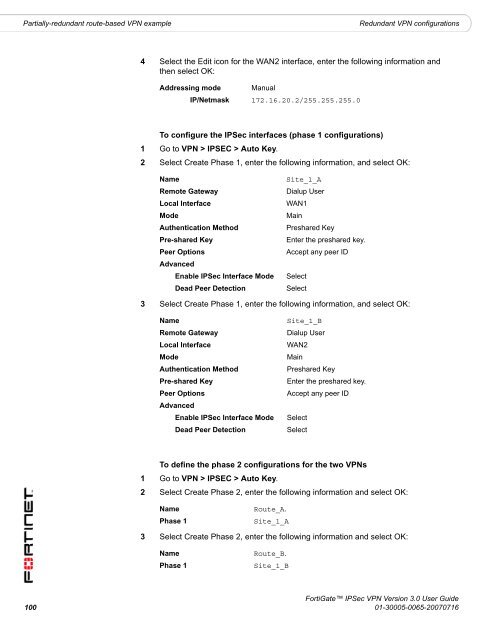
Partially-redundant route-based <strong>VPN</strong> example<br />
Redundant <strong>VPN</strong> configurations<br />
4 Select the Edit icon for the WAN2 interface, enter the following information and<br />
then select OK:<br />
Addressing mode Manual<br />
IP/Netmask 172.16.20.2/255.255.255.0<br />
To configure the <strong>IPSec</strong> interfaces (phase 1 configurations)<br />
1 Go to <strong>VPN</strong> > IPSEC > Auto Key.<br />
2 Select Create Phase 1, enter the following information, and select OK:<br />
Name<br />
Remote Gateway<br />
Local Interface<br />
Mode<br />
Authentication Method<br />
Pre-shared Key<br />
Peer Options<br />
Advanced<br />
Enable <strong>IPSec</strong> Interface Mode<br />
Dead Peer Detection<br />
Site_1_A<br />
Dialup <strong>User</strong><br />
WAN1<br />
Main<br />
Preshared Key<br />
Enter the preshared key.<br />
Accept any peer ID<br />
Select<br />
Select<br />
3 Select Create Phase 1, enter the following information, and select OK:<br />
Name<br />
Remote Gateway<br />
Local Interface<br />
Mode<br />
Authentication Method<br />
Pre-shared Key<br />
Peer Options<br />
Advanced<br />
Enable <strong>IPSec</strong> Interface Mode<br />
Dead Peer Detection<br />
Site_1_B<br />
Dialup <strong>User</strong><br />
WAN2<br />
Main<br />
Preshared Key<br />
Enter the preshared key.<br />
Accept any peer ID<br />
Select<br />
Select<br />
To define the phase 2 configurations for the two <strong>VPN</strong>s<br />
1 Go to <strong>VPN</strong> > IPSEC > Auto Key.<br />
2 Select Create Phase 2, enter the following information and select OK:<br />
Name<br />
Phase 1<br />
Route_A.<br />
Site_1_A<br />
3 Select Create Phase 2, enter the following information and select OK:<br />
Name<br />
Phase 1<br />
Route_B.<br />
Site_1_B<br />
<strong>FortiGate</strong> <strong>IPSec</strong> <strong>VPN</strong> Version 3.0 <strong>User</strong> <strong>Guide</strong><br />
100 01-30005-0065-20070716


