FortiGate IPSec VPN User Guide - FirewallShop.com
FortiGate IPSec VPN User Guide - FirewallShop.com
FortiGate IPSec VPN User Guide - FirewallShop.com

Create successful ePaper yourself
Turn your PDF publications into a flip-book with our unique Google optimized e-Paper software.
FortiClient dialup-client configurations<br />
FortiClient dialup-client configuration example<br />
• Create an <strong>IPSec</strong> firewall policy to control the permitted services and permitted<br />
direction of traffic between the IP source address and the dialup clients. A<br />
single policy controls both inbound and outbound IP traffic through the <strong>VPN</strong><br />
tunnel. See “Define the <strong>IPSec</strong> firewall policy” on page 68.<br />
• Configure the <strong>FortiGate</strong> unit to relay DHCP requests from dialup clients to the<br />
DHCP server. See “Configure <strong>FortiGate</strong>_1 to assign VIPs” on page 69.<br />
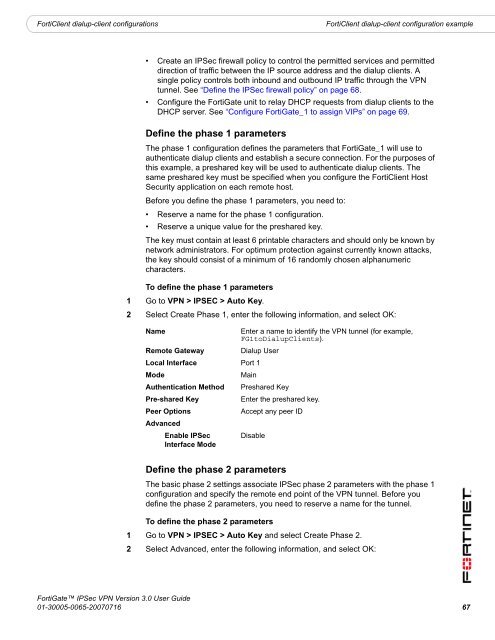
Define the phase 1 parameters<br />
The phase 1 configuration defines the parameters that <strong>FortiGate</strong>_1 will use to<br />
authenticate dialup clients and establish a secure connection. For the purposes of<br />
this example, a preshared key will be used to authenticate dialup clients. The<br />
same preshared key must be specified when you configure the FortiClient Host<br />
Security application on each remote host.<br />
Before you define the phase 1 parameters, you need to:<br />
• Reserve a name for the phase 1 configuration.<br />
• Reserve a unique value for the preshared key.<br />
The key must contain at least 6 printable characters and should only be known by<br />
network administrators. For optimum protection against currently known attacks,<br />
the key should consist of a minimum of 16 randomly chosen alphanumeric<br />
characters.<br />
To define the phase 1 parameters<br />
1 Go to <strong>VPN</strong> > IPSEC > Auto Key.<br />
2 Select Create Phase 1, enter the following information, and select OK:<br />
Name<br />
Enter a name to identify the <strong>VPN</strong> tunnel (for example,<br />
FG1toDialupClients).<br />
Remote Gateway<br />
Dialup <strong>User</strong><br />
Local Interface Port 1<br />
Mode<br />
Main<br />
Authentication Method Preshared Key<br />
Pre-shared Key<br />
Enter the preshared key.<br />
Peer Options<br />
Accept any peer ID<br />
Advanced<br />
Enable <strong>IPSec</strong> Disable<br />
Interface Mode<br />
Define the phase 2 parameters<br />
The basic phase 2 settings associate <strong>IPSec</strong> phase 2 parameters with the phase 1<br />
configuration and specify the remote end point of the <strong>VPN</strong> tunnel. Before you<br />
define the phase 2 parameters, you need to reserve a name for the tunnel.<br />
To define the phase 2 parameters<br />
1 Go to <strong>VPN</strong> > IPSEC > Auto Key and select Create Phase 2.<br />
2 Select Advanced, enter the following information, and select OK:<br />
<strong>FortiGate</strong> <strong>IPSec</strong> <strong>VPN</strong> Version 3.0 <strong>User</strong> <strong>Guide</strong><br />
01-30005-0065-20070716 67