FortiGate IPSec VPN User Guide - FirewallShop.com
FortiGate IPSec VPN User Guide - FirewallShop.com
FortiGate IPSec VPN User Guide - FirewallShop.com

You also want an ePaper? Increase the reach of your titles
YUMPU automatically turns print PDFs into web optimized ePapers that Google loves.
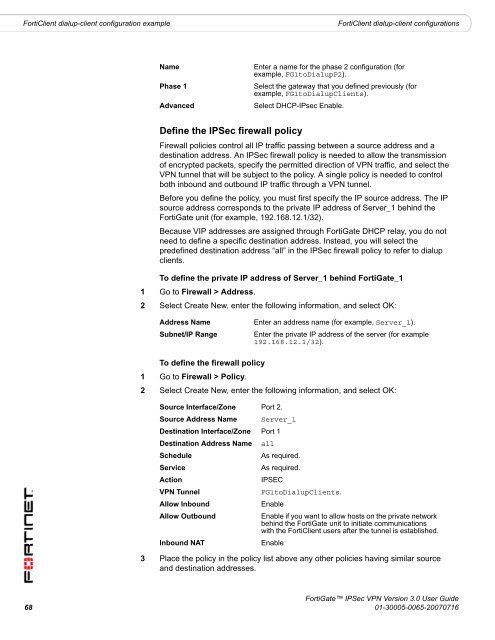
FortiClient dialup-client configuration example<br />
FortiClient dialup-client configurations<br />
Name<br />
Phase 1<br />
Advanced<br />
Enter a name for the phase 2 configuration (for<br />
example, FG1toDialupP2).<br />
Select the gateway that you defined previously (for<br />
example, FG1toDialupClients).<br />
Select DHCP-IPsec Enable.<br />
Define the <strong>IPSec</strong> firewall policy<br />
Firewall policies control all IP traffic passing between a source address and a<br />
destination address. An <strong>IPSec</strong> firewall policy is needed to allow the transmission<br />
of encrypted packets, specify the permitted direction of <strong>VPN</strong> traffic, and select the<br />
<strong>VPN</strong> tunnel that will be subject to the policy. A single policy is needed to control<br />
both inbound and outbound IP traffic through a <strong>VPN</strong> tunnel.<br />
Before you define the policy, you must first specify the IP source address. The IP<br />
source address corresponds to the private IP address of Server_1 behind the<br />
<strong>FortiGate</strong> unit (for example, 192.168.12.1/32).<br />
Because VIP addresses are assigned through <strong>FortiGate</strong> DHCP relay, you do not<br />
need to define a specific destination address. Instead, you will select the<br />
predefined destination address “all” in the <strong>IPSec</strong> firewall policy to refer to dialup<br />
clients.<br />
To define the private IP address of Server_1 behind <strong>FortiGate</strong>_1<br />
1 Go to Firewall > Address.<br />
2 Select Create New, enter the following information, and select OK:<br />
Address Name<br />
Subnet/IP Range<br />
Enter an address name (for example, Server_1).<br />
Enter the private IP address of the server (for example<br />
192.168.12.1/32).<br />
To define the firewall policy<br />
1 Go to Firewall > Policy.<br />
2 Select Create New, enter the following information, and select OK:<br />
Source Interface/Zone Port 2.<br />
Source Address Name Server_1<br />
Destination Interface/Zone Port 1<br />
Destination Address Name all<br />
Schedule<br />
As required.<br />
Service<br />
As required.<br />
Action<br />
IPSEC<br />
<strong>VPN</strong> Tunnel<br />
FG1toDialupClients.<br />
Allow Inbound<br />
Enable<br />
Allow Outbound<br />
Enable if you want to allow hosts on the private network<br />
behind the <strong>FortiGate</strong> unit to initiate <strong>com</strong>munications<br />
with the FortiClient users after the tunnel is established.<br />
Inbound NAT<br />
Enable<br />
3 Place the policy in the policy list above any other policies having similar source<br />
and destination addresses.<br />
<strong>FortiGate</strong> <strong>IPSec</strong> <strong>VPN</strong> Version 3.0 <strong>User</strong> <strong>Guide</strong><br />
68 01-30005-0065-20070716