FortiGate IPSec VPN User Guide - FirewallShop.com
FortiGate IPSec VPN User Guide - FirewallShop.com
FortiGate IPSec VPN User Guide - FirewallShop.com
You also want an ePaper? Increase the reach of your titles
YUMPU automatically turns print PDFs into web optimized ePapers that Google loves.
Gateway-to-gateway configurations<br />
How to work with overlapping subnets<br />
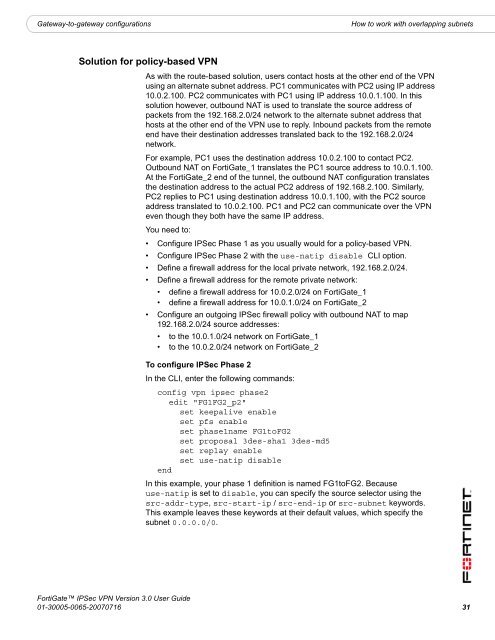
Solution for policy-based <strong>VPN</strong><br />
As with the route-based solution, users contact hosts at the other end of the <strong>VPN</strong><br />
using an alternate subnet address. PC1 <strong>com</strong>municates with PC2 using IP address<br />
10.0.2.100. PC2 <strong>com</strong>municates with PC1 using IP address 10.0.1.100. In this<br />
solution however, outbound NAT is used to translate the source address of<br />
packets from the 192.168.2.0/24 network to the alternate subnet address that<br />
hosts at the other end of the <strong>VPN</strong> use to reply. Inbound packets from the remote<br />
end have their destination addresses translated back to the 192.168.2.0/24<br />
network.<br />
For example, PC1 uses the destination address 10.0.2.100 to contact PC2.<br />
Outbound NAT on <strong>FortiGate</strong>_1 translates the PC1 source address to 10.0.1.100.<br />
At the <strong>FortiGate</strong>_2 end of the tunnel, the outbound NAT configuration translates<br />
the destination address to the actual PC2 address of 192.168.2.100. Similarly,<br />
PC2 replies to PC1 using destination address 10.0.1.100, with the PC2 source<br />
address translated to 10.0.2.100. PC1 and PC2 can <strong>com</strong>municate over the <strong>VPN</strong><br />
even though they both have the same IP address.<br />
You need to:<br />
• Configure <strong>IPSec</strong> Phase 1 as you usually would for a policy-based <strong>VPN</strong>.<br />
• Configure <strong>IPSec</strong> Phase 2 with the use-natip disable CLI option.<br />
• Define a firewall address for the local private network, 192.168.2.0/24.<br />
• Define a firewall address for the remote private network:<br />
• define a firewall address for 10.0.2.0/24 on <strong>FortiGate</strong>_1<br />
• define a firewall address for 10.0.1.0/24 on <strong>FortiGate</strong>_2<br />
• Configure an outgoing <strong>IPSec</strong> firewall policy with outbound NAT to map<br />
192.168.2.0/24 source addresses:<br />
• to the 10.0.1.0/24 network on <strong>FortiGate</strong>_1<br />
• to the 10.0.2.0/24 network on <strong>FortiGate</strong>_2<br />
To configure <strong>IPSec</strong> Phase 2<br />
In the CLI, enter the following <strong>com</strong>mands:<br />
config vpn ipsec phase2<br />
edit "FG1FG2_p2"<br />
set keepalive enable<br />
set pfs enable<br />
set phase1name FG1toFG2<br />
set proposal 3des-sha1 3des-md5<br />
set replay enable<br />
set use-natip disable<br />
end<br />
In this example, your phase 1 definition is named FG1toFG2. Because<br />
use-natip is set to disable, you can specify the source selector using the<br />
src-addr-type, src-start-ip / src-end-ip or src-subnet keywords.<br />
This example leaves these keywords at their default values, which specify the<br />
subnet 0.0.0.0/0.<br />
<strong>FortiGate</strong> <strong>IPSec</strong> <strong>VPN</strong> Version 3.0 <strong>User</strong> <strong>Guide</strong><br />
01-30005-0065-20070716 31


