FortiGate IPSec VPN User Guide - FirewallShop.com
FortiGate IPSec VPN User Guide - FirewallShop.com
FortiGate IPSec VPN User Guide - FirewallShop.com

Create successful ePaper yourself
Turn your PDF publications into a flip-book with our unique Google optimized e-Paper software.
Gateway-to-gateway configurations<br />
How to work with overlapping subnets<br />
How to work with overlapping subnets<br />
A site-to-site <strong>VPN</strong> configuration sometimes has the problem that the private<br />
subnet addresses at each end are the same. You can resolve this problem by<br />
remapping the private addresses using virtual IP addresses (VIP).<br />
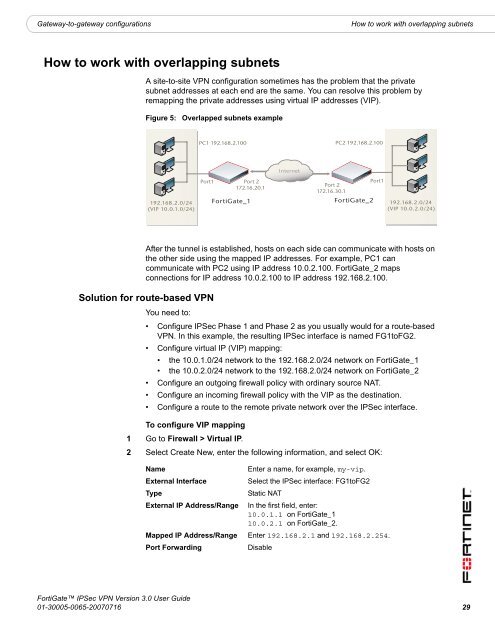
Figure 5:<br />
Overlapped subnets example<br />
PC1 192.168.2.100 PC2 192.168.2.100<br />
Internet<br />
192.168.2.0/24<br />
(VIP 10.0.1.0/24)<br />
Port1<br />
Port 2<br />
172.16.20.1<br />
<strong>FortiGate</strong>_1<br />
Port 2<br />
172.16.30.1<br />
<strong>FortiGate</strong>_2<br />
Port1<br />
192.168.2.0/24<br />
(VIP 10.0.2.0/24)<br />
After the tunnel is established, hosts on each side can <strong>com</strong>municate with hosts on<br />
the other side using the mapped IP addresses. For example, PC1 can<br />
<strong>com</strong>municate with PC2 using IP address 10.0.2.100. <strong>FortiGate</strong>_2 maps<br />
connections for IP address 10.0.2.100 to IP address 192.168.2.100.<br />
Solution for route-based <strong>VPN</strong><br />
You need to:<br />
• Configure <strong>IPSec</strong> Phase 1 and Phase 2 as you usually would for a route-based<br />
<strong>VPN</strong>. In this example, the resulting <strong>IPSec</strong> interface is named FG1toFG2.<br />
• Configure virtual IP (VIP) mapping:<br />
• the 10.0.1.0/24 network to the 192.168.2.0/24 network on <strong>FortiGate</strong>_1<br />
• the 10.0.2.0/24 network to the 192.168.2.0/24 network on <strong>FortiGate</strong>_2<br />
• Configure an outgoing firewall policy with ordinary source NAT.<br />
• Configure an in<strong>com</strong>ing firewall policy with the VIP as the destination.<br />
• Configure a route to the remote private network over the <strong>IPSec</strong> interface.<br />
To configure VIP mapping<br />
1 Go to Firewall > Virtual IP.<br />
2 Select Create New, enter the following information, and select OK:<br />
Name<br />
External Interface<br />
Type<br />
External IP Address/Range<br />
Enter a name, for example, my-vip.<br />
Select the <strong>IPSec</strong> interface: FG1toFG2<br />
Static NAT<br />
In the first field, enter:<br />
10.0.1.1 on <strong>FortiGate</strong>_1<br />
10.0.2.1 on <strong>FortiGate</strong>_2.<br />
Mapped IP Address/Range Enter 192.168.2.1 and 192.168.2.254.<br />
Port Forwarding<br />
Disable<br />
<strong>FortiGate</strong> <strong>IPSec</strong> <strong>VPN</strong> Version 3.0 <strong>User</strong> <strong>Guide</strong><br />
01-30005-0065-20070716 29