FortiGate IPSec VPN User Guide - FirewallShop.com
FortiGate IPSec VPN User Guide - FirewallShop.com
FortiGate IPSec VPN User Guide - FirewallShop.com
You also want an ePaper? Increase the reach of your titles
YUMPU automatically turns print PDFs into web optimized ePapers that Google loves.
Auto Key phase 1 parameters<br />
Authenticating remote peers and clients<br />
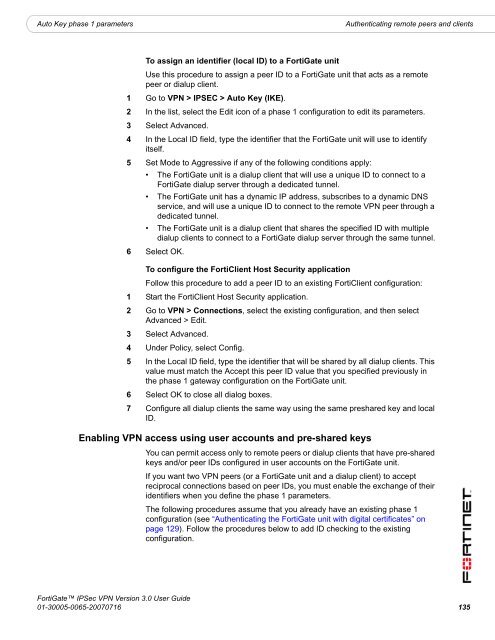
To assign an identifier (local ID) to a <strong>FortiGate</strong> unit<br />
Use this procedure to assign a peer ID to a <strong>FortiGate</strong> unit that acts as a remote<br />
peer or dialup client.<br />
1 Go to <strong>VPN</strong> > IPSEC > Auto Key (IKE).<br />
2 In the list, select the Edit icon of a phase 1 configuration to edit its parameters.<br />
3 Select Advanced.<br />
4 In the Local ID field, type the identifier that the <strong>FortiGate</strong> unit will use to identify<br />
itself.<br />
5 Set Mode to Aggressive if any of the following conditions apply:<br />
• The <strong>FortiGate</strong> unit is a dialup client that will use a unique ID to connect to a<br />
<strong>FortiGate</strong> dialup server through a dedicated tunnel.<br />
• The <strong>FortiGate</strong> unit has a dynamic IP address, subscribes to a dynamic DNS<br />
service, and will use a unique ID to connect to the remote <strong>VPN</strong> peer through a<br />
dedicated tunnel.<br />
• The <strong>FortiGate</strong> unit is a dialup client that shares the specified ID with multiple<br />
dialup clients to connect to a <strong>FortiGate</strong> dialup server through the same tunnel.<br />
6 Select OK.<br />
To configure the FortiClient Host Security application<br />
Follow this procedure to add a peer ID to an existing FortiClient configuration:<br />
1 Start the FortiClient Host Security application.<br />
2 Go to <strong>VPN</strong> > Connections, select the existing configuration, and then select<br />
Advanced > Edit.<br />
3 Select Advanced.<br />
4 Under Policy, select Config.<br />
5 In the Local ID field, type the identifier that will be shared by all dialup clients. This<br />
value must match the Accept this peer ID value that you specified previously in<br />
the phase 1 gateway configuration on the <strong>FortiGate</strong> unit.<br />
6 Select OK to close all dialog boxes.<br />
7 Configure all dialup clients the same way using the same preshared key and local<br />
ID.<br />
Enabling <strong>VPN</strong> access using user accounts and pre-shared keys<br />
You can permit access only to remote peers or dialup clients that have pre-shared<br />
keys and/or peer IDs configured in user accounts on the <strong>FortiGate</strong> unit.<br />
If you want two <strong>VPN</strong> peers (or a <strong>FortiGate</strong> unit and a dialup client) to accept<br />
reciprocal connections based on peer IDs, you must enable the exchange of their<br />
identifiers when you define the phase 1 parameters.<br />
The following procedures assume that you already have an existing phase 1<br />
configuration (see “Authenticating the <strong>FortiGate</strong> unit with digital certificates” on<br />
page 129). Follow the procedures below to add ID checking to the existing<br />
configuration.<br />
<strong>FortiGate</strong> <strong>IPSec</strong> <strong>VPN</strong> Version 3.0 <strong>User</strong> <strong>Guide</strong><br />
01-30005-0065-20070716 135


