FortiGate IPSec VPN User Guide - FirewallShop.com
FortiGate IPSec VPN User Guide - FirewallShop.com
FortiGate IPSec VPN User Guide - FirewallShop.com
Create successful ePaper yourself
Turn your PDF publications into a flip-book with our unique Google optimized e-Paper software.
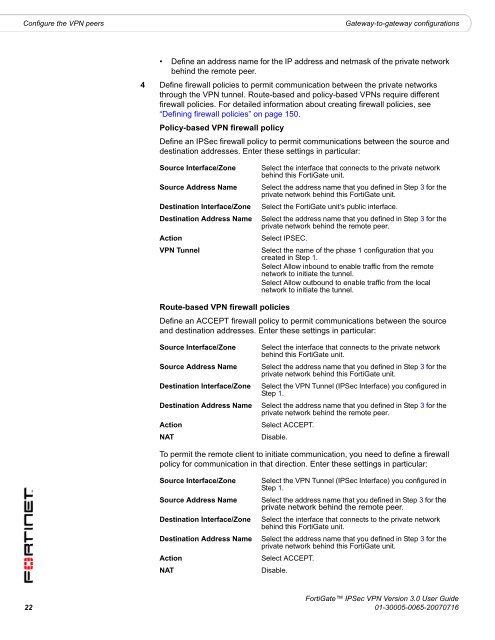
Configure the <strong>VPN</strong> peers<br />
Gateway-to-gateway configurations<br />
• Define an address name for the IP address and netmask of the private network<br />
behind the remote peer.<br />
4 Define firewall policies to permit <strong>com</strong>munication between the private networks<br />
through the <strong>VPN</strong> tunnel. Route-based and policy-based <strong>VPN</strong>s require different<br />
firewall policies. For detailed information about creating firewall policies, see<br />
“Defining firewall policies” on page 150.<br />
Policy-based <strong>VPN</strong> firewall policy<br />
Define an <strong>IPSec</strong> firewall policy to permit <strong>com</strong>munications between the source and<br />
destination addresses. Enter these settings in particular:<br />
Source Interface/Zone<br />
Source Address Name<br />
Destination Interface/Zone<br />
Destination Address Name<br />
Action<br />
<strong>VPN</strong> Tunnel<br />
Select the interface that connects to the private network<br />
behind this <strong>FortiGate</strong> unit.<br />
Select the address name that you defined in Step 3 for the<br />
private network behind this <strong>FortiGate</strong> unit.<br />
Select the <strong>FortiGate</strong> unit’s public interface.<br />
Select the address name that you defined in Step 3 for the<br />
private network behind the remote peer.<br />
Select IPSEC.<br />
Select the name of the phase 1 configuration that you<br />
created in Step 1.<br />
Select Allow inbound to enable traffic from the remote<br />
network to initiate the tunnel.<br />
Select Allow outbound to enable traffic from the local<br />
network to initiate the tunnel.<br />
Route-based <strong>VPN</strong> firewall policies<br />
Define an ACCEPT firewall policy to permit <strong>com</strong>munications between the source<br />
and destination addresses. Enter these settings in particular:<br />
Source Interface/Zone<br />
Source Address Name<br />
Destination Interface/Zone<br />
Destination Address Name<br />
Action<br />
NAT<br />
Select the interface that connects to the private network<br />
behind this <strong>FortiGate</strong> unit.<br />
Select the address name that you defined in Step 3 for the<br />
private network behind this <strong>FortiGate</strong> unit.<br />
Select the <strong>VPN</strong> Tunnel (<strong>IPSec</strong> Interface) you configured in<br />
Step 1.<br />
Select the address name that you defined in Step 3 for the<br />
private network behind the remote peer.<br />
Select ACCEPT.<br />
Disable.<br />
To permit the remote client to initiate <strong>com</strong>munication, you need to define a firewall<br />
policy for <strong>com</strong>munication in that direction. Enter these settings in particular:<br />
Source Interface/Zone<br />
Source Address Name<br />
Destination Interface/Zone<br />
Destination Address Name<br />
Action<br />
NAT<br />
Select the <strong>VPN</strong> Tunnel (<strong>IPSec</strong> Interface) you configured in<br />
Step 1.<br />
Select the address name that you defined in Step 3 for the<br />
private network behind the remote peer.<br />
Select the interface that connects to the private network<br />
behind this <strong>FortiGate</strong> unit.<br />
Select the address name that you defined in Step 3 for the<br />
private network behind this <strong>FortiGate</strong> unit.<br />
Select ACCEPT.<br />
Disable.<br />
<strong>FortiGate</strong> <strong>IPSec</strong> <strong>VPN</strong> Version 3.0 <strong>User</strong> <strong>Guide</strong><br />
22 01-30005-0065-20070716


