DevKit8500D/A User Manual - DMCS Pages for Students
DevKit8500D/A User Manual - DMCS Pages for Students
DevKit8500D/A User Manual - DMCS Pages for Students

Create successful ePaper yourself
Turn your PDF publications into a flip-book with our unique Google optimized e-Paper software.
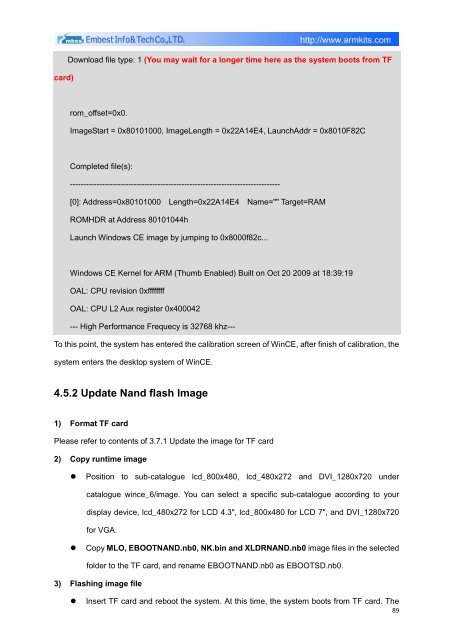
card)<br />
Download file type: 1 (You may wait <strong>for</strong> a longer time here as the system boots from TF<br />
rom_offset=0x0.<br />
ImageStart = 0x80101000, ImageLength = 0x22A14E4, LaunchAddr = 0x8010F82C<br />
Completed file(s):<br />
-------------------------------------------------------------------------------<br />
[0]: Address=0x80101000 Length=0x22A14E4 Name="" Target=RAM<br />
ROMHDR at Address 80101044h<br />
Launch Windows CE image by jumping to 0x8000f82c...<br />
Windows CE Kernel <strong>for</strong> ARM (Thumb Enabled) Built on Oct 20 2009 at 18:39:19<br />
OAL: CPU revision 0xffffffff<br />
OAL: CPU L2 Aux register 0x400042<br />
--- High Per<strong>for</strong>mance Frequecy is 32768 khz---<br />
To this point, the system has entered the calibration screen of WinCE, after finish of calibration, the<br />
system enters the desktop system of WinCE.<br />
4.5.2 Update Nand flash Image<br />
1) Format TF card<br />
Please refer to contents of 3.7.1 Update the image <strong>for</strong> TF card<br />
2) Copy runtime image<br />
• Position to sub-catalogue lcd_800x480, lcd_480x272 and DVI_1280x720 under<br />
catalogue wince_6/image. You can select a specific sub-catalogue according to your<br />
display device, lcd_480x272 <strong>for</strong> LCD 4.3", lcd_800x480 <strong>for</strong> LCD 7", and DVI_1280x720<br />
<strong>for</strong> VGA.<br />
• Copy MLO, EBOOTNAND.nb0, NK.bin and XLDRNAND.nb0 image files in the selected<br />
folder to the TF card, and rename EBOOTNAND.nb0 as EBOOTSD.nb0.<br />
3) Flashing image file<br />
• Insert TF card and reboot the system. At this time, the system boots from TF card. The<br />
89