Télécharger PDF - Paul Forrer AG
Télécharger PDF - Paul Forrer AG
Télécharger PDF - Paul Forrer AG
- No tags were found...

You also want an ePaper? Increase the reach of your titles
YUMPU automatically turns print PDFs into web optimized ePapers that Google loves.
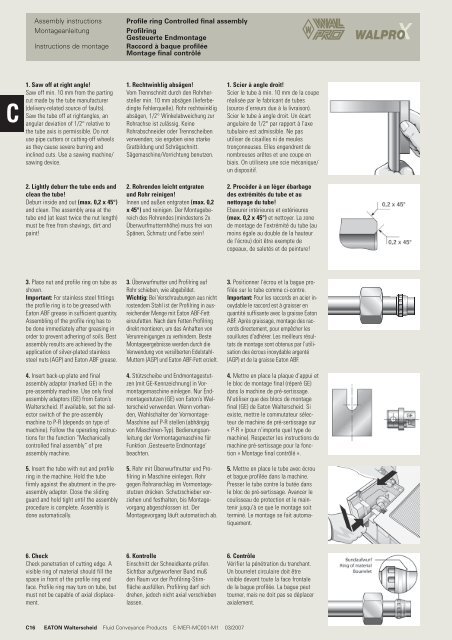
Assembly instructionsMontageanleitungInstructions de montageProfile ring Controlled final assemblyProfilringGesteuerte EndmontageRaccord à baque profiléeMontage final contrôléC1. Saw off at right angle!Saw off min. 10 mm from the partingcut made by the tube manufacturer(delivery-related source of faults).Saw the tube off at rightangles, anangular deviation of 1/2° relative tothe tube axis is permissible. Do notuse pipe cutters or cutting-off wheelsas they cause severe burring andinclined cuts. Use a sawing machine/sawing device.1. Rechtwinklig absägen!Vom Trennschnitt durch den Rohrherstellermin. 10 mm absägen (lieferbedingteFehlerquelle). Rohr rechtwinkligabsägen, 1/2° Winkelabweichung zurRohrachse ist zulässig. KeineRohrabschneider oder Trennscheibenverwenden; sie ergeben eine starkeGratbildung und Schrägschnitt.Sägemaschine/Vorrichtung benutzen.1. Scier à angle droit!Scier le tube à min. 10 mm de la couperéalisée par le fabricant de tubes(source d’erreurs due à la livraison).Scier le tube à angle droit. Un écartangulaire de 1/2° par rapport à l'axetubulaire est admissible. Ne pasutiliser de cisailles ni de meulestronçonneuses. Elles engendrent denombreuses arêtes et une coupe enbiais. On utilisera une scie mécanique/un dispositif.2. Lightly deburr the tube ends andclean the tube!Deburr inside and out (max. 0,2 x 45°)and clean. The assembly area at thetube end (at least twice the nut length)must be free from shavings, dirt andpaint!2. Rohrenden leicht entgratenund Rohr reinigen!Innen und außen entgraten (max. 0,2x 45°) und reinigen. Der Montagebereichdes Rohrendes (mindestens 2xÜberwurfmutternhöhe) muss frei vonSpänen, Schmutz und Farbe sein!2. Procéder à un léger ébarbagedes extrémités du tube et aunettoyage du tube!Ebavurer intérieures et extérieures(max. 0,2 x 45°) et nettoyer. La zonede montage de l’extrémité du tube (aumoins égale au double de la hauteurde l’écrou) doit être exempte decopeaux, de saletés et de peinture!3. Place nut and profile ring on tube asshown.Important: For stainless steel fittingsthe profile ring is to be greased withEaton ABF grease in sufficient quantity.Assembling of the profile ring has tobe done immediately after greasing inorder to prevent adhering of soils. Bestassembly results are achieved by theapplication of silver-plated stainlesssteel nuts (<strong>AG</strong>P) and Eaton ABF grease.3. Überwurfmutter und Profilring aufRohr schieben, wie abgebildet.Wichtig: Bei Verschraubungen aus nichtrostendem Stahl ist der Profilring in ausreichenderMenge mit Eaton ABF-Fetteinzufetten. Nach dem Fetten Profilringdirekt montieren, um das Anhaften vonVerunreinigungen zu verhindern. BesteMontageergebnisse werden durch dieVerwendung von versilberten Edelstahl-Muttern (<strong>AG</strong>P) und Eaton ABF-Fett erzielt.3. Positionner l'écrou et la bague profiléesur le tube comme ci-contre.Important: Pour les raccords en acier inoxydablele raccord est à graisser enquantité suffisante avec la graisse EatonABF. Après graissage, montage des raccordsdirectement, pour empêcher lessouillures d’adhérer. Les meilleurs résultatsde montage sont obtenus par l’utilisationdes écrous inoxydable argenté(<strong>AG</strong>P) et de la graisse Eaton ABF.4. Insert back-up plate and finalassembly adaptor (marked GE) in thepre-assembly machine. Use only finalassembly adaptors (GE) from Eaton’sWalterscheid. If available, set the selectorswitch of the pre-assemblymachine to P-R (depends on type ofmachine). Follow the operating instructionsfor the function “Mechanicallycontrolled final assembly” of preassembly machine.4. Stützscheibe und Endmontagestutzen(mit GE-Kennzeichnung) in Vormontagemaschineeinlegen. Nur Endmontagestutzen(GE) von Eaton’s Walterscheidverwenden. Wenn vorhanden,Wahlschalter der Vormontage-Maschine auf P-R stellen (abhängigvon Maschinen-Typ). Bedienungsanleitungder Vormontagemaschine fürFunktion ,Gesteuerte Endmontage’beachten.4. Mettre en place la plaque d’appui etle bloc de montage final (réperé GE)dans la machine de pré-sertissage.N‘utiliser que des blocs de montagefinal (GE) de Eaton Walterscheid. Siexiste, mettre le commutateur sélecteurde machine de pré-sertissage sur« P-R » (pour n’importe quel type demachine). Respecter les instructions demachine pré-sertissage pour la fonction« Montage final contrôlé ».5. Insert the tube with nut and profilering in the machine. Hold the tubefirmly against the abutment in the preassemblyadaptor. Close the slidingguard and hold tight until the assemblyprocedure is complete. Assembly isdone automatically.5. Rohr mit Überwurfmutter und Profilringin Maschine einlegen. Rohrgegen Rohranschlag im Vormontagestutzendrücken. Schutzschieber vorziehenund festhalten, bis Montagevorgangabgeschlossen ist. DerMontagevorgang läuft automatisch ab.5. Mettre en place le tube avec écrouet bague profilée dans la machine.Presser le tube contre la butée dansle bloc de pré-sertissage. Avancer lecoulisseau de protection et le maintenirjusqu’à ce que le montage soitterminé. Le montage se fait automatiquement.6. CheckCheck penetration of cutting edge. Avisible ring of material should fill thespace in front of the profile ring endface. Profile ring may turn on tube, butmust not be capable of axial displacement.6. KontrolleEinschnitt der Schneidkante prüfen.Sichtbar aufgeworfener Bund mußden Raum vor der Profilring-Stirnflächeausfüllen. Profilring darf sichdrehen, jedoch nicht axial verschiebenlassen.6. ContrôleVérifier la pénétration du tranchant.Un bourrelet circulaire doit êtrevisible devant toute la face frontalede la bague profilée. La bague peuttourner, mais ne doit pas se déplaceraxialement.C16 EATON Walterscheid Fluid Conveyance Products E-MEFI-MC001-M1 03/2007