- Page 1 and 2:
Walterscheid Tube fitting systems C
- Page 3:
General informationAllgemeine Infor
- Page 6 and 7:
Parts spectrum - Complete overviewT
- Page 8 and 9:
Parts spectrum - Complete overviewT
- Page 11 and 12:
General informationAllgemeine Infor
- Page 13 and 14:
The economical solution to every co
- Page 15 and 16:
ABBOSNWFplusFlare fittingFlare fitt
- Page 17:
Eaton’s Walterscheidproject consu
- Page 22 and 23:
AFunctional characteristicsFunktion
- Page 24 and 25:
AFunctional characteristics Profile
- Page 26 and 27:
AFunctional characteristics Profile
- Page 28 and 29:
AFunctional characteristics Profile
- Page 30 and 31:
AFunctional characteristicsFunktion
- Page 32 and 33:
AFunctional characteristicsFunktion
- Page 34 and 35:
AFunctional characteristicsFunktion
- Page 36 and 37:
AFunctional characteristicsFunktion
- Page 38 and 39:
AFunctional characteristicsFunktion
- Page 40 and 41:
AFunctional characteristicsFunktion
- Page 42 and 43:
AFunctional characteristicsFunktion
- Page 44 and 45:
AFunctional characteristicsFunktion
- Page 46 and 47:
A+-MFunctional characteristicsFunkt
- Page 48 and 49: AFunctional characteristicsFunktion
- Page 50 and 51: AFunctional characteristicsFunktion
- Page 52 and 53: AFunctional characteristicsFunktion
- Page 54 and 55: AFunctional characteristics Flare t
- Page 56 and 57: AFunctional characteristics Flare t
- Page 58 and 59: AFunctional characteristics Flare t
- Page 60 and 61: AFunctional characteristicsFunktion
- Page 62 and 63: AFunctional characteristicsFunktion
- Page 64 and 65: AAccessoriesZubehörAccessoiresABF
- Page 66 and 67: Materials and surfaceWerkstoffe und
- Page 68 and 69: Pressure strength andtemperature re
- Page 70 and 71: Calculated pressures and tolerances
- Page 72 and 73: Studs and port formsEinschraubzapfe
- Page 74 and 75: Stud connection dimensionsRohransch
- Page 76 and 77: Survey of applicable standardsNorme
- Page 78 and 79: Assembly modesMontageartenMéthodes
- Page 80 and 81: Safety NotesSicherheitshinweiseCons
- Page 82 and 83: CTurning-angle-controlled assembly
- Page 84 and 85: Assembly instructionsMontageanleitu
- Page 86 and 87: Assembly instructionsMontageanleitu
- Page 88 and 89: CAssembly instructionsMontageanleit
- Page 90 and 91: Assembly instructionsMontageanleitu
- Page 92 and 93: Assembly instructionsMontageanleitu
- Page 94 and 95: Assembly instructionsMontageanleitu
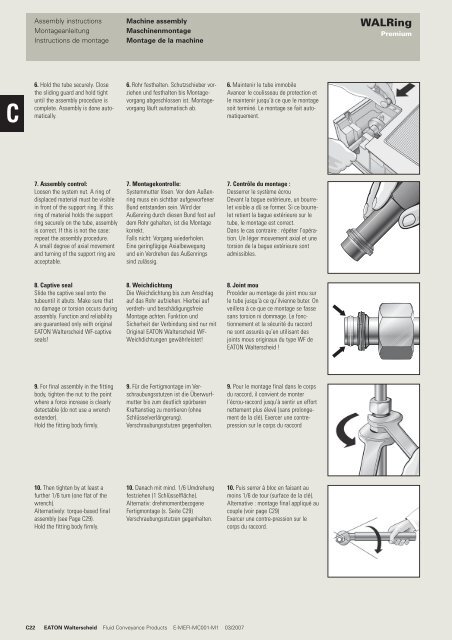
- Page 96 and 97: WALRingCAssembly instructionsMontag
- Page 100 and 101: Assembly instructionsMontageanleitu
- Page 102 and 103: Assembly instructionsMontageanleitu
- Page 104 and 105: Assembly instructionsMontageanleitu
- Page 106 and 107: +CAssembly instructionsMontageanlei
- Page 108 and 109: Assembly instructionsMontageanleitu
- Page 110 and 111: Assembly instructions/TablesMontage
- Page 112 and 113: +CAssembly instructionsMontageanlei
- Page 114 and 115: Assembly instructionsMontageanleitu
- Page 116 and 117: Assembly instructions/TablesMontage
- Page 118 and 119: +-MCAssembly instructionsMontageanl
- Page 120 and 121: Assembly instructionsMontageanleitu
- Page 122 and 123: CAssembly instructionsMontageanleit
- Page 124 and 125: Assembly instructionsMontageanleitu
- Page 126 and 127: Assembly instructions/TablesMontage
- Page 128 and 129: Assembly instructions/TablesMontage
- Page 130 and 131: CAssembly instructionsMontageanleit
- Page 132 and 133: Assembly instructionsMontageanleitu
- Page 134 and 135: Assembly instructions/TablesMontage
- Page 136 and 137: Assembly instructions/TablesMontage
- Page 138 and 139: CAssembly instructionsMontageanleit
- Page 140 and 141: Assembly instructionsMontageanleitu
- Page 142 and 143: Assembly instructionsMontageanleitu
- Page 144 and 145: Instructions for tube bending (6-18
- Page 146 and 147: Instructions for tube bending (Tube
- Page 148 and 149:
Instructions for tube bending (Tube
- Page 150 and 151:
Assembly instructionsMontageanleitu
- Page 152 and 153:
Nuts and rings for profile ring tub
- Page 154 and 155:
Nuts and rings for WALFORM tube fit
- Page 156 and 157:
Connecting parts for flare tube fit
- Page 158 and 159:
Connecting parts for flare tube fit
- Page 160 and 161:
DD10 EATON Walterscheid Fluid Conve
- Page 162 and 163:
Male stud coupling (body only)Gerad
- Page 164 and 165:
Male stud coupling (body only)Gerad
- Page 166 and 167:
Male stud coupling (body only)Gerad
- Page 168 and 169:
Male stud coupling (body only)Gerad
- Page 170 and 171:
Male stud elbow (body only)Winkel-E
- Page 172 and 173:
Straight coupling (body only)Gerade
- Page 174 and 175:
Equal elbow (body only)Winkel-Stutz
- Page 176 and 177:
Reducing Tee (body only)T-Reduziers
- Page 178 and 179:
Bulkhead coupling (body only)Gerade
- Page 180 and 181:
Weldable stud (body only)Anschweiß
- Page 182 and 183:
EE22 EATON Walterscheid Fluid Conve
- Page 184 and 185:
Banjo coupling with one-piece bolt
- Page 186 and 187:
Banjo coupling with one-piece bolt
- Page 188 and 189:
Double banjo coupling with one-piec
- Page 190 and 191:
Double banjo coupling with one-piec
- Page 192 and 193:
Adjustable male stud elbow (body on
- Page 194 and 195:
Adjustable branch Tee (body only)Ei
- Page 196 and 197:
Adjustable male stud run Tee (body
- Page 198 and 199:
Stud standpipe adaptor (body only)G
- Page 200 and 201:
Stud standpipe adaptor (body only)G
- Page 202 and 203:
Stud standpipe adaptor (body only)G
- Page 204 and 205:
Straight couplingGerade-VerbindungU
- Page 206 and 207:
Straight couplingGerade-VerbindungU
- Page 208 and 209:
Swivel banjo (body only)Drehstutzen
- Page 210 and 211:
Swivel banjo coupling (body only)Wi
- Page 212 and 213:
Swivel elbow coupling (body only)Wi
- Page 214 and 215:
Non-return valve (Valve insert)Rüc
- Page 216 and 217:
Non-return valve with male stud (bo
- Page 218 and 219:
Non-return valve with male stud (bo
- Page 220 and 221:
Shuttle valve (body only)Wechselven
- Page 222 and 223:
High-pressure ball valve (body only
- Page 224 and 225:
Ball valve (body only)Kugelhahn (St
- Page 226 and 227:
Compact diverter valve (body only)K
- Page 228 and 229:
GG22 EATON Walterscheid Fluid Conve
- Page 230 and 231:
Reducing fitting (body only)Reduzie
- Page 232 and 233:
Reducing fitting (body only)Reduzie
- Page 234 and 235:
Reducing fitting (body only)Reduzie
- Page 236 and 237:
Reducing adaptor with captive seal
- Page 238 and 239:
Straight flange coupling (body only
- Page 240 and 241:
Elbow flange coupling (body only)Wi
- Page 242 and 243:
Parallel female stud coupling (body
- Page 244 and 245:
Adjustable gauge coupling (body onl
- Page 246 and 247:
HH18 EATON Walterscheid Fluid Conve
- Page 248 and 249:
Male stud couplingGerade-Einschraub
- Page 250 and 251:
Male stud couplingGerade-Einschraub
- Page 252 and 253:
Male stud couplingGerade-Einschraub
- Page 254 and 255:
Male stud couplingGerade-Einschraub
- Page 256 and 257:
Male stud elbowWinkel-Einschraubver
- Page 258 and 259:
Straight couplingGerade-Verschraubu
- Page 260 and 261:
Equal elbowWinkel-VerschraubungUnio
- Page 262 and 263:
Reducing TeeT-Reduzierverschraubung
- Page 264 and 265:
Bulkhead couplingGerade-Schottversc
- Page 266 and 267:
Weldable studAnschweiß-Verschraubu
- Page 268 and 269:
II22 EATON Walterscheid Fluid Conve
- Page 270 and 271:
Banjo coupling with one-piece boltW
- Page 272 and 273:
Banjo coupling with one-piece boltW
- Page 274 and 275:
Double banjo coupling with one-piec
- Page 276 and 277:
Double banjo coupling with one-piec
- Page 278 and 279:
Adjustable male stud elbowEinstellb
- Page 280 and 281:
Adjustable equal TeeEinstellbare T-
- Page 282 and 283:
Adjustable male stud Tee-stud barre
- Page 284 and 285:
Stud standpipe adaptor (body only)G
- Page 286 and 287:
Stud standpipe adaptor (body only)G
- Page 288 and 289:
Stud standpipe adaptor (body only)G
- Page 290 and 291:
Straight couplingGerade-VerbindungU
- Page 292 and 293:
Straight couplingGerade-VerbindungU
- Page 294 and 295:
Swivel banjoDrehverschraubungRaccor
- Page 296 and 297:
Swivel banjo couplingWinkel-Einschr
- Page 298 and 299:
Swivel elbow couplingWinkel-Drehver
- Page 300 and 301:
Non-return valve (Valve insert)Rüc
- Page 302 and 303:
Non-return valve with male studEins
- Page 304 and 305:
Non-return valve with male studEins
- Page 306 and 307:
Shuttle valveWechselventilSoupape
- Page 308 and 309:
High-pressure ball valveHochdruck-K
- Page 310 and 311:
Ball valveKugelhahnRobinet à boiss
- Page 312 and 313:
Compact diverter valve (body only)K
- Page 314 and 315:
LL22 EATON Walterscheid Fluid Conve
- Page 316 and 317:
Reducing fittingReduzierverschraubu
- Page 318 and 319:
Reducing fittingReduzierverschraubu
- Page 320 and 321:
Reducing fittingReduzierverschraubu
- Page 322 and 323:
Reducing adaptor with captive seal
- Page 324 and 325:
Straight flange couplingGerade-Flan
- Page 326 and 327:
Elbow flange couplingWinkel-Flansch
- Page 328 and 329:
Parallel female stud couplingGerade
- Page 330 and 331:
Adjustable gauge coupling (body onl
- Page 332 and 333:
MM18 EATON Walterscheid Fluid Conve
- Page 334 and 335:
37° flared flange according to SAE
- Page 336 and 337:
37° flared flange according to SAE
- Page 338 and 339:
37° flared flange according to SAE
- Page 340 and 341:
37° flared flange according to SAE
- Page 342 and 343:
37° flared flange according to SAE
- Page 344 and 345:
37° flared flange according to SAE
- Page 346 and 347:
Blanking plug with limit stop for a
- Page 348 and 349:
Blanking end for tube ends and seal
- Page 350 and 351:
Welding nippleSchweißnippelEmbout
- Page 352 and 353:
O-ringsO-RingeJoints toriquesBO-ZR
- Page 354 and 355:
O-ringsO-RingeJoints toriquesIntend
- Page 356 and 357:
Pre-assembly machineVormontagemasch
- Page 358 and 359:
Pre-assembly machineVormontagemasch
- Page 360 and 361:
Reshaping machinesUmformmaschinenMa
- Page 362 and 363:
Tools for reshaping machineWerkzeug
- Page 364 and 365:
Tools for reshaping machineWerkzeug
- Page 366 and 367:
Reshaping machinesUmformmaschinenMa
- Page 368 and 369:
Tools for reshaping machineWerkzeug
- Page 370 and 371:
Tools for reshaping machineWerkzeug
- Page 372 and 373:
Tube bending toolsRohrbiegewerkzeug
- Page 374 and 375:
Agents - GermanyVertretungen - Inla
- Page 376 and 377:
Agents - EuropeVertretungen - Europ
- Page 378 and 379:
NoticeNotizenNotesPP24 EATON Walter
- Page 380:
WALTERSCHEIDconnectsSpecification s


