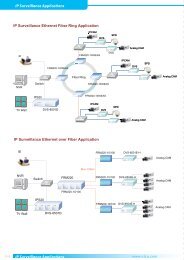
SmartView Plus User Manual - CTC Union Technologies Co.,Ltd.
SmartView Plus User Manual - CTC Union Technologies Co.,Ltd.
SmartView Plus User Manual - CTC Union Technologies Co.,Ltd.

Create successful ePaper yourself
Turn your PDF publications into a flip-book with our unique Google optimized e-Paper software.
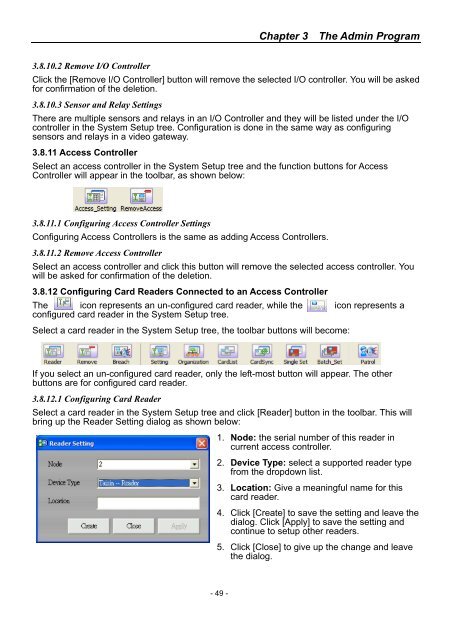
Chapter 3 The Admin Program3.8.10.2 Remove I/O <strong>Co</strong>ntrollerClick the [Remove I/O <strong>Co</strong>ntroller] button will remove the selected I/O controller. You will be askedfor confirmation of the deletion.3.8.10.3 Sensor and Relay SettingsThere are multiple sensors and relays in an I/O <strong>Co</strong>ntroller and they will be listed under the I/Ocontroller in the System Setup tree. <strong>Co</strong>nfiguration is done in the same way as configuringsensors and relays in a video gateway.3.8.11 Access <strong>Co</strong>ntrollerSelect an access controller in the System Setup tree and the function buttons for Access<strong>Co</strong>ntroller will appear in the toolbar, as shown below:3.8.11.1 <strong>Co</strong>nfiguring Access <strong>Co</strong>ntroller Settings<strong>Co</strong>nfiguring Access <strong>Co</strong>ntrollers is the same as adding Access <strong>Co</strong>ntrollers.3.8.11.2 Remove Access <strong>Co</strong>ntrollerSelect an access controller and click this button will remove the selected access controller. Youwill be asked for confirmation of the deletion.3.8.12 <strong>Co</strong>nfiguring Card Readers <strong>Co</strong>nnected to an Access <strong>Co</strong>ntrollerThe icon represents an un-configured card reader, while the icon represents aconfigured card reader in the System Setup tree.Select a card reader in the System Setup tree, the toolbar buttons will become:If you select an un-configured card reader, only the left-most button will appear. The otherbuttons are for configured card reader.3.8.12.1 <strong>Co</strong>nfiguring Card ReaderSelect a card reader in the System Setup tree and click [Reader] button in the toolbar. This willbring up the Reader Setting dialog as shown below:1. Node: the serial number of this reader incurrent access controller.2. Device Type: select a supported reader typefrom the dropdown list.3. Location: Give a meaningful name for thiscard reader.4. Click [Create] to save the setting and leave thedialog. Click [Apply] to save the setting andcontinue to setup other readers.5. Click [Close] to give up the change and leavethe dialog.- 49 -