testing
This is just a test
This is just a test
- No tags were found...

Create successful ePaper yourself
Turn your PDF publications into a flip-book with our unique Google optimized e-Paper software.
MS-7589<br />
Power Supply<br />
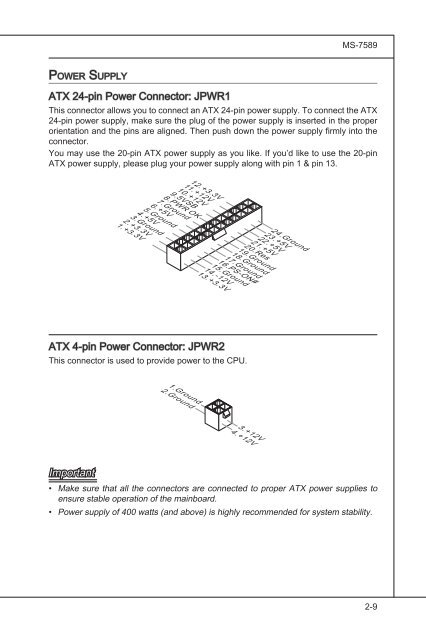
ATX 24-pin Power Connector: JPWR1<br />
This connector allows you to connect an ATX 24-pin power supply. To connect the ATX<br />
24-pin power supply, make sure the plug of the power supply is inserted in the proper<br />
orientation and the pins are aligned. Then push down the power supply firmly into the<br />
connector.<br />
You may use the 20-pin ATX power supply as you like. If you’d like to use the 20-pin<br />
ATX power supply, please plug your power supply along with pin 1 & pin 13.<br />
12.+3.3V<br />
11.+12V<br />
10.+12V<br />
9.5VSB<br />
8.PWR OK<br />
7.Ground<br />
6.+5V<br />
5.Ground<br />
4.+5V<br />
3.Ground<br />
2.+3.3V<br />
1.+3.3V<br />
24.Ground<br />
23.+5V<br />
22.+5V<br />
21.+5V<br />
20.Res<br />
19.Ground<br />
18.Ground<br />
17.Ground<br />
16.PS-ON#<br />
15.Ground<br />
14.-12V<br />
13.+3.3V<br />
ATX 4-pin Power Connector: JPWR2<br />
This connector is used to provide power to the CPU.<br />
1.Ground<br />
2.Ground<br />
3.+12V<br />
4.+12V<br />
Important<br />
• Make sure that all the connectors are connected to proper ATX power supplies to<br />
ensure stable operation of the mainboard.<br />
• Power supply of 400 watts (and above) is highly recommended for system stability.<br />
2-9