testing
This is just a test
This is just a test
- No tags were found...

Create successful ePaper yourself
Turn your PDF publications into a flip-book with our unique Google optimized e-Paper software.
MS-7589<br />
frequency higher dynamically when applications demand more performance and TDP<br />
headroom exists. It also can deliver seamless power scalability (Dynamically scale up,<br />
Speed-Step Down).<br />
▶Adjust CPU Base Frequency (MHz)<br />
This item allows you to set the CPU Base clock (in MHz). You may overclock the CPU<br />
by adjusting this value. Please note the overclocking behavior is not guaranteed.<br />
▶OC Stepping<br />
This item will be enabled after you set the overclocking frequency in the “Adjust CPU<br />
Base Frequency (MHz)”. And the following items will appear. This items will help the<br />
system to overclock step by step after system booting up.<br />
▶Start OC Stepping From (MHz)<br />
This item is used to set the initial base clock. The system will boot with the initial base<br />
clock, and start to overclock from initial base clock to set base clock that you set in<br />
“Adjust CPU Base Frequency (MHz)” step by step.<br />
▶OC Step<br />
This item is used to set how many steps for base colck overclocking.<br />
▶OC Step Count Timer<br />
This item is used to set the buffer time for every step.<br />
▶Adjust CPU Ratio<br />
This item allows you to adjust the CPU ratio. Setting to [Startup] enables the CPU running<br />
at the fastest speed which is detected by system.<br />
▶Adjusted CPU Frequency (MHz)<br />
It shows the adjusted CPU frequency (Base clock x Ratio). Read-only.<br />
▶OC Genie Button Operation<br />
This item is used to enable/ disable the OC Genie Button function.<br />
▶Base Clock Button<br />
This item is used to enable/ disable the Base Clock Button function.<br />
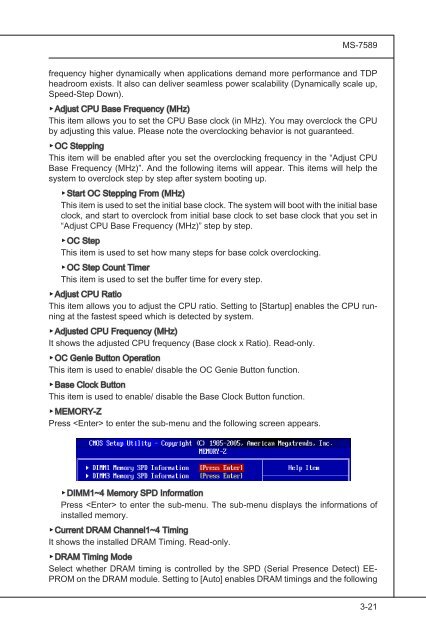
▶MEMORY-Z<br />
Press to enter the sub-menu and the following screen appears.<br />
▶DIMM1~4 Memory SPD Information<br />
Press to enter the sub-menu. The sub-menu displays the informations of<br />
installed memory.<br />
▶Current DRAM Channel1~4 Timing<br />
It shows the installed DRAM Timing. Read-only.<br />
▶DRAM<br />
Timing Mode<br />
Select whether DRAM timing is controlled by the SPD (Serial Presence Detect) EE-<br />
PROM on the DRAM module. Setting to [Auto] enables DRAM timings and the following<br />
3-21