A handbbok on Weed Control in Rice.pdf
A handbbok on Weed Control in Rice.pdf
A handbbok on Weed Control in Rice.pdf

You also want an ePaper? Increase the reach of your titles
YUMPU automatically turns print PDFs into web optimized ePapers that Google loves.
58 <strong>Weed</strong> c<strong>on</strong>trol handbook<br />
It is important to select the proper<br />
type of nozzle for each activity<br />
(Fig. 4.5). For residual herbicides<br />
applied to the soil, impact nozzles (e.g.,<br />
Polijet) should be used because they<br />
cause less drift problems. For systemic,<br />
translocated herbicides, where thor-<br />
ough wett<strong>in</strong>g of stems and leaves is<br />
not required, an impact nozzle or fan<br />
nozzle is recommended. For c<strong>on</strong>tact<br />
herbicides, use a hollow c<strong>on</strong>e nozzle,<br />
an impact nozzle, or a fan nozzle<br />
operated at 275 kPa.<br />
Sprayer calibrati<strong>on</strong><br />
Sprayer calibrati<strong>on</strong> determ<strong>in</strong>es the<br />
volume of water that will be applied <strong>on</strong><br />
a given area by a given applicator<br />
under given c<strong>on</strong>diti<strong>on</strong>s. The volume of<br />
water applied by a sprayer depends <strong>on</strong><br />
walk<strong>in</strong>g speed, sprayer pressure, and<br />
nozzle size.<br />
Walk<strong>in</strong>g speed. An <strong>in</strong>crease <strong>in</strong> walk-<br />
<strong>in</strong>g speed results <strong>in</strong> less spray mixture<br />
applied to a given area. C<strong>on</strong>versely, a<br />
decrease <strong>in</strong> walk<strong>in</strong>g speed results <strong>in</strong><br />
applicati<strong>on</strong> of a greater volume applied<br />
per unit area.<br />
Sprayer pressure. Increas<strong>in</strong>g sprayer<br />
pressure results <strong>in</strong> a greater volume of<br />
spray mixture applied to a given area.<br />
C<strong>on</strong>versely, a lower spray pressure<br />
results <strong>in</strong> less spray mixture applied.<br />
The sprayer should be operated to give<br />
as steady a pressure as possible. A<br />
pressure gauge may be fitted to the<br />
sprayer.<br />
Nozzle size. The use of a large nozzle<br />
open<strong>in</strong>g <strong>in</strong>creases the volume of spray<br />
mixture applied to a given area.<br />
Smaller open<strong>in</strong>gs deliver a smaller<br />
spray volume.<br />
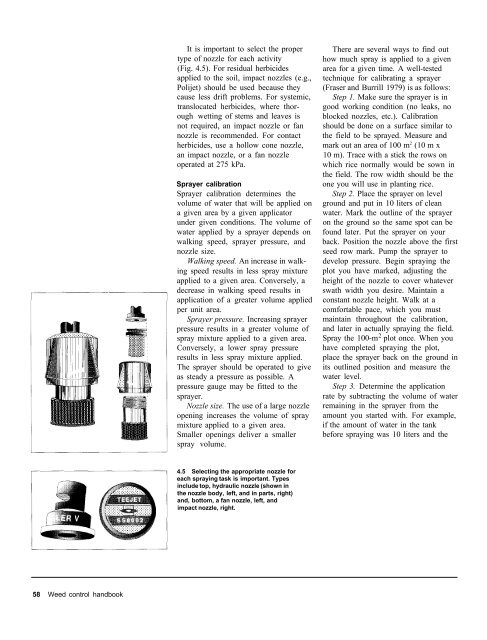
4.5 Select<strong>in</strong>g the appropriate nozzle for<br />
each spray<strong>in</strong>g task is important. Types<br />
<strong>in</strong>clude top, hydraulic nozzle (shown <strong>in</strong><br />
the nozzle body, left, and <strong>in</strong> parts, right)<br />
and, bottom, a fan nozzle, left, and<br />
impact nozzle, right.<br />
There are several ways to f<strong>in</strong>d out<br />
how much spray is applied to a given<br />
area for a given time. A well-tested<br />
technique for calibrat<strong>in</strong>g a sprayer<br />
(Fraser and Burrill 1979) is as follows:<br />
Step 1. Make sure the sprayer is <strong>in</strong><br />
good work<strong>in</strong>g c<strong>on</strong>diti<strong>on</strong> (no leaks, no<br />
blocked nozzles, etc.). Calibrati<strong>on</strong><br />
should be d<strong>on</strong>e <strong>on</strong> a surface similar to<br />
the field to be sprayed. Measure and<br />
mark out an area of 100 m 2 (10 m x<br />
10 m). Trace with a stick the rows <strong>on</strong><br />
which rice normally would be sown <strong>in</strong><br />
the field. The row width should be the<br />
<strong>on</strong>e you will use <strong>in</strong> plant<strong>in</strong>g rice.<br />
Step 2. Place the sprayer <strong>on</strong> level<br />
ground and put <strong>in</strong> 10 liters of clean<br />
water. Mark the outl<strong>in</strong>e of the sprayer<br />
<strong>on</strong> the ground so the same spot can be<br />
found later. Put the sprayer <strong>on</strong> your<br />
back. Positi<strong>on</strong> the nozzle above the first<br />
seed row mark. Pump the sprayer to<br />
develop pressure. Beg<strong>in</strong> spray<strong>in</strong>g the<br />
plot you have marked, adjust<strong>in</strong>g the<br />
height of the nozzle to cover whatever<br />
swath width you desire. Ma<strong>in</strong>ta<strong>in</strong> a<br />
c<strong>on</strong>stant nozzle height. Walk at a<br />
comfortable pace, which you must<br />
ma<strong>in</strong>ta<strong>in</strong> throughout the calibrati<strong>on</strong>,<br />
and later <strong>in</strong> actually spray<strong>in</strong>g the field.<br />
Spray the 100-m 2 plot <strong>on</strong>ce. When you<br />
have completed spray<strong>in</strong>g the plot,<br />
place the sprayer back <strong>on</strong> the ground <strong>in</strong><br />
its outl<strong>in</strong>ed positi<strong>on</strong> and measure the<br />
water level.<br />
Step 3. Determ<strong>in</strong>e the applicati<strong>on</strong><br />
rate by subtract<strong>in</strong>g the volume of water<br />
rema<strong>in</strong><strong>in</strong>g <strong>in</strong> the sprayer from the<br />
amount you started with. For example,<br />
if the amount of water <strong>in</strong> the tank<br />
before spray<strong>in</strong>g was 10 liters and the