
Create successful ePaper yourself
Turn your PDF publications into a flip-book with our unique Google optimized e-Paper software.
<strong>Technical</strong> <strong>Information</strong><br />
<strong>Technical</strong> <strong>Information</strong><br />
KM Manual Clamping System<br />
KM Manual Clamping Unit • Disassembly Procedures<br />
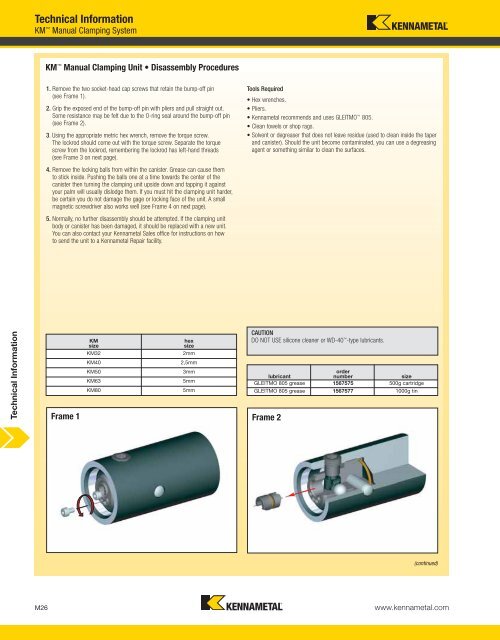
1. Remove the two socket-head cap screws that retain the bump-off pin<br />
(see Frame 1).<br />
2. Grip the exposed end of the bump-off pin with pliers and pull straight out.<br />
Some resistance may be felt due to the O-ring seal around the bump-off pin<br />
(see Frame 2).<br />
3. Using the appropriate metric hex wrench, remove the torque screw.<br />
The lockrod should come out with the torque screw. Separate the torque<br />
screw from the lockrod, remembering the lockrod has left-hand threads<br />
(see Frame 3 on next page).<br />
4. Remove the locking balls from within the canister. Grease can cause them<br />
to stick inside. Pushing the balls one at a time towards the center of the<br />
canister then turning the clamping unit upside down and tapping it against<br />
your palm will usually dislodge them. If you must hit the clamping unit harder,<br />
be certain you do not damage the gage or locking face of the unit. A small<br />
magnetic screwdriver also works well (see Frame 4 on next page).<br />
5. Normally, no further disassembly should be attempted. If the clamping unit<br />
body or canister has been damaged, it should be replaced with a new unit.<br />
You can also contact your Kennametal Sales office for instructions on how<br />
to send the unit to a Kennametal Repair facility.<br />
KM<br />
size<br />
hex<br />
size<br />
KM32 2mm<br />
KM40 2,5mm<br />
KM50 3mm<br />
KM63 5mm<br />
KM80 5mm<br />
Frame 1 Frame 2<br />
Tools Required<br />
• Hex wrenches.<br />
• Pliers.<br />
• Kennametal recommends and uses GLEITMO 805.<br />
• Clean towels or shop rags.<br />
• Solvent or degreaser that does not leave residue (used to clean inside the taper<br />
and canister). Should the unit become contaminated, you can use a degreasing<br />
agent or something similar to clean the surfaces.<br />
CAUTION<br />
DO NOT USE silicone cleaner or WD-40 -type lubricants.<br />
order<br />
lubricant<br />
number size<br />
GLEITMO 805 grease 1567575 500g cartridge<br />
GLEITMO 805 grease 1567577 1000g tin<br />
(continued)<br />
M26 www.kennametal.com