
You also want an ePaper? Increase the reach of your titles
YUMPU automatically turns print PDFs into web optimized ePapers that Google loves.
The HPMC (High-Performance Milling Chuck) System (continued)<br />
Cutting Tool Requirements<br />
The outside diameter of the cutting tool shank and the inside diameter of<br />
the HPMC System must be wiped with a clean dry cloth before assembly.<br />
Any contamination will increase runout and reduce gripping force.<br />
Carefully monitor the cutting tools used in these chucks so they do not exceed<br />
h6 (nominal to -.0005") on the shank diameter. Use tools as close to nominal<br />
as possible. Cutting tool shank roundness should be within 0,003mm (.0001").<br />
Undersized tools cause excessive stress and may cause chuck failure.<br />
Optimal chuck performance is attained when the cutting tool shank is round,<br />
without flats. Cutting tools with small flats may be held, but they will increase<br />
runout. Whistle and flatted cutting tool shanks are recommended in conjunction<br />
with reducing sleeves. For best performance, keep shank flats to a minimum.<br />
The minimum length of engagement is 2x the diameter of the cutting tool<br />
shank. Short holding length may cause the tool and/or chuck to break. This<br />
could dislodge the cutting tool and result in serious injury to the operator.<br />
The milling chuck should never be tightened without a cutting tool inside<br />
the bore. High gripping forces will cause permanent deformation to the<br />
inside diameter.<br />
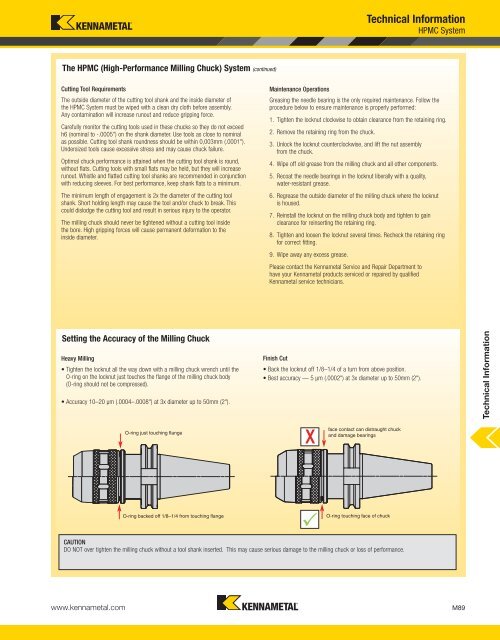
Setting the Accuracy of the Milling Chuck<br />
Heavy Milling<br />
• Tighten the locknut all the way down with a milling chuck wrench until the<br />
O-ring on the locknut just touches the flange of the milling chuck body<br />
(O-ring should not be compressed).<br />
• Accuracy 10–20 μm (.0004–.0008") at 3x diameter up to 50mm (2").<br />
www.kennametal.com<br />
O-ring just touching flange<br />
O-ring backed off 1/8–1/4 from touching flange<br />
<strong>Technical</strong> <strong>Information</strong><br />
HPMC System<br />
Maintenance Operations<br />
Greasing the needle bearing is the only required maintenance. Follow the<br />
procedure below to ensure maintenance is properly performed:<br />
1. Tighten the locknut clockwise to obtain clearance from the retaining ring.<br />
2. Remove the retaining ring from the chuck.<br />
3. Unlock the locknut counterclockwise, and lift the nut assembly<br />
from the chuck.<br />
4. Wipe off old grease from the milling chuck and all other components.<br />
5. Recoat the needle bearings in the locknut liberally with a quality,<br />
water-resistant grease.<br />
6. Regrease the outside diameter of the milling chuck where the locknut<br />
is housed.<br />
7. Reinstall the locknut on the milling chuck body and tighten to gain<br />
clearance for reinserting the retaining ring.<br />
8. Tighten and loosen the locknut several times. Recheck the retaining ring<br />
for correct fitting.<br />
9. Wipe away any excess grease.<br />
Please contact the Kennametal Service and Repair Department to<br />
have your Kennametal products serviced or repaired by qualified<br />
Kennametal service technicians.<br />
Finish Cut<br />
• Back the locknut off 1/8–1/4 of a turn from above position.<br />
• Best accuracy — 5 μm (.0002") at 3x diameter up to 50mm (2").<br />
face contact can distraught chuck<br />
and damage bearings<br />
O-ring touching face of chuck<br />
CAUTION<br />
DO NOT over tighten the milling chuck without a tool shank inserted. This may cause serious damage to the milling chuck or loss of performance.<br />
X<br />
M89<br />
<strong>Technical</strong> <strong>Information</strong>