
You also want an ePaper? Increase the reach of your titles
YUMPU automatically turns print PDFs into web optimized ePapers that Google loves.
<strong>Technical</strong> <strong>Information</strong><br />
<strong>Technical</strong> <strong>Information</strong><br />
KM Micro /KM Mini Manual Clamping System<br />
KM Micro/KM Mini • Assembly/Disassembly Instructions<br />
1. Apply GLEITMO 805 grease generously to threads, cones on torque screw<br />
and nut, and bump-off area (behind threads) of the torque screw. Also, apply<br />
grease generously to the female taper on the shank.<br />
2. Screw the torque screw and the nut together.<br />
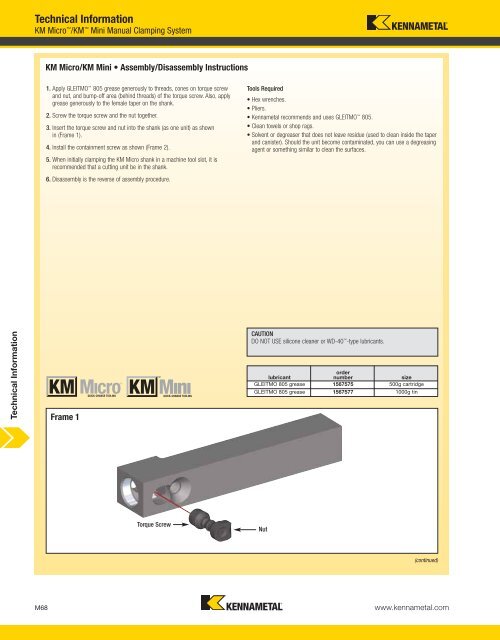
3. Insert the torque screw and nut into the shank (as one unit) as shown<br />
in (Frame 1).<br />
4. Install the containment screw as shown (Frame 2).<br />
5. When initially clamping the KM Micro shank in a machine tool slot, it is<br />
recommended that a cutting unit be in the shank.<br />
6. Disassembly is the reverse of assembly procedure.<br />
Frame 1<br />
Torque Screw<br />
Tools Required<br />
• Hex wrenches.<br />
• Pliers.<br />
• Kennametal recommends and uses GLEITMO 805.<br />
• Clean towels or shop rags.<br />
• Solvent or degreaser that does not leave residue (used to clean inside the taper<br />
and canister). Should the unit become contaminated, you can use a degreasing<br />
agent or something similar to clean the surfaces.<br />
CAUTION<br />
DO NOT USE silicone cleaner or WD-40 -type lubricants.<br />
order<br />
lubricant<br />
number size<br />
GLEITMO 805 grease 1567575 500g cartridge<br />
GLEITMO 805 grease 1567577 1000g tin<br />
(continued)<br />
M68 www.kennametal.com<br />
Nut