ECL Comfort 210/310, A275/A375 Installation Guide - Danfoss ...
ECL Comfort 210/310, A275/A375 Installation Guide - Danfoss ...
ECL Comfort 210/310, A275/A375 Installation Guide - Danfoss ...

You also want an ePaper? Increase the reach of your titles
YUMPU automatically turns print PDFs into web optimized ePapers that Google loves.
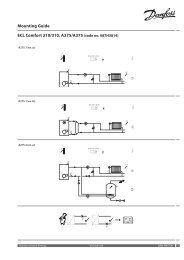
<strong>Installation</strong> <strong>Guide</strong> <strong>ECL</strong> <strong>Comfort</strong> <strong>210</strong> / <strong>310</strong>, application <strong>A275</strong> / <strong>A375</strong><br />
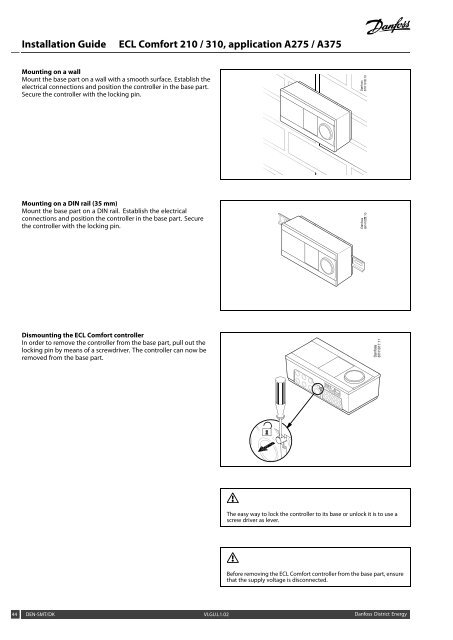
Mounting on a wall<br />
Mount the base part on a wall with a smooth surface. Establish the<br />
electrical connections and position the controller in the base part.<br />
Secure the controller with the locking pin.<br />
Mounting on a DIN rail (35 mm)<br />
Mount the base part on a DIN rail. Establish the electrical<br />
connections and position the controller in the base part. Secure<br />
the controller with the locking pin.<br />
Dismounting the <strong>ECL</strong> <strong>Comfort</strong> controller<br />
In order to remove the controller from the base part, pull out the<br />
locking pin by means of a screwdriver. The controller can now be<br />
removed from the base part.<br />
The easy way to lock the controller to its base or unlock it is to use a<br />
screw driver as lever.<br />
Before removing the <strong>ECL</strong> <strong>Comfort</strong> controller from the base part, ensure<br />
that the supply voltage is disconnected.<br />
44 DEN-SMT/DK VI.GU.L1.02 <strong>Danfoss</strong> District Energy