Vision and Studio Vision Pro Version 4.1 Manual ... - House of Synth
Vision and Studio Vision Pro Version 4.1 Manual ... - House of Synth
Vision and Studio Vision Pro Version 4.1 Manual ... - House of Synth

You also want an ePaper? Increase the reach of your titles
YUMPU automatically turns print PDFs into web optimized ePapers that Google loves.
CHAPTER 6: Acadia: Audio Instruments & Routings Window<br />
You can change the colors available in the<br />
color selection pop-up menu. To do so:<br />
Choose Setups>Colors.<br />
<strong>Vision</strong> opens a dialog box containing all<br />
defined colors.<br />
Click the color you wish to change.<br />
<strong>Vision</strong> opens a st<strong>and</strong>ard Macintosh color<br />
picker dialog box.<br />
Pick a new color <strong>and</strong> click the OK<br />
button.<br />
Change other colors as desired, then<br />
click the OK button to close the<br />
Colors dialog box.<br />
You can reset any modified colors to<br />
Opcode’s default colors. To do so:<br />
Choose Windows>Instruments.<br />
<strong>Vision</strong> opens the MIDI Instruments<br />
Window.<br />
Choose Initialize Colors from the<br />
Instruments Window menu.<br />
<strong>Vision</strong> resets its colors to their default<br />
values.<br />
Enabling Inputs <strong>and</strong> Outputs<br />
Inputs <strong>and</strong> outputs are unique in that they<br />
have an option for being enabled <strong>and</strong> disabled<br />
from the Audio Instruments &<br />
Routings Window. To enable an input or<br />
output place a checkmark next to it in the<br />
Name column.<br />
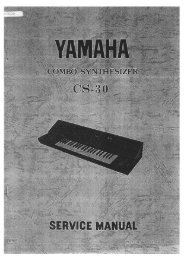
Figure 6.5: Enabling/disabling inputs<br />
By default, only the first two <strong>of</strong> your<br />
hardware inputs <strong>and</strong> outputs are<br />
enabled. To enable more, simply place a<br />
checkmark next to the desired items.<br />
To disable an input or output, click on a<br />
checkmark to remove it. Disabled items<br />
are unavailable (grayed out) in the popups<br />
in the Record Monitor <strong>and</strong> Console<br />
Windows.<br />
Inputs <strong>and</strong> outputs are always enabled or<br />
disabled in pairs. For instance, placing a<br />
checkmark next to “Input 1” also automatically<br />
places a checkmark next to<br />
“Input 2.”<br />
NOTE: Enabled inputs <strong>and</strong> outputs consume<br />
valuable CPU resources. Therefore, to<br />
preserve CPU resources, disable any inputs<br />
<strong>and</strong> outputs not in use.<br />
IMPORTANT: Enabling a digital input<br />
may change the Clock Source in the Hardware<br />
Setup dialog from “Analog” to<br />
“Digital.” If you wish to record from only<br />
your analog inputs, make sure all digital<br />
inputs are disabled.<br />
<strong>Vision</strong> & <strong>Studio</strong> <strong>Vision</strong> <strong>Pro</strong> — <strong>Version</strong> <strong>4.1</strong> <strong>Manual</strong> Supplement 39