

Owner's Manual - Smarthome
Owner's Manual - Smarthome
Owner's Manual - Smarthome

You also want an ePaper? Increase the reach of your titles
YUMPU automatically turns print PDFs into web optimized ePapers that Google loves.
54 Multi-Wave PE653-PE953 Installation Guide<br />
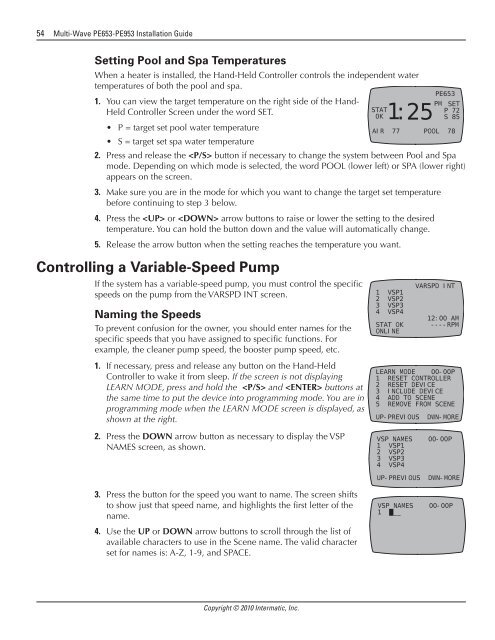
Setting Pool and Spa Temperatures<br />
When a heater is installed, the Hand-Held Controller controls the independent water<br />
temperatures of both the pool and spa.<br />
1.<br />
You can view the target temperature on the right side of the Hand-<br />
Held Controller Screen under the word SET.<br />
• P = target set pool water temperature<br />
AIR 77 POOL 78<br />
• S = target set spa water temperature<br />
2. Press and release the button if necessary to change the system between Pool and Spa<br />
mode. Depending on which mode is selected, the word POOL (lower left) or SPA (lower right)<br />
appears on the screen.<br />
3. Make sure you are in the mode for which you want to change the target set temperature<br />
before continuing to step 3 below.<br />
4. Press the or arrow buttons to raise or lower the setting to the desired<br />
temperature. You can hold the button down and the value will automatically change.<br />
5. Release the arrow button when the setting reaches the temperature you want.<br />
Controlling a Variable-Speed Pump<br />
If the system has a variable-speed pump, you must control the specific<br />
speeds on the pump from the VARSPD INT screen.<br />
Naming the Speeds<br />
To prevent confusion for the owner, you should enter names for the<br />
specific speeds that you have assigned to specific functions. For<br />
example, the cleaner pump speed, the booster pump speed, etc.<br />
1. If necessary, press and release any button on the Hand-Held<br />
Controller to wake it from sleep. If the screen is not displaying<br />
LEARN MODE, press and hold the and buttons at<br />
the same time to put the device into programming mode. You are in<br />
programming mode when the LEARN MODE screen is displayed, as<br />
shown at the right.<br />
0K 1: 25<br />
STAT<br />
1 VSP1<br />
2 VSP2<br />
3 VSP3<br />
4 VSP4<br />
STAT OK<br />
ONLINE<br />
PE653<br />
PM SET<br />
P 72<br />
S 85<br />
VARSPD INT<br />
12:00 AM<br />
----RPM<br />
LEARN MODE 00-00P<br />
1 RESET CONTROLLER<br />
2 RESET DEVICE<br />
3 INCLUDE DEVICE<br />
4 ADD TO SCENE<br />
5 REMOVE FROM SCENE<br />
UP-PREVIOUS DWN-MORE<br />
2. Press the DOWN arrow button as necessary to display the VSP<br />
NAMES screen, as shown.<br />
VSP NAMES 00-00P<br />
1 VSP1<br />
2 VSP2<br />
3 VSP3<br />
4 VSP4<br />
UP-PREVIOUS DWN-MORE<br />
3. Press the button for the speed you want to name. The screen shifts<br />
to show just that speed name, and highlights the first letter of the<br />
name.<br />
4. Use the UP or DOWN arrow buttons to scroll through the list of<br />
available characters to use in the Scene name. The valid character<br />
set for names is: A-Z, 1-9, and SPACE.<br />
VSP NAMES 00-00P<br />
1 ___<br />
Copyright © 2010 Intermatic, Inc.


